Battlefield Visit: The Fight for Jesionową Górę

By Seth Marshall

                By the end of the summer of 1944, the situation for the German military was desperate. In June, the Western Allies had landed on the coast of Normandy and, after struggling through hedgerows for several weeks, broke out into open country and surrounded much of the 15th Army at Falaise. On the Eastern Front, the situation was even worse. On June 23rd, three years to the day after the German invasion, the Soviets had launched Operation Bagration against the Wehrmacht’s Army Group Center. In one of the largest land campaigns ever fought, some 1.6 million Red Army soldiers supported by over 3800 tanks, over 2000 assault guns, 32,700 guns and rocket launchers, and 7800 aircraft, assaulted the German front line. What resulted was nothing short of disastrous for the German Army along the Eastern Front. After six weeks of fighting, the Germans had been pushed out of almost all of Belarus, and some Soviet units had crossed the Polish frontier. By August 19th, 28 of the 34 divisions of Army Group Center had been destroyed. German losses amounted to 150,000-225,000 men killed or missing and another 150,000 captured. Soviet losses were also tremendous: 180,000 were killed or missing, and between 340,000-590,000 were wounded or sick. Material losses amounted to around 3,000 tanks and assault guns destroyed, over 800 aircraft destroyed, and 2,500 guns and howitzers destroyed. The shattered remnants of Army Group Center had withdrawn inside Poland, while the battered Army Group North withdrew towards East Prussia. Preparations were made as best they could to defend native German territory for the first time. Elsewhere, including Suwałki, German units prepared use the terrain in the region to slow the advance of the Red Army as long as possible.

                Suwałki has long been in the path of armies, as a major intersection between numerous major roads and highways in northeastern Poland which led in multiple directions (including westwards towards Prussia and Germany). In the 20th Century alone, war had come to Suwałki three separate times before the fighting of 1944. From 1914-1915 during the First World War, multiple large battles between the Russian and German armies had taken place in the region, including Tannenberg, First and Second Masurian Lakes, and many smaller, but no less bloody, battles. In 1919-1920, the town was successively occupied by the Soviets, Lithuanians, and finally the Polish, though no battles actually took place in the area.[1] In 1939, the Soviets first took control of the city before it was turned over to the Germans in October. Several years into the occupation, the German administration changed the name of the city to Sudauen. The nearby dense Augustow Forest was also used as a base for Home Army units, who used the dark woods and swamps to hide their operations. Partisan activity around Suwałki, which had begun almost immediately after the Germans occupied the city, was enough for the Germans to mount multiple operations against them; throughout five years of occupation, at least 93 were executed. The Second World War touched Suwałki in other ways as well. After the German invasion of the Soviet Union in June 1941, a POW camp known as Stalag IF was set up in the Krzywolka suburb. Around 120,000 Soviet POWs were ultimately housed there and, owing to the generally appalling conditions in which the Germans kept the Soviet POWs and also to exposure and starvation, some 50,000 of these POWs died from 1941-1944.[2]

Occupying German soldiers guard Soviet prisoners in Suwałki during 1914-1915.

Occupying German soldiers guard Soviet prisoners in Suwałki during 1914-1915.

                By late July 1944, with Bagration still in progress and the German Army in retreat, it became apparent that the area around Suwałki would again become an area of conflict. The terrain gradually sloped down towards the border with Prussia and Lithuania and the impassible and enormous Augustow Forest would force the Soviets to advance around it. Among the numerous roads leading in and out of the city, the road known today as Highway 8 runs northeast out of the city towards Lithuania. The Germans recognized that this road was the quickest means into Suwałki from the east and northeast. In order to prevent the Soviets from moving along this road, German high command decided to take advantage of the heights to the north of the city. Among these heights was Hill 252. Known to the Polish as Jesionowa Gora, as the Elefantenberg (Elephant Mountain) to the Germans, and Ash Mountain to the Russians, Hill 252 rises up to dominate the terrain for miles around. Situated on the southeastern bank of Lake Szelment, the hill offers clear sightlines up to 30km away from its top, providing an obvious advantage for both sides. More importantly, Hill 252 and several nearby slightly smaller hills all provided excellent observation on Highway 8.

                The main German unit tasked with defense of this hill, along with much of the area to the immediate east of Suwałki, was the 170th Infantry Division. This division had seen action all through the war - first involved in the invasion of Denmark in April 1940, then during the fighting in France during the summer of 1940. The following year, the 170th had joined in Operation Barbarossa, the invasion of the Soviet Union. Among the major campaigns which the division took part in was the Crimean campaign in 1942 and the Siege of Leningrad, which didn’t end until 1944. Under the command of Brigadier General Siegfried Haß since February 1944, the division was a part of the Fourth Army under General of the Infantry Friedrich Hossbach. Like many other German divisions in Army Group Center, the division was severely understrength after Operation Bagration. Normal German divisional manpower strength for a 1944 formation was some 12,500 personnel, but the strength of the 170th in the fall of 1944 was likely closer to 50% of that strength. The division comprised of three Grenadier Regiments, four artillery battalions, an engineer battalion, and an anti-tank battalion which included 14 Sturmgeschutz assault guns. In addition to the 170th, other German units in the area included some Volkssturm units, which were essentially militia groups raised from ethnic Germans poorly equipped with older weapons and Luftwaffe units who, with too few aircraft remaining to service, had been transformed into infantry.  Beginning in late summer, these units began digging numerous trench lines and anti-tank ditches in the area, and also began installing single-man concrete observation stands and small reinforced-concrete pillboxes.

Brigadier General Siegfried Haß, who had commanded the  170th Infantry Division since early 1944. Photo source: ostvermisste-1944.de

Brigadier General Siegfried Haß, who had commanded the 170th Infantry Division since early 1944. Photo source: ostvermisste-1944.de

German Volkssturm digging positions in East Prussia during the summer of 1944. Photo source: historyimages.blogspot.com.

German Volkssturm digging positions in East Prussia during the summer of 1944. Photo source: historyimages.blogspot.com.

The main Soviet unit which would be tasked with taking both Suwałki and Hill 252 was the 31st Army, which fielded eight rifle divisions. The 31st Army, commanded during this time by General Vasily Glagolev, had been activated in July 1941 after the German invasion began the month prior. Entering combat in October 1941, the Army spent the next 16 months fighting around Rzhev on the western approaches to Moscow. Beginning in the spring of 1943, the 31st Army had fought its way westward across the Dnieper River, and taken Smolensk in the fall of 1943. In 1944, the Army had advanced into Belarus and participated in Operation Bagration, which had finally brought it into the Suwałki region. The two main divisions that would see combat in the area were the 173rd and 352nd Rifle Divisions; the 173rd would lead an attack to take Suwałki, while the 352nd would have the difficult task of taking Hill 252. Normally, a Rifle Division at full strength would consist of some 11,700 men, including three Rifle Regiments. With the Army having been fully involved in Bagration, it’s likely that the strength for the 173rd and 352nd Rifle Divisions was probably closer to 60-70%. In command of the 352nd was Major General Nikolai Mikhailovich Strizhenko.

Major General Nikolai Mikhailovich Strizhenko, commander of the 352nd Rifle Division. Photo source: Suwalki Military History Association.

Major General Nikolai Mikhailovich Strizhenko, commander of the 352nd Rifle Division. Photo source: Suwalki Military History Association.

                Fighting began in late summer 1944 in the Suwałki region. Hoping to take the hill in a quick assault, the Soviets organized an infantry attack supported by tanks on August 6th. Attacking the hill from the north and east, the Soviets immediately came under heavy fire from German Sturmgeschutz assault guns and anti-tank guns positioned on the hill. Soon, 15 burning Soviet tanks were left along the front of the hill, and the attack was called off. After this failure, fighting began degenerating into relatively stagnate warfare. Because of the terrain, Soviet infantry attempted to dig trenches towards the hill, trying to give their men cover to move through before assaulting the hill, but this was to prove unsuccessful. The Soviets also airdropped propaganda leaflets over German lines, attempting to encourage the Germans to surrender. By late September 1944, the Soviets had reached the defensive line set up along Hill 252. By then, the German defenders had been able to fortify two smaller hills, Hill 234 and Hill 239, which were more or less forward positions for the strongpoint on Hill 252. Fighting around the hills began in mid-September and would reach a climax during seven days from September 26th to October 4th. This increase in the fighting around the hills was due to the Soviet desire to seize the hills as a jumping-off point for a follow-on offensive to take Suwałki. The 352nd was to bear the brunt of the fighting during this period, while the 173rd was tasked with taking Hill 195 near the village of Bilwinowo. The Soviets ordered the soldiers from two of their penal companies to lead the attack, which cost these units heavily; between September 21-30th, the 135th and 140th Penal Companies lost 108 killed.[3] With several previous efforts to take Hill 252 having failed, the leadership of the 352nd decided to change their tactics. A special battalion-sized unit was formed from men from the 1162nd Rifle Regiment, led by Senior Lieutenant Hlovistov and Lieutenant Homiakowa Hilstowa, and tasked with sneaking across no-man’s land and destroying German bunkers and machinegun emplacements. Early on the morning of September 26th, these men moved across the cratered landscape and hid in shell craters and trenches just 100 meters short of the bunkers. To distract German attention, a diversionary attack was carried out by a Soviet scout unit further north. Additionally, the Soviets planned on triggering several smoke pots to provide a smokescreen over the battlefield and allow the infantry to advance across the open fields south to the hill.[4]

A knocked-out T-34-85 on the outskirts of Nemmersdorf, October 1944. Fifteen tanks of this type were lost in the first attempt to take the hill. Photo source: Alamy.com

A knocked-out T-34-85 on the outskirts of Nemmersdorf, October 1944. Fifteen tanks of this type were lost in the first attempt to take the hill. Photo source: Alamy.com

A Soviet document showing the distances between the Soviet and German lines on September 16th. Photo scanned by Mirosław Surmacz. Source: Suwalki Military History Association.

A Soviet document showing the distances between the Soviet and German lines on September 16th. Photo scanned by Mirosław Surmacz. Source: Suwalki Military History Association.

The Soviet plan for air support on September 26th involved two squadrons of Il-2 Shturmoviks, as shown above. Photo scanned by Mirosław Surmacz. Source: Suwalki Military History Association.

The Soviet plan for air support on September 26th involved two squadrons of Il-2 Shturmoviks, as shown above. Photo scanned by Mirosław Surmacz. Source: Suwalki Military History Association.

The Soviet plan for the use of flamethrowers on September 26th. Photo scanned by Mirosław Surmacz. Source: Suwalki Military History Association.

The Soviet plan for the use of flamethrowers on September 26th. Photo scanned by Mirosław Surmacz. Source: Suwalki Military History Association.

                At daybreak, Soviet artillery opened fire on the German fortifications. Accurate fire destroyed several bunkers, while mortar fire cut down many exposed German soldiers. To assist in the bombardment, two squadrons of Il-2 Shturomvik attack aircraft hammered the German lines on the hilltop continuously, flying circles around the German positions until their ordnance was expended. Before the Soviet artillery ceased firing, the assault battalion began attacking the Germans, led by Lieutenants Hlovistov and Hilstowa. They quickly breached the German trench lines and began engaging the infantry there in hand-to-hand combat. Lieutenant Schnell, an officer with the 170th Infantry Division, later recalled the fighting on the hill:

“The Volkssturm and other work units have built catchment positions as part of the East Prussian protective position. Unfortunately, the trenches are all on the eastern slopes and so we have to hold the notorious curtain positions. As the Russian grenade launchers can shoot into our trenches without difficulty- they are very wide at the top because they were made in the evening- the losses are too great, so the positions have to be given up again and again… Soon we are fighting on the front slope. Now the Russians are sitting in our old front slope position and we, parts of the 401st Grenadier Regiment with former Air Force soldiers, with me as VB. And two as radio operators, sit on the western side of the slope in a collecting ditch. We are now digging in competition with the Russians in order to be the first to reach the summit of the Elephant Mountain… One disturbs the other in his work with raiding parties, and the hand grenades are thrown back and forth. It it’s a position that does not allow any rest, day and night can only be survived with the utmost effectiveness. It is constantly spoken in a whisper, because the enemy can overhear and then the hand grenades will fly immediately and Russian grenade launchers are used, we miss them very much in the war in Russia.”[5]

Realizing they were being overwhelmed, the Germans pulled off the hilltop. The following day, the Germans brought up several assault guns and prepared to launch a counterattack. A large group of artillery had also been gathered to support the attack. However, Soviet observers on the hill saw this German grouping of artillery and called for fire on the position, destroying a number of guns causing enough mayhem that the counterattack was called off.  However, the Soviet success was short-lived – the next day, the Germans counterattacked and pushed the Soviets back off the hill. Fighting would seesaw back and forth during the next several days, and at some points both the Germans and Soviets occupied portions of the hill, and the distance between the opposing lines was as little as 30 meters, close enough for both sides to throw hand grenades at one another. On several occasions, the Soviets brought up flamethrowers in attempt to drive the Germans off the hilltop. Some Soviet survivors of the battle reported that in one instance in late September, Lieutenant Colonel Kolesnikov Sergei Charlampievich, commander of the 1158th Regiment, had ordered his supporting artillery to fire on his own position as his unit was being overwhelmed by a German attack.[6]

                Several Soviet soldiers recounted their experiences during the fighting for the hill in September and October. Grigory Fedorowicz Denisenko, a scout with the 1160th Rifle Regiment, later recalled:

“The battle for the mountain goes on all the time, continuous shots, explosions. Debris is flying in the air all the time. On September 28, fierce fights for the mountain have been going on for almost a week. Several times the hill changes hands. We lost a lot of soldiers. At one point, we captured the hill and positioned artillery too quickly on the mountain. The Germans recaptured the mountain in a counterattack and we lost two guns… We attack on October 4th and 5th and again on October 11th and 12th. Autumn, mud in the trenches. You can’t see anything at night, and I stumble over stones, fall into water pits… On October 17th, we are ordered to make a reconnaissance, enter the forest with some difficult and become lost. After wandering around for an hour and a half, we finally get to where we need to be. Several scouts captured a German- he was serving as a sapper. He is 57 years old and wounded in both legs from a grenade blast. After interrogating him, we moved him to a crater and shot him. “[7]

In a week of intense fighting, the Soviets lost over 1,000 soldiers killed in the fighting for the hill. German losses during the same period are unknown.[8]

A knocked-out Sturmgeschutz III assault gun, with a dead crewman in the foreground. A number of these assault guns provided valuable anti-tank capabilities for the Germans on Hill 252. Photo source: uncensoredhistory.blogspot.com.

A knocked-out Sturmgeschutz III assault gun, with a dead crewman in the foreground. A number of these assault guns provided valuable anti-tank capabilities for the Germans on Hill 252. Photo source: uncensoredhistory.blogspot.com.

Soviet map showing a partial ascent of Hill 252 on October 1st- note how many battalions were thrown into this attack. Photo scanned by Mirosław Surmacz. Source: Suwalki Military History Association.

Soviet map showing a partial ascent of Hill 252 on October 1st- note how many battalions were thrown into this attack. Photo scanned by Mirosław Surmacz. Source: Suwalki Military History Association.

                While the most intense phase of fighting had passed, fighting over the hill continued for weeks. Despite the loss of so many soldiers, and with the hill still in German hands, the commander of the Soviet 3rd Belorussian Front, General Ivan Chernyakhovsky, received an order from Soviet Supreme Command Headquarters to mount a major offensive into Eastern Prussia. The order, known as Directive No. 220235, read “Prepare and conduct an offensive operation… with the aim of interacting with the 1st Baltic Front, to defeat the Tilsit-Insterburg grouping of the Germans and capture the area of Konigsberg.”[9] In order to meet this directive, Chernyakhovsky planned to use the 5th and 11th Guards Armies to break the German defensive lines, while the 2nd Guards Tank Corps would exploit the breach, with the 28th Army acting as follow-on support. In support of this operation, the 31st and 39th Armies would conduct supporting operations of their own. The 31st Army, of which the 352nd Rifle Division was a part of, would first take Suwałkibefore continuing westwards and assaulting Gołdap.[10] This offensive was to become known as the Gubińsko-Gołdap. Before the offensive began, Chernyakhovsky released the directive from higher command to his subordinates, adding his own note at the end:

“Soldiers, sergeants, officers and generals of the 3rd Belorussian Front, we were honored to be the first to break into the den of the fascist beast. Remember, the fascist invasion began from these places. How many disasters it brought to the world! How many destroyed cities and villages, how many exhausted and tormented people were burned in crematoria, the earth was doused with blood and covered with burial mounds… we were honored, we were the first to raise the sword over the head of the fascist beast in its den. Let us deserve our glorious combat mission, fulfill our duty, and let the whole world breathe a sigh of relief.”[11]

                On October 16th, the offensive began. Chernyakhovsky had concentrated a massive amount of artillery for a preparatory bombardment, which began in the early morning hours. The following day, the 31st Army began its own supporting operations with an attack on Hill 252, hitting the hill with another large bombardment. The following day, the 173rd Rifle Division began an attack towards Suwałki. At 7PM, a thirty-minute artillery bombardment began, and the division began attacking along the Bilwinowo-Czerwonka line. Elements of the 170th Infantry Division resisted fiercely, and the Soviet attack ground to a halt in the dark. The next day, the Soviets began another attack. A 20-minute bombardment began at 4PM, which was followed by an infantry assault. Again, the Penal Companies were ordered forward first, with the 1311th Rifle Regiment following. The Soviet infantry attack concentrated on Hill 195, near the village of Bilwinowo. The Soviets lost 50 killed in the assault, but broke through the German trenches and took the hill. Now under pressure all along their line and realizing that a much larger Soviet strategic offensive was underway, the hard-pressed German 170th Infantry Division began withdrawing, leaving a rearguard to prevent the Soviets from following them. Hill 252, which had been fought over for over a month, was finally abandoned to the Soviets.

                Late on October 20th, with the 173rd Rifle Division having secured the town of Bilwinowo, Major General Provalov ordered his division to continue advancing towards Suwałkiby securing the towns of Krzemianka, Biala Woda, and Zywa Woda. The attack began at 9PM on the 20th and before the next morning all of the towns had been captured. Without pausing to rest, the division was ordered to cross the Czarna Hancza River. After daybreak, the 1311th and 1315th Rifle Regiments crossed the river under fire from the opposite bank, overwhelmed the German trenches, and soon began advancing along the Osowa-Suwalki road. By the evening of October 21st, the 173rd had reached the outskirts of Suwałki. Suwałki was still held by large elements of the 170th Infantry Division, along with a large number of Volkssturm conscripts under the command of Colonel Kluger. On October 22nd, the Soviets began their attack on the city, with most of the fighting taking place in the St. Alexander suburb of the city.  The next day, the Soviets launched an attack around the north end of the city, which threatened to cut off the main avenue of retreat for the Germans. The remaining units from the 170th Infantry Division then withdrew from the city to avoid being cut off and surrounded. By the end of the day, the city had been secured. In the week of fighting to take the city, the 173rd had lost approximately 400 killed, while the Germans had lost 600 killed defending Suwałki. Among the dead was Colonel Kluger. Despite the death toll, the fighting in the city proper was not considered particularly intense - further north, German resistance was far more substantial.[12]

Damage to St. Alexander Cathedral in Suwalki. The two bell towers were destroyed by explosives by the withdrawing Germans. Photo source: ostvermisste-1944.de.

Damage to St. Alexander Cathedral in Suwalki. The two bell towers were destroyed by explosives by the withdrawing Germans. Photo source: ostvermisste-1944.de.

                In contrast to the resistance encountered by the 31st Army, the rest of the 3rd Belorussian Front further north had immediately encountered very tough resistance in the face of the 4th Army and 3rd Panzer Army. After taking heavier losses than anticipated, Chernyakhovsky was forced to commit the 2nd Guards Tank Army to the fight much sooner than he had planned in order to break through the German lines. The 2nd Guards Tank Army and the 11th Guard Army finally broke through the second layer of German defenses on October 20th, but again hit resistance on the following day. This additional delay caused Chernyakhovsky to commit his Front’s reserve force, the 28th Army.[13][14] On October 22nd, Gumbinnen was captured by the Soviets, but then recaptured by the Germans just two days later. Seeing that the Soviets were overextended and stretched thin after having taken heavy casualties, German commanders were able to cobble together a counterattack force which quickly moved along the Soviet force’s flanks and cut-off several units, despite itself being heavily outnumbered. Heavy tank combat resulted near the towns of Großwaltersdorf and Gołdap. The German attack completely took the momentum out of the Soviet attack and, by October 30th, the offensive was over. The Germans retook Gołdapin early November, and the lines stabilized for the next two and a half months.[15][16][17]

Soviet map showing the progress of the 31st Army in during the mid-October offensive. Photo scanned by Mirosław Surmacz. Source: Suwalki Military History Association.

Soviet map showing the progress of the 31st Army in during the mid-October offensive. Photo scanned by Mirosław Surmacz. Source: Suwalki Military History Association.

German infantry talk to the commander of a tank or assault gun while retaking Goldap in early November. Photo source: Warfare History Network.

German infantry talk to the commander of a tank or assault gun while retaking Goldap in early November. Photo source: Warfare History Network.

Panthers from the 5th Panzer Regiment in action near Goldap during the First East Prussian Offensive. Photo source: Warfare History Network.

Panthers from the 5th Panzer Regiment in action near Goldap during the First East Prussian Offensive. Photo source: Warfare History Network.

                After the fighting around Suwałki, the 170th Infantry Division withdrew 10km to the west and consolidated around the town of Filipów. The 352nd and 173rd Rifle Divisions both continued in their offensive operations, with the 352nd becoming heavily involved in the fighting around Gołdap. The battle for Hill 252 and the week of combat around Suwałki had resulted in the deaths of over 5,100 Soviet soldiers. German casualties during the same period is unknown, but is likely also in the thousands. The overall casualty figures for Chernyakhovsky’s offensive were heavy for both sides: the Soviets had suffered nearly 80,000 casualties, including nearly 17,000 killed. The Germans suffered fewer casualties, with just over 16,000 total, including 6,800 killed or missing, but this represented a much larger percentage of their available forces. Material losses were heavy too, particularly in terms of tanks and armored vehicles; the Germans lost 115 tanks and assault guns destroyed, while the Soviets lost 914 tanks and assault guns destroyed.[18] These losses were indicative of the heavy armored combat taking place in the region. Another aspect of the East Prussian offensive was the behavior of Soviet troops towards German civilians. On October 23rd, the Germans had retaken the Prussian town of Nemmersdorf, which had been captured by the Soviets days earlier. At least 74 civilians and over 50 French and Belgian POWs were brutally raped and executed by Soviet soldiers, eager to avenge the carnage brought on their own homeland by the Germans. This massacre became an early example of how the Red Army would wreak its revenge on the Germans, but was still exploited by the Nazi propaganda ministry to stir up patriotic fervor.[19] After withdrawing from Hill 252, the 170th Infantry Division withdrew first to Filipów, then on towards a line along the Rospuda river, which ran through Bakałarzewo , Raczki and Augustów. Both armies would then hold these lines until late January 1945.

                Today, the landscape has changed significantly. Hill 252 still bears scars from the fighting- the main trench lines which were dug by the Germans and then occupied and enlarged by the Soviets still remain in place. Standing from the German positions, it is very easy to see why they chose this piece of terrain to block the Soviet advance- from the trenches, the Germans would have had a clear view of the Soviets trying to force their way across the fields to the north and west of the hill and the marshy ground to the east. Any tanks moving across the fields would have been exposed to German anti-tank fire, and then could only have advanced up the hill from the east where the slope permits tank movement. Further up the hill, a number of single-man concrete fighting positions remain, partially-filled in with dirt and plants. In a bizarre twist, much of the top of the hill and portions of the slope are taken up with ski lifts and slopes.  The ski slopes have covered over portions of the trench line, and trees have reclaimed other areas. Soviet drawings of the hill 1944 show that by mid-September 1944, artillery fire had removed all trees from the hill. Still, periodically more remnants of the fighting surface. Several years ago, a portion of the hill gave way and revealed a number of corpses, along with several live hand grenades. Artifact hunters visit the hill from time to time, scanning with metal detectors to find items left behind from the fighting- on one visit to the hill, I and several guides found numerous pieces of shrapnel, the burst remnant of a Soviet 82mm mortar, and pieces of barbed wire. Two kilometers to the southeast, on Hill 249, more remnants of the fighting in late 1944 remain. Here, two observation bunkers remain facing north and east- both would have provided German observers with excellent sightlines on nearby Highway 8. Both bunkers have sustained several hits from tank or artillery fire. Additionally, a criss-cross network of trenches remain on the hill. Further west, in Bakałarzewo, more traces of the fighting remain. Here, along the pre-war border between Poland and East Prussia, several bunkers remain on the west bank of the Raspuda River, overlooking a wide gorge. The Germans held these older bunkers for three months from late October 1944 until the Vistula-Oder Offensive began in January 1945. On the eastern bank, there are fewer signs of the fighting. Numerous patches of woods have grown up in the intervening 75 years, changing much of the landscape. There are still some one-man fighting positions and the remains of an anti-tank ditch which are just north of the town. Bakałarzewo itself was severely damaged in the fighting- the church was completely destroyed by Soviet tank and artillery fire after it was discovered that the Germans were using the bell towers as observation points for their forward observers. The landscape then has changed significantly, but many traces of the fighting remain today.

                The fighting for Hill 252 was some of the heaviest fighting in eastern Poland during 1944. Despite being greatly outnumbered by Soviet men and equipment, the Germans were able to maintain control over the hill and its surrounding area for weeks before finally being pushed off the hill in October. The failure to capture Hill 252 sooner delayed the Soviet capture of Suwałki, which in turn hurt their ability to move into central Poland. Though many of the marks left by the battle have since faded, and the hilltop itself has become home to a ski resort, Hill 252’s importance as key terrain in the region is still clear when visiting the site; it continues to provide a dominating view of the surrounding region, and would even today be considered a highly valuable piece of terrain.

View of the hill from the West. Today the hill is home to a ski resort, which doubles in the summer with a mini-golf course, rope challenge and water ski rental. Photo source: Author.

View of the hill from the West. Today the hill is home to a ski resort, which doubles in the summer with a mini-golf course, rope challenge and water ski rental. Photo source: Author.

Several trenches around the hill remain today. The first trench line runs all around the north side of the hill. Phot source: Author.

Several trenches around the hill remain today. The first trench line runs all around the north side of the hill. Phot source: Author.

Another view of the German trench line on the north side of the hill. Photo source: Author.

Another view of the German trench line on the north side of the hill. Photo source: Author.

One of the many single-man fighting positions on the hill which remain today. Thousands of these were emplaced throughout East Prussia during 1944. Photo source: Author.

One of the many single-man fighting positions on the hill which remain today. Thousands of these were emplaced throughout East Prussia during 1944. Photo source: Author.

A view of the second German trench line, further up the hill. Photo source: Author.

A view of the second German trench line, further up the hill. Photo source: Author.

Mid-way up Hill 252, a portion of the earth gave way about 5 years ago. A number of human remains were exposed- considering most Soviet soldiers were buried in the cemetery in Suwalki, it seems likely that these were German. Several live hand grenades were also found with the bodies. Photo source: Author.

Mid-way up Hill 252, a portion of the earth gave way about 5 years ago. A number of human remains were exposed- considering most Soviet soldiers were buried in the cemetery in Suwalki, it seems likely that these were German. Several live hand grenades were also found with the bodies. Photo source: Author.

A view from the top of the hill, looking north. The open ground at the bottom of the hill would have been where Soviet infantry charged across towards the German defenses. Photo source: Author.

A view from the top of the hill, looking north. The open ground at the bottom of the hill would have been where Soviet infantry charged across towards the German defenses. Photo source: Author.

One of two German observation posts on Hill 249. Photo source: Author.

One of two German observation posts on Hill 249. Photo source: Author.

This cellar was used by the German artillery officers of the 170th Infantry Division to coordinate the fires for the hill’s defense- the cellar is just south of the hill itself. Photo source: Author.

This cellar was used by the German artillery officers of the 170th Infantry Division to coordinate the fires for the hill’s defense- the cellar is just south of the hill itself. Photo source: Author.

The Soviet military cemetery at Suwalki. Over 5500 soldiers are buried here, most in unmarked graves. Photo source: Author.

The Soviet military cemetery at Suwalki. Over 5500 soldiers are buried here, most in unmarked graves. Photo source: Author.


Sources

1.       Glantz, David M. “The Failures of Historiography: Forgotten Battles of the German‐Soviet War (1941–1945).” The Journal of Slavic Military Studies, vol. 8, no. 4, 1995, pp. 768–808., doi:10.1080/13518049508430217.

2.       Frieser, Karl-Heinz, et al. Germany and the Second World War. Volume VIII: The Eastern Front 1943-1944: The War in the East and on the Neighboring Fronts. Oxford University Press, 2017.

3.       Eilender, Kasriel. A BRIEF HISTORY OF THE JEWS IN SUWALKI, JewishGen, kehilalinks.jewishgen.org/suwalki/History.htm.

4.       “The History of Podlaskie Voivodeship.” Wrota Podlasia, Urząd Marszałkowski Województwa Podlaskiego, 6 Jan. 2009, www.wrotapodlasia.pl/en/region/history/The_history_of_Podlaskie_Voivodeship.html.

5.       Friedrich, Hagen. “Fighting of the 170th Infantry Division for Suwalki.” Ostvermisste 1944, 2008, www.ostvermisste-1944.de/Suwalki%201944.htm.

6.       Surmacz, Miroslaw. “Jeleniewo-Höhe 252.” Wo Sind Sie Geblieben? - Jeleniewo - Hoehe 252, 2011, www.ostvermisste-1944.de/Jeleniewo-Hoehe%20252.htm. Translated from Polish to German in 2011, accessed in 2020.

7.       170. Infanterie-Division, 25 Aug. 2011, www.axishistory.com/books/150-germany-heer/heer-divisionen/3667-170-infanterie-division.

8.       Mctaggert, Pat. “Goldap Operation: Soviets in the Prussian Heartland.” Warfare History Network, Sovereign Media, 16 Dec. 2018, warfarehistorynetwork.com/2018/12/15/goldap-operation-soviets-in-the-prussian-heartland/.

9.       Buttar, Prit. Battleground Prussia: the Assault on Germany's Eastern Front 1944-1945. Osprey Publishing , 2010.

10.   “STAROSTWO POWIATOWE W SUWAŁKACH.” II Wojna Światowa - Powiat Suwalski, Minister of Administration and Digitization, Apr. 2019, www.powiat.suwalski.pl/kat/nasz-powiat/historia/ii-wojna-swiatowa.

11.   Anisimovna, Maistrenko Tatiana. Scorched Youth.

12.   Surmacz, Miroslaw. “Suwalszczyzna w Ogniu Walk II Wojny Światowej – Raczki 1944/45.” Ojczyzna Suwalczyzna, Suwalki Association of History, 9 Nov. 2017, ojczyzna-suwalszczyzna.pl/suwalszczyzna-w-ogniu-walk-ii-wojny-swiatowej-raczki-194445/#more-941.

13.   Surmacz, Miroslaw. “Jeleniewo-Höhe 252.” Wo Sind Sie Geblieben? - Jeleniewo - Hoehe 252, 2011, www.ostvermisste-1944.de/Jeleniewo-Hoehe%20252.htm. Translated from Polish to German in 2011

14.   http://www.ostvermisste-1944.de/Reisebericht-Suwalki.htm. Friedrich Hagen. Published 2011, accessed 2020.

15.   Müller, Ferdinand. “My War Years.” Wo Sind Sie Geblieben? - Reisebericht Jeleniewo - Suwalki 2011, Friedrich Hagen, 2011, www.ostvermisste-1944.de/Reisebericht-Suwalki.htm.

16.   Technical Manual: Handbook on German Military Forces, 15 March 1945. TM-E30-451.

17.    Glantz, David. “The Great Patriotic War and the Maturation of Soviet Operational Art: 1941-1945.” Soviet Army Studies Office, 1987. Ft. Leavenworth, Kansas.

18.   Anisimovna, Maistrenko Tatiana. Scorched Youth.

19.   Surmacz, Mirosław. “Działania Militarne Na Ziemi Bakałarzewskiej z Lat 1944/1945.” Ojczyzna Suwalczyzna, Suwalki Association of Military History, 17 July 2014, ojczyzna-suwalszczyzna.pl/dzialania-militarne-na-ziemi-bakalarzewskiej-z-lat-19441945/.

20.   Surmacz, Mirosław. “Bitwa o Jesionową Górę 1944.” Ojczyzna Suwalczyzna, Suwalki Association of Military History, 17 July 2014, ojczyzna-suwalszczyzna.pl/bitwa-o-jesionowa-gore-1944/.


[1] “The History of Podlaskie Voivodeship.” Wrota Podlasia, Urząd Marszałkowski Województwa Podlaskiego, 6 Jan. 2009

[2] “STAROSTWO POWIATOWE W SUWAŁKACH.” II Wojna Światowa - Powiat Suwalski, Minister of Administration and Digitization, Apr. 2019, www.powiat.suwalski.pl/kat/nasz-powiat/historia/ii-wojna-swiatowa

[3] Surmacz, Mirosław. “Działania Militarne Na Ziemi Bakałarzewskiej z Lat 1944/1945.” Ojczyzna Suwalczyzna, Suwalki Association of Military History, 17 July 2014, ojczyzna-suwalszczyzna.pl/dzialania-militarne-na-ziemi-bakalarzewskiej-z-lat-19441945/.

[4] Surmacz, Miroslaw. “Jeleniewo-Höhe 252.” Wo Sind Sie Geblieben? - Jeleniewo - Hoehe 252, 2011, www.ostvermisste-1944.de/Jeleniewo-Hoehe%20252.htm. Translated from Polish to German in 2011

[5] http://www.ostvermisste-1944.de/Reisebericht-Suwalki.htm. Friedrich Hagen. Published 2011, accessed 2020.

[6] Surmacz, Miroslaw. “Jeleniewo-Höhe 252.” Wo Sind Sie Geblieben? - Jeleniewo - Hoehe 252, 2011, www.ostvermisste-1944.de/Jeleniewo-Hoehe%20252.htm. Translated from Polish to German in 2011

[7] Surmacz, Mirosław. “Bitwa o Jesionową Górę 1944.” Ojczyzna Suwalczyzna, Suwalki Association of Military History, 17 July 2014, ojczyzna-suwalszczyzna.pl/bitwa-o-jesionowa-gore-1944/.

[8] Surmacz, Miroslaw. “Suwalszczyzna w Ogniu Walk II Wojny Światowej – Raczki 1944/45.” Ojczyzna Suwalczyzna, Suwalki Association of History, 9 Nov. 2017, ojczyzna-

[9] Anisimovna, Maistrenko Tatiana. Scorched Youth.

[10] Mctaggert, Pat. “Goldap Operation: Soviets in the Prussian Heartland.” Warfare History Network, Sovereign Media, 16 Dec. 2018, warfarehistorynetwork.com/2018/12/15/goldap-operation-soviets-in-the-prussian-heartland/

[11] Anisimovna, Maistrenko Tatiana. Scorched Youth.

[12] Surmacz, Miroslaw. “Suwalszczyzna w Ogniu Walk II Wojny Światowej – Raczki 1944/45.” Ojczyzna Suwalczyzna, Suwalki Association of History, 9 Nov. 2017, ojczyzna-

[13] Glantz, David M. “The Failures of Historiography: Forgotten Battles of the German‐Soviet War (1941–1945).” The Journal of Slavic Military Studies, vol. 8, no. 4, 1995, pp. 768–808., doi:10.1080/13518049508430217

[14] P. 612-613- Frieser, Karl-Heinz, et al. Germany and the Second World War. Volume VIII: The Eastern Front 1943-1944: The War in the East and on the Neighboring Fronts. Oxford University Press, 2017.

[15] P.614-615- Frieser, Karl-Heinz, et al. Germany and the Second World War. Volume VIII: The Eastern Front 1943-1944: The War in the East and on the Neighboring Fronts. Oxford University Press, 2017.

[16] Mctaggert, Pat. “Goldap Operation: Soviets in the Prussian Heartland.” Warfare History Network, Sovereign Media, 16 Dec. 2018, warfarehistorynetwork.com/2018/12/15/goldap-operation-soviets-in-the-prussian-heartland/

[17] Buttar, Prit. Battleground Prussia: the Assault on Germany's Eastern Front 1944-1945. Osprey Publishing , 2010.

[18] P. 616- Frieser, Karl-Heinz, et al. Germany and the Second World War. Volume VIII: The Eastern Front 1943-1944: The War in the East and on the Neighboring Fronts. Oxford University Press, 2017.


[19] Mctaggert, Pat. “Goldap Operation: Soviets in the Prussian Heartland.” Warfare History Network, Sovereign Media, 16 Dec. 2018, warfarehistorynetwork.com/2018/12/15/goldap-operation-soviets-in-the-prussian-heartland/

An Alsatian Hellscape: The Battle of Hatten-Rittershoffen

Attack on the Maginot Line.jpg

In January 1945, amidst the smoldering ruins of two Alsatian villages, the US VI Corps fought the German XXXIX Panzer Corps to a standstill during Operation Nordwind. The Battle of Hatten-Rittershoffen, described by Americans and Germans alike as a hellacious fight, became one of the last major tank battles along the Western Front.

By Seth Marshall

               In mid-December, the Wehrmacht had launched Operation Wacht am Rhein, cutting deep into Allied lines in Belgium. It would be this battle which drew public attention during the winter of 1944-45, and is frequently referred to in some circles as “Hitler’s Last Gamble.” However, in January 1945 the Germans launched another offensive into Alsace; unlike the Ardennes Offensive, the objective of this offensive was the destruction of Allied forces- in this case, the US Seventh Army and French 1st Army. Called Operation Nordwind, this armored thrust drove into the Alsatian plains, threatening to break through the Vosges Mountains to the rear of the Seventh Army. In the second week of January, Nordwind came to two small towns situated less than a mile apart- Hatten and Rittershoffen. For nearly two weeks, armored units from the US Sixth Corps and German XXXIX Panzer Corps fought each other here with such ferocity that even some of the most seasoned German veterans would have reason to later say that it had been the most difficult battle of their careers.

Even as the Battle of the Bulge dragged on, the German High Command was planning another major effort further to the south. Plans for new offensive were finalized during the last week of December 1944. Initially, the German High Command had planned to send Army Group G’s 1st Army into the Low Voges Mountains with two corps as the main effort; a third corps would be used in supporting attacks west of the mountains. However, a series of modifications beginning with Hitler altered the plans; originally the 21st Panzer Division was slated for use in the main attack. Now, along with the 25th Panzergrenadier Division, it formed an operational reserve.[1] Further modifications to Nordwind were made at the operational command level. The overall commander of Nordwind was Generaloberst Johannes Blaskowitz. Born in 1883 in East Prussia, Blaskowitz had commanded an army during the invasion of Poland. After complaining of atrocities committed in that country, he was sidelined to an occupational command in France during the years prior to D-Day. After skillfully conducting a defense against Allied forces following the invasion of southern France in August 1944, Blaskowitz had been relieved of his command in September 1944 after refusing to engage in what he believed to be a futile attack against the US Third Army. He was reinstated to his old command in December.[2]

Generaloberst Johannes Blaskowitz, the German commander of Operation Nordwind. Photo source: Wikipedia.

Generaloberst Johannes Blaskowitz, the German commander of Operation Nordwind. Photo source: Wikipedia.

The opening of the Nordwind offensive on December 31, 1944, preceded by a large artillery bombardment. Illustration by Vincent Mai.

The opening of the Nordwind offensive on December 31, 1944, preceded by a large artillery bombardment. Illustration by Vincent Mai.

Blaskowitz’s final plan called for the retention of two panzer divisions as an operational reserve to exploit any success in breaking through American defenses in the Saare River valley or in the vicinity of Bitche. On December 31, Nordwind was launched. Unlike in the Ardennes, Nordwind was not met with immediate success. Lieutenant General Alexander Patch, commanding the US Seventh Army, had anticipated a German offensive in the area and accordingly had made defensive arrangements.[3] In several places, the Nordwind offensive bogged down quickly in the face of determined resistance. In the wake of this sturdy defense, Blaskowitz shifted the main effort of his attack. He called upon his reserve force, the 21st Panzer Division and 25th Panzergrenadier Division, to attack from the northeast and break through the old Maginot Line defenses north of Haguenau Forest.[4] Both of these units were not fully up to strength. 21st Panzer, commanded by Generalleutnant Edward Feuchtinger, possessed more than 70 tanks and tank destroyers, but had less than half of its authorized halftracks and personnel carriers. The 25th Panzergrenadier Division had similar problems, with just over 20 tanks, tank destroyers, and assault guns making up its depleted armor formations; however, it still possessed over 130 halftracks, which made it a potent mechanized force.[5]

American defenses in this region were a mix of combat veterans and newly-arrived forces. The US Sixth Corps, commanded by Major General Edward Brooks, was made up 42nd, 45th, 70th, and 79th Infantry Divisions. Elements of the 42nd, 70th Infantry, and 14th Armored Divisions had been organized into three task forces to better suit local defensive purposes. In the face of Blaskowitz’s armored thrust, Task Force Linden, made up of green troops from the 42nd Infantry Division, was forced to withdraw to new positions to west. American units were now roughly aligned along the old Maginot Line fortifications running through northern Alsace. In Hatten, the 1st Battalion of the 242nd Infantry Regiment, 42nd Infantry Division established itself in defensive positions. Just two kilometers north, 3/313th Infantry Regiment of the 79th Infantry Division situated itself in Oberroedern.[6] Both of these towns had several major pillboxes and casemates which were occupied by the Americans for use as defensive strongpoints. To complicate matters for the Germans, minefields and barbed wire were emplaced along avenues of approach to slow the tanks and dismounted Landsers.

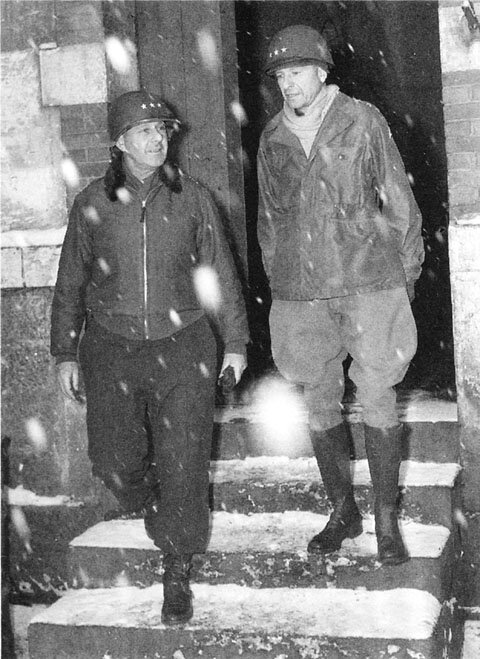
Lieutenant Generals Alexander Patch (left), commander of the US Seventh Army, and Jacob Devers (right), commander of the US Sixth Army Group. Photo source: WIkipedia.

Lieutenant Generals Alexander Patch (left), commander of the US Seventh Army, and Jacob Devers (right), commander of the US Sixth Army Group. Photo source: WIkipedia.

A view of the town square in Hatten before the war.

A view of the town square in Hatten before the war.

A postcard from Rittershoffen from before the war.

A postcard from Rittershoffen from before the war.

The German attack commenced in the early hours of January 6th. Slowed by weather conditions and minefields, the push toward the Vosges was delayed until the following day. By January 8th, the 21st Panzer Division had broken through the Maginot Line north of Oberroedern. Turning south, Blaskowitz intended his forces to widen the gap created in the Maginot Line at Hatten, then move east through Rittershoffen and began moving south through the Haguenau Forest. This move would cut off any remaining US forces north of the Haguenau Forest.[7] On the American side, General Brooks, realizing the danger that this German armored force posed, immediately began moving reinforcements towards Hatten. His intent was to assemble and then move the entire 14th Armored Division into the area. The 14th Armored Division, commanded by Major General Albert Smith, was spread across much of northern Alsace; it would take time for the Division to pull itself back together and move as one unit.

In the early hours of January 9th, the German attack began on Hatten. German infantry crept up to a Maginot pillbox and found the Americans inside asleep- the entire crew was captured before shooting erupted all along the edge of Hatten.[8] German tanks and assault guns began moving north around Hatten, trying to cut off the village. Several pillboxes, still being held by GIs, were isolated by the fast-moving German armor. In an effort to restore his lines, the 1/242’s commander, Lieutenant Colonel Rusteberg, committed his reserve company to the fight- he succeeded in stabilizing his perimeter, but it cost C Company all of its officers.[9] In the northern portion of Hatten, B/1/242 found itself under attack by 18 tanks and 20 personnel carriers by late morning. With the tanks using direct fire and flamethrowers to burn the GIs out of their fortifications, B Company’s commander was forced to surrender.[10] By noon, parts of Hatten were under German control; fighting became desperate as cooks and headquarters personnel from 1/242 were sent to man machine guns and rifle positions. Anti-tank mines placed in the streets slowed the progress of the German tanks. When the battalion command post was forced to relocate, PFC Vito Bertoldo, a cook with the headquarters unit, took control of a machine gun and held off the attacking German infantry long enough for the CP to reestablish elsewhere. Bertoldo, concussed from receiving direct tank fire on his position, survived and was later awarded the Medal of Honor for his defense.[11]  

Two platoons of Shermans from A Company, 48th Tank Battalion, a subordinate unit of the 14th Armored, rushed into Rittershoffen in the early afternoon to provide the 2-242nd with badly-needed armor support.[12] Taking up defensive positions on the northeastern and southeastern edges of town, the tankers in the north were not in position long before a group of sixteen German tanks were seen moving west from Hatten towards Rittershoffen. Waiting until the lead tank closed to 600 yards, platoon leader LT Edgar Woodard opened fire and knocked the Panzer IV out. The other three tanks in his platoon also fired- within minutes, six German tanks were knocked out. The remainder withdrew. Later in the day, the same platoon destroyed four knocked-out enemy tanks which the Germans were trying to recover. The platoon also claimed destruction of a personnel carrier and motorcycle. For these actions, the platoon would be awarded a Presidential Unit Citation.[13][14]

               Further American reinforcements were on the way. Later on the 9th, elements of the 813th Tank Destroyer Battalion, operating M-10 tank destroyers, and the 827th Tank Destroyer Battalion, an African-American unit operating M-18 tank destroyers, began arriving in both towns. Several of the 813th’s M-10s were immediately relocated to Hatten to reinforce the small perimeter which 1/242 still held.[15] By nightfall, the Germans had occupied about two-thirds of Hatten, leaving the Americans with the southwestern portion of the village. Most of the tank destroyers were moved back to Rittershoffen during the night hours.

               The following morning, two battalions of infantry from the 315th Infantry Regiment, 79th Infantry Division attacked with elements of 2/242 towards Hatten. This attack ground to a halt when it ran into a German force of five tanks and two companies of infantry- two US tank destroyers were knocked out, while the infantry withdrew to Rittershoffen.[16] 2/315, commanded by Lieutenant Colonel Earl Holton, was able to move into southeastern Hatten, where it was to relieve the 1/242. It was just as well- that battalion had taken serious losses. Reinforcing the 2/315th in Hatten was a company of M-18s from the 827th. One platoon led by 2LT Robert Jones knocked out three German tanks on the 10th, then held their ground for the next seven days, firing on any enemy armor that tried to approach the village on the main roads leading into southwestern Hatten. Jones found a disabled M-10 tank destroyer on one Hatten street whose gun still functioned- he put several crewmen in this vehicle and put it to use as well.[17] The remainder of his company was not as successful- three M-18s were knocked out or destroyed, with fifteen men missing on January 10th alone.[18]

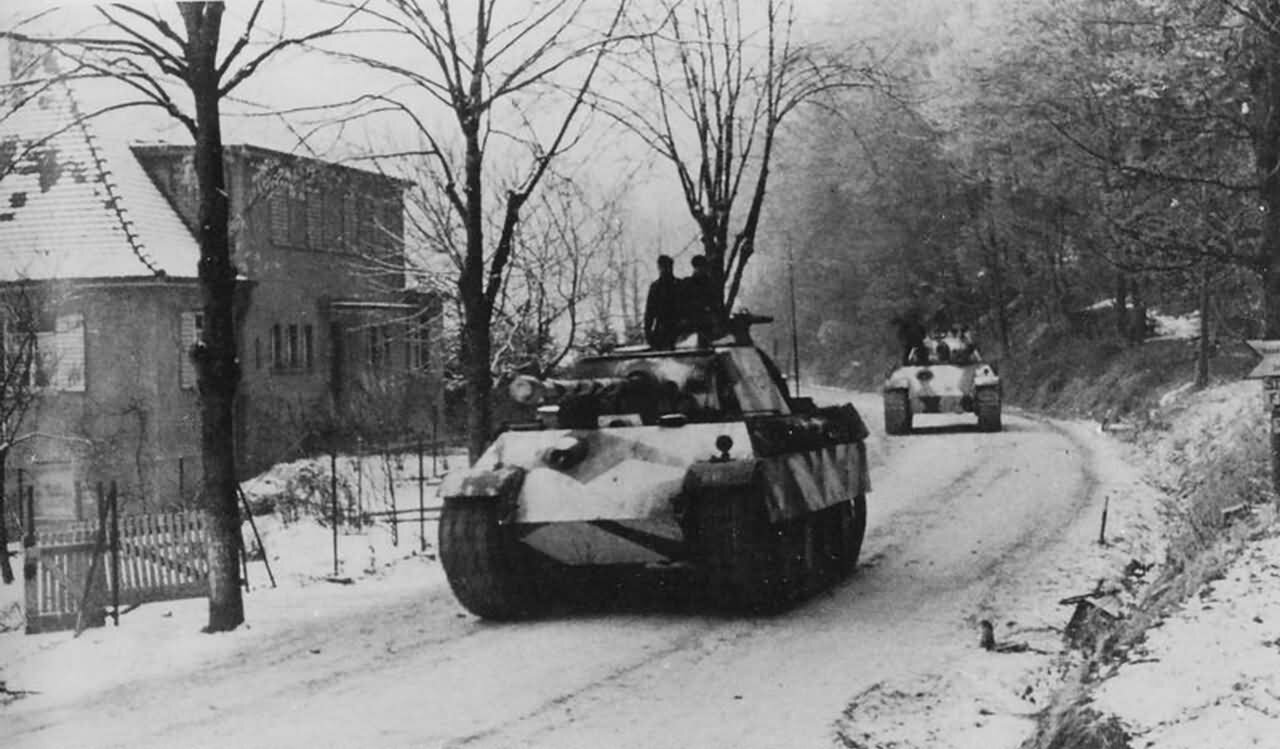
A Panther tank of the 25th Panzer-Grenadier Division moves through Dragon’s Teeth during the Nordwind offensive. Photo source: Bundesarchiv.

A Panther tank of the 25th Panzer-Grenadier Division moves through Dragon’s Teeth during the Nordwind offensive. Photo source: Bundesarchiv.

A line of Panthers move through Haguenau Forest during Nordwind. Photo source: Bundesarchiv.

A line of Panthers move through Haguenau Forest during Nordwind. Photo source: Bundesarchiv.

Another photo of Panthers moving through the Haguenau Forest. The zig-zag pattern seems to have been used exclusively during the Nordwind offensive. Photo source: Bundesarchiv.

Another photo of Panthers moving through the Haguenau Forest. The zig-zag pattern seems to have been used exclusively during the Nordwind offensive. Photo source: Bundesarchiv.

Several US Shermans from the 48th Tank Battalion are seen maneuvering towards Hatten in this photo taken from the church tower in Rittershoffen. The smoke in the background is from burning German tanks, hit by tank or artillery fire. Photo source: N…

Several US Shermans from the 48th Tank Battalion are seen maneuvering towards Hatten in this photo taken from the church tower in Rittershoffen. The smoke in the background is from burning German tanks, hit by tank or artillery fire. Photo source: NARA.

               Fierce fighting continued the following day- a German counterattack in the morning hit particularly hard. Preceded by a bombardment, tanks and artillery attacked towards Rittershoffen. C/48th Tank BN lost four tanks with another two hit- 8 of its men were killed.[19] The tanks pressed their attack, breaking through the lines of I Company, 3/315th and cutting off several of its positions located in Maginot fortifications.  Many of 2/242’s men remained in the town and received orders to withdraw towards Kuhlendorf in the west, even as German tanks rolled through the streets of Rittershoffen.[20] With the help of the 827th’s tank destoyers, the Germans were prevented from completely overrunning the town- the M-18s claimed the destruction of four tanks.[21] Without additional reinforcements however, both battalions were likely to be overrun.

               After a lengthy process of assembling its subordinate battalions, Brooks’ 14th Armored Division was ready for a counterattack by the morning of January 12th. Brooks ordered his forces to conduct a two-pronged attack. Combat Command A (CCA), built around the 48th Tank Battalion and 68th Armored Infantry Battalion would attack to take back Rittershoffen. CCB, with its 25th Tank Battalion and 62nd Armored Infantry Battalion would attempt to seize and hold Hatten until relieved by additional infantry units from the 79th ID. CCR, with the 47th Tank Battalion and 19th Armored Infantry Battalion, were held in reserve.[22] After a fifteen-minute artillery bombardment, the attack began the following morning at 0750. However, despite support of the 48th’s Shermans, CCA was unable to advance further than the southern edge of Rittershoffen. The tanks and halftracks of CCA met heavy artillery, tank and small arms fire which was particularly heavy around the church in the eastern portion of town. However, the 68th AIB made contact with elements of the 3/315th in town and cleared several houses and buildings in the western end of Rittershoffen. CCB fared worse north of Rittershoffen- C/47th Tank Battalion lost two tanks as it advanced across the rolling plains and also encountered heavy anti-tank fire. The 62nd’s infantry dismounted from their halftracks and dug in under fire along the Rittershoffen-Leiterswiller road- the battalion’s commander was wounded during the attack. With the apparent failure of the armor to gain a foothold in the towns, the tanks withdrew for the night to resupply in Hohwiller.[23] Inside Rittershoffen, the 813th’s tank destroyers reported that ten German tanks had been operating around the village, including one Mark IV tank emplaced at the church.[24]

               The following day, the Americans launched another attack. This time, CCB provided support by fires with its tanks, while CCR was tasked with securing Hatten. CCA was also augmented with 3/315th, and attacked towards Rittershoffen. Another artillery bombardment preceded the attack, with smoke being laid on the southern edge of Hatten. CCA made good progress, advancing into Hatten until one tank was knocked out by German fire from the church, which was still a strongpoint.[25] CCR was able to advance into Hatten a link up with 2/315th and several survivors from 1/242 who had refused the order to withdraw and remained in the town. However, the armored vehicles pulled back from the town in the afternoon. General Smith then ordered a second attack in the evening. This time, the Americans changed tactics. Colonel Daniel Hudelson, the commander of CCR, formed one light tank company of Stuarts from the 94th Cavalry Reconnaissance Squadron and two companies of Shermans from the 47th Tank BN into one column. The 12 light tanks and 23 medium tanks were then loaded up with infantry from the 19th AIB, and moved swiftly without a preceding artillery bombardment. Meeting little resistance on the way in, the tanks dropped their infantry inside the town- most of the armor then withdrew, leaving behind a platoon to assist the infantry. Meanwhile, the infantry was engaged in house-to-house fighting. By midnight, when the attack finally petered out, the Americans had retaken three-fourths of the town- they had discovered 91 dead Germans in the houses they captured. While no tanks were lost by the column during its movement, three Shermans were lost inside Hatten and were replaced.[26] CCB had tried to carry out its own small attacks during the day, but had paid for it with three tanks.[27] Late on the 13th, the Germans launched a counterattack of their own, supported by flame-throwing tanks, and recaptured most of the parts of Hatten that the Americans had taken earlier in the day. However, the Germans lost at least three of their own tanks in the process. The Germans also lost 158 men as prisoners to the GIs.[28][29][30]

               The American attacks on the 13th would be the last major coordinated attack that the Americans mounted in the area. For the next week, vicious small-unit attacks would surge back and forth through both villages, gradually reducing both to furiously burning piles of rubble. The infantry from the 315th reported firing mortars at “impossible” ranges of 75 to 150 yards, and firing 40 rounds of bazooka rockets in five minutes.[31] It was not uncommon for GIs to occupy the upstairs of a building while German soldiers were in the cellar, and vice versa.[32] For the civilians from both villages who were caught in the middle, it was worse. Major Hans von Luck, commanding one of the panzer units, would later write that Rittershoffen “… became a phantom village… Almost all the buildings, including the church… were in ruins. Many of the houses were on fire and lit up the scene at night. The dead lay about the streets, among them many civilians. We couldn’t recover their bodies, since the enemy here was no more than 15 or 20 yards away. The cows bellowed in their stalls, unattended; the cadavers of animals stank and infected the air.”[33] Tanks and tank destroyers were frequently used for direct fire on buildings. On the 14th, in an attempt to reduce the church strongpoint in Rittershoffen, five Shermans were attached to 3/315 to provide fire support, along with a self-propelled 155mm gun which fired directly into the church. The SPG had to withdraw after a time owing to anti-tank fire.[34] A second attempt the following day met with similar results.[35][36]

               On the 15th, the Germans launched several small counterattacks to retake Hatten. Richard Engler, a veteran of the 79th ID, described the kind of fighting which took place:

“Now they seemed intent on burning Hatten to the ground. Tanks hammered holes through houses with machine guns and cannon, then flame throwers spurted fire through the apertures while tracers from the tank and infantry guns set fire to the hay in barns. By afternoon, there was little cover- houses or other structures- left beyond “the bend” where the Americans continued to hold…”[37]

Another after-action report described a typical tank engagement inside the towns:

“A German tank would move up a wreck-strewn street, climbing over the piles of rock and timbers; and an American tank would move to meet it. The German tank would stop just short of a curve and the American would wait, just around the corner. And so they would sit. They would try to move to get a shot without being hit- blow holes with HE through the walls of houses to fire through. And then the other would maneuver out of the way.”[38]

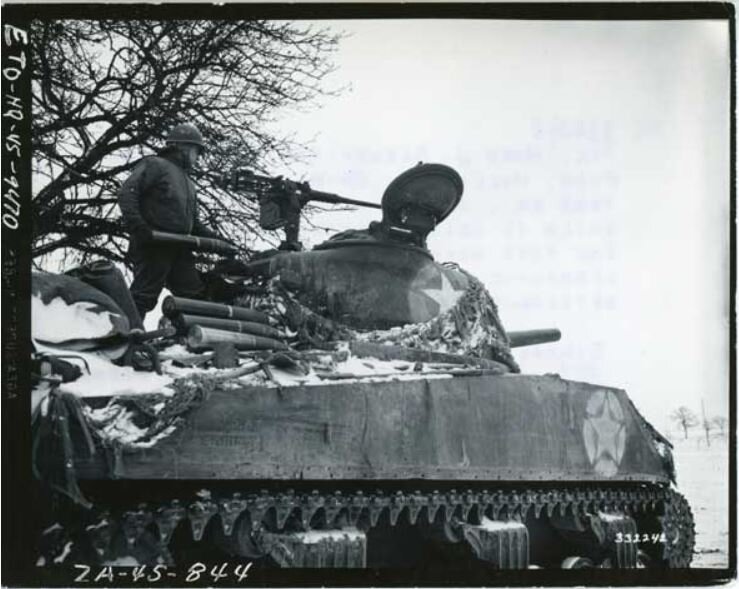
In this picture taken on January 20th, PFC Hugo Scearpitti loads ammunition into a Sherman with the 48th Tank Battalion. Photo source: NARA.

In this picture taken on January 20th, PFC Hugo Scearpitti loads ammunition into a Sherman with the 48th Tank Battalion. Photo source: NARA.

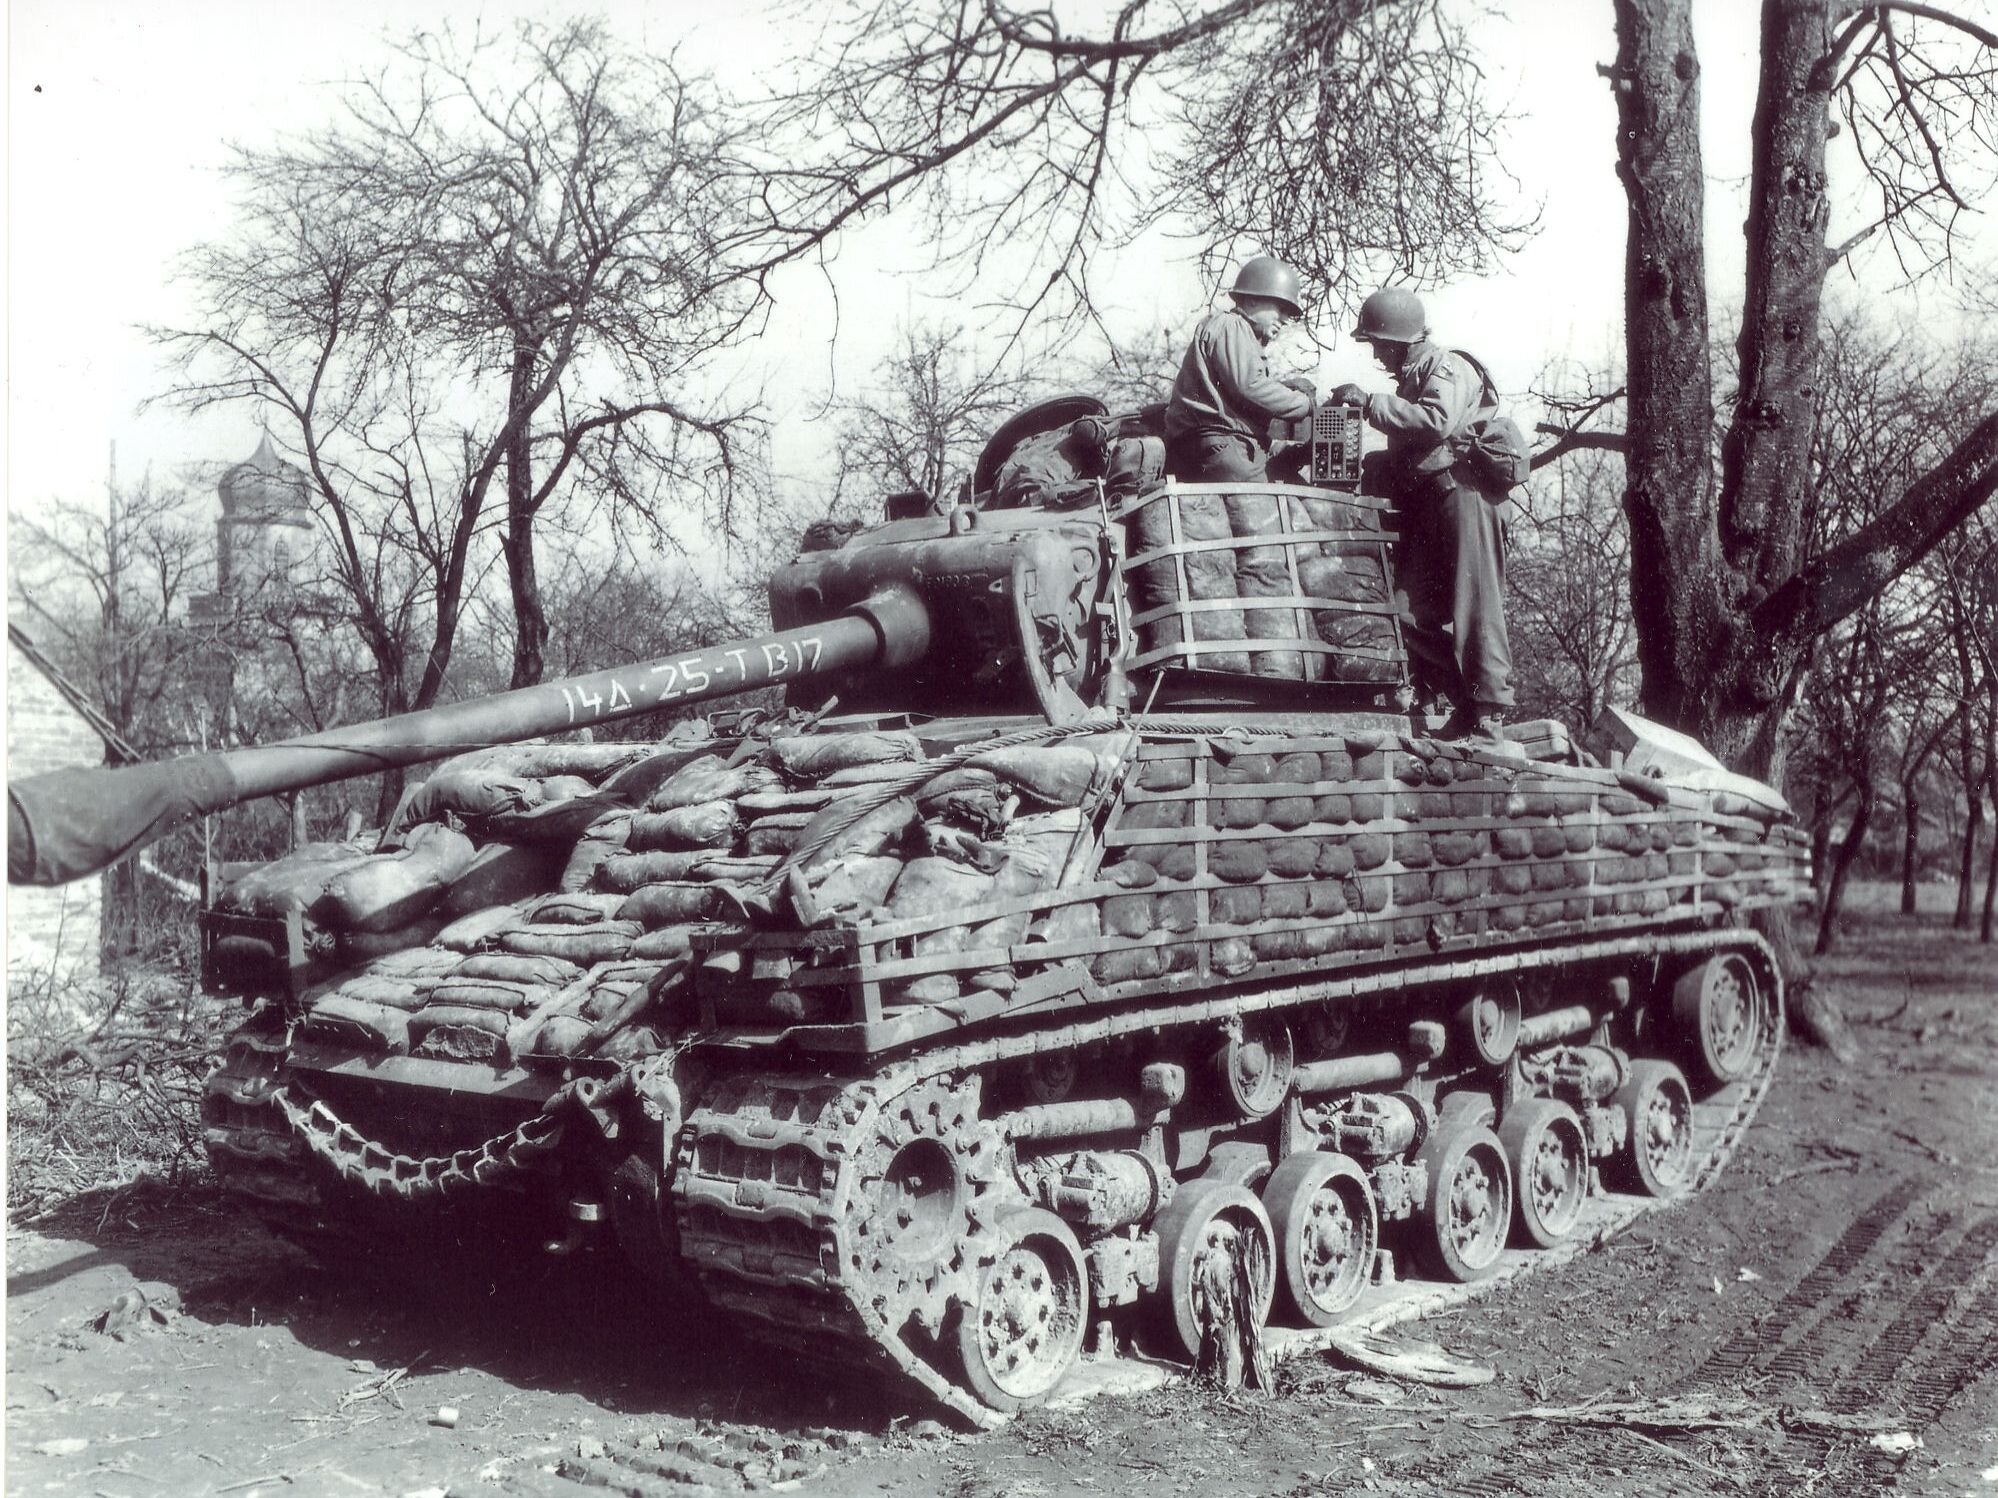
This M4A376W is assigned to B Company, 25th Tank Battalion, 14th Armored Division. As was common with many tanks in this division, the crew have outfitted the tank with sandbag armor. While it is possible that this might have had some effectiveness …

This M4A376W is assigned to B Company, 25th Tank Battalion, 14th Armored Division. As was common with many tanks in this division, the crew have outfitted the tank with sandbag armor. While it is possible that this might have had some effectiveness against portable HEAT weapons like Panzerfausts, it would have provided little protection against tank or anti-tank gun fire, and it would have added a substantial amount of weight to the tank. Photo source: NARA.

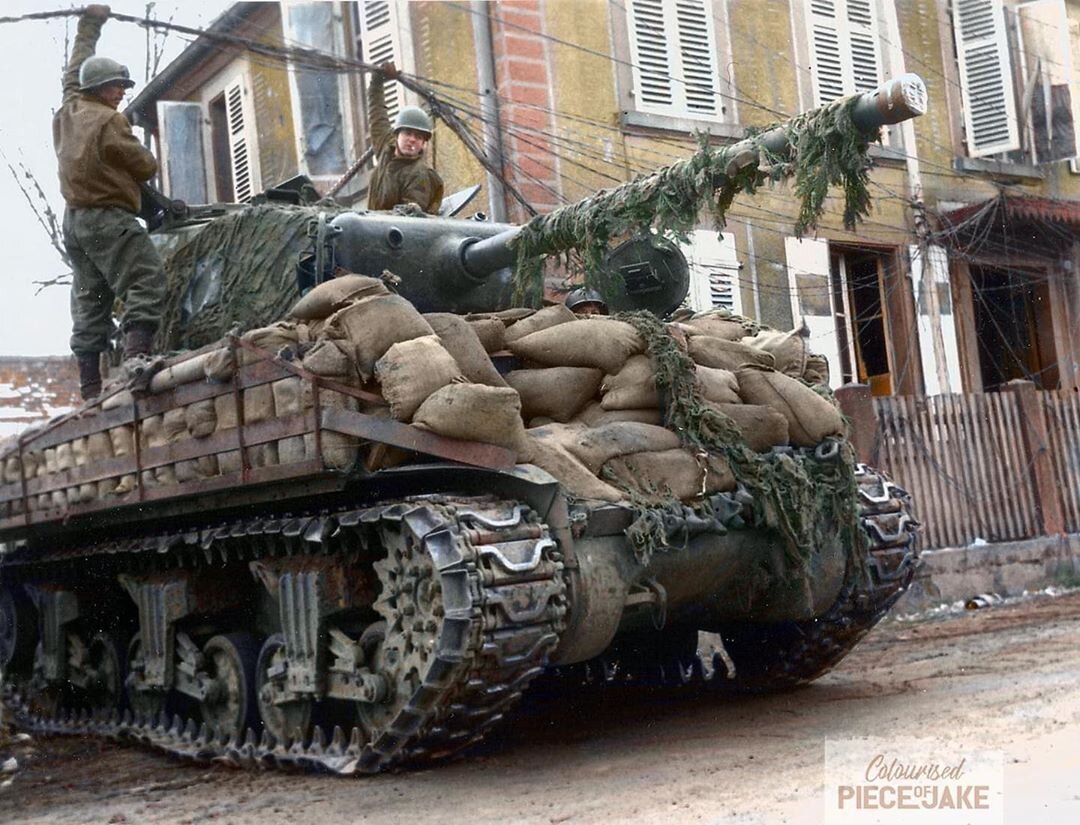
Another M4A376W Sherman of the 14th Armored Division equipped with sandbag armor. The crew is lifting telephone cables over the turret while tank maneuvers into the town of Niederbetschdorf in early 1945. Original photo source: NARA, colorized by Pi…

Another M4A376W Sherman of the 14th Armored Division equipped with sandbag armor. The crew is lifting telephone cables over the turret while tank maneuvers into the town of Niederbetschdorf in early 1945. Original photo source: NARA, colorized by Piece of Jake.

A Flammpanzer 38(t), an infantry-support version of the Jagdpanzer 38(t), also known as the Hetzer. Flamm Panzer Kompanie was equipped with about 20 of these armored vehicles during the fighting for Hatten and Rittershoffen. Photo source: NARA.

A Flammpanzer 38(t), an infantry-support version of the Jagdpanzer 38(t), also known as the Hetzer. Flamm Panzer Kompanie was equipped with about 20 of these armored vehicles during the fighting for Hatten and Rittershoffen. Photo source: NARA.

In this illustration, German Panzer-Grenadiers are supported in their attacks on Maginot bunkers by Flamm-Panzers on January 9th. These vehicles were capable of firing some 60-70 flame bursts at up to 50m, making them effective vehicles to take on t…

In this illustration, German Panzer-Grenadiers are supported in their attacks on Maginot bunkers by Flamm-Panzers on January 9th. These vehicles were capable of firing some 60-70 flame bursts at up to 50m, making them effective vehicles to take on the bunkers. However, half of these vehicles were lost in the fighting. Illustration by Jim Laurier.

Anti-tank fire and artillery concentrations were frequently used to break up the German attacks. The artillery observers with the infantry units became adept at adjusting fire to within 35-50 yards of American positions.[39] The German counterattacks on the 15th were broken up. As the Germans also had the villages under artillery fire, the wounded could not be evacuated by foot. Expedient aid stations were set up in cellars- a Stuart from the 94th Cavalry Reconnaissance Squadron made 13 trips back and forth from the villages, carrying loads of wounded back to the relative safety of Haguenau Forest.[40]

               By now, fighting had been raging around Hatten and Rittershoffen for nearly a week. Instead of a quick capture by the German armored forces, both the 21st Panzer and 25th Panzergrenadier Divisions had become bogged down and taken heavy losses. Consequently, after the first several days of fighting, when it had become apparent that his attack had stalled, Blaskowitz asked for the release of several divisions which had been earmarked for Operation Zahnartzt, a cancelled offensive which had been intended to drive further into the Allied rear. Four divisions, including the 7th Parachute Division and 47th Volksgrenadier Division, were released to Blaskowitz. To the Hatten-Rittershoffen battlefield he committed the 20th Regiment of the 7th Parachute Division, along with the 104th Regiment of the 47th Volksgrenadiers Division. These reinforcements began arriving between January 15-16th. However, they did not decisively tip the advantage to the Germans.

               January 15-16th saw the same kind of fighting as the previous two days, with the battle seesawing back and forth through the towns. Attrition from the fighting was taking its toll. The 827th Tank Destroyer Battalion recorded that two of its M-18s were destroyed by artillery during these days, and an officer wounded.[41] One tank company reported that both its first and second platoons had just one Sherman left apiece.[42] However, additional armor reinforcements were not forthcoming. Artillery fire would continue to pound the villages, and occasionally Me-262 jet fighters would swoop overhead to drop bombs and strafe ground targets. On the morning of the 17th, CCA made one last attempt to clear Rittershoffen with the support of 1/315th. Under cover of heavy snowfall, the attack began at 0730- some companies reached the village and initially had some success. Hans von Luck recorded that this attack captured a large number of battalion and regimental staff members. His unit then counterattacked, freeing the captured men and in turn capturing some 80 GIs. This was likely B/1/315, which was reported as first being cut off, then was reported missing almost in its entirety.[43][44]

Following this final major American attack, fighting finally began to taper off. The 18th was noted as a relatively quiet day in the villages, though the weather cleared enough for P-47 fighter-bombers to strafe German targets in the area. Late on January 19th, the Germans launched their own final attack. Preceded by a large bombardment, Von Luck recorded that this last attack: “Only in Hatten did the paratroops, supported by a few tanks, once again attack the brave 79th Infantry Division. The Americans defended themselves with guns, pistols, bazookas, and knives house by house, so that the attack had to be broken off.”[45] Even before this last attack was beaten off, General Brooks had made arrangements to pull the 14th Armored Division and the 315th Infantry Regiment back from Hatten and Rittershoffen. Losses among his units had been heavy, and supporting artillery units were running low on ammunition. Consequently, on the night of January 20th, under the cover of darkness the Americans began withdrawing from the battlefield. They were first pulled back to Kuhlendorf, then were pulled back to positions along the Moder River, which would allow them to shorten their lines and provided a better place to defend against the Germans. The Germans awoke the next day to silence- Alsatian villagers peeked out from under the ruins of their homes and began coming outside for the first time in days.

The battle had been costly for both sides. Total casualties remain unknown for both sides and can only be estimated. CCA’s casualties for the month of January included 41 killed, 202 wounded, and 29 missing- the 68th had absorbed the bulk of these casualties, with 160 total.[46] CCR took 362 casualties, including 26 killed.[47] The 242nd Infantry Regiment had suffered heavily as well. When 1/242 arrived in Hatten on January 9th, it had 33 officers and 748 enlisted men- just two days later, it could count only 11 officers and 253 enlisted men present for duty.[48] Given these casualty figures for CCA, CCR, and one battalion from the 242nd Infantry Regiment, it is reasonable to assume that total US casualties for the battle were likely around 1,500-1,700. German losses are also unknown, but a post-war paper written in 1950 estimates their losses at at least 3200 killed and wounded with an unknown number of prisoners.[49] Materiel losses were also heavy in the battle, though these again cannot be tallied with absolute certainty. When Hatten and Rittershoffen were recaptured by Allied forces in March 1945, the shattered and burned-out husks of 31 Shermans, 9 Stuart light tanks, 8 M3 halftracks, 51 German tanks and assault guns, and 12 German halftracks were found lying among streets and fields around the villages. Civilians from the two villages suffered greatly as well- both Hatten and Rittershoffen had 90% of their structures destroyed or damaged. It Hatten, 83 civilians were killed. Another 30 died in Rittershoffen.[50]

A few days following the end of the battle, Operation Nordwind was called to an end. Blaskowitz had committed all of his available reserves without achieving a decisive breakthrough. On the Eastern Front, the Red Army had launched the Vistula-Oder offensive- the remaining mechanized units which had not been utterly spent in Nordwind were now desperately needed to defend western Poland and Prussia. The operation was a failure, and would be the last time that a large offensive operation was mounted along the Western Front.

The Battle of Hatten-Rittershoffen could not in any seriousness be claimed as a tactical victory for either side. The Germans had been unable to breakthrough the American defenses, even during the opening phases when they had the advantage in armor and firepower. Likewise, the Americans had failed to retake either town even once an entire armored division, infantry regiment, and two tank destroyer battalions and their supporting artillery had arrived in the area. However, the Germans had suffered so greatly in terms of men and equipment that they had been forced to commit their reserves, intended for use elsewhere. Even these were not enough to crack the resolute American units holding their little corners of Hatten and Rittershoffen. This was an expenditure in men and equipment that the Germans could ill afford to replace at this juncture in the war. Viewed in this manner, the battle was an operational American victory. In any case, this terrible battle would prove one of the last large armored clashes along the Western Front, and was remembered on both sides- even among the most experienced Germans- as one of the most difficult fights of their careers.

Today, the scenery of both towns have changed significantly, along with that of neighboring towns. Since so much of Hatten and Rittershoffen were obliterated in the fighting, they had to be rebuilt following the end of the war. The buildings look decidedly postwar, and are generally the same slab-sided monochrome concrete structures which are common throughout Central Europe. Surrounding villages near Hatten and Rittershoffen were clearly similarly affected; three kilometers to the north in Stundwiller, which was captured early in the battle by the Germans and used to stage attacks but subjected to American artillery and air strikes, has been reconstructed in a like fashion. While most of the original buildings are long since gone along with the burned out husks of tanks and assault guns, numerous traces of the battle remain. Most of the Maginot Line bunkers remain in place; many continued to be used for a time by the French Army in the post-war era (in fact, a few ouvrages remain in use further to the northwest). The most prominent of these bunkers are two located in Hatten itself.  A very large bunker on the southern edge of the village, known as Casemate D’Esch, was a strong point in the battle- it remains heavily cratered by tank and shell fire, with numerous parts showing exposed rebar. The inside of this bunker has been converted into a museum, which preserves both the original fittings of the fort, but also displays a large collection of artifacts recovered from the battlefield, along with numerous pictures from the period. Another large bunker is located just up the road, and has been converted into a museum called Musée de l'Abri de Hatten. This museum preserves nearly 30 underground rooms as they would have appeared in the late 1930s and early 1940s when the French occupied the fortification. A number of buildings have been built on the premises which contain vehicles, weapons, and other artifacts from the battle.

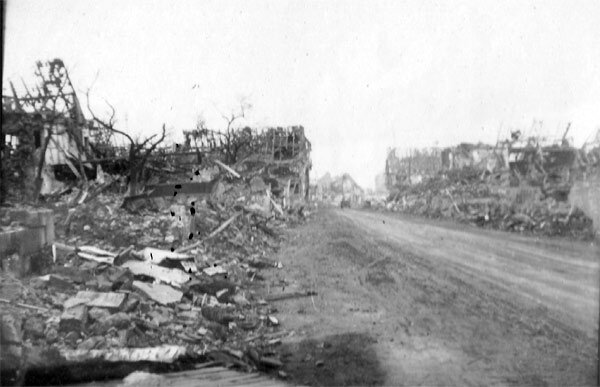
The ruins of one of the towns following the battle. Photo source: 14th Armored Division website.

The ruins of one of the towns following the battle. Photo source: 14th Armored Division website.

Both Hatten and Rittershoffen were devastated in the battle, with nearly all buildings in the towns destroyed or damaged. Photo source: 14th Armored Division website.

Both Hatten and Rittershoffen were devastated in the battle, with nearly all buildings in the towns destroyed or damaged. Photo source: 14th Armored Division website.

This Sherman from the 48th Tank Division was hit repeatedly in Rittershoffen. Photo source: NARA.

This Sherman from the 48th Tank Division was hit repeatedly in Rittershoffen. Photo source: NARA.

A knocked-out Sherman in the ruins of Hatten. Photo source: 14th Armored Division website.

A knocked-out Sherman in the ruins of Hatten. Photo source: 14th Armored Division website.

Another knocked-out Sherman. Photo source: History of the 21st Panzer Division.

Another knocked-out Sherman. Photo source: History of the 21st Panzer Division.

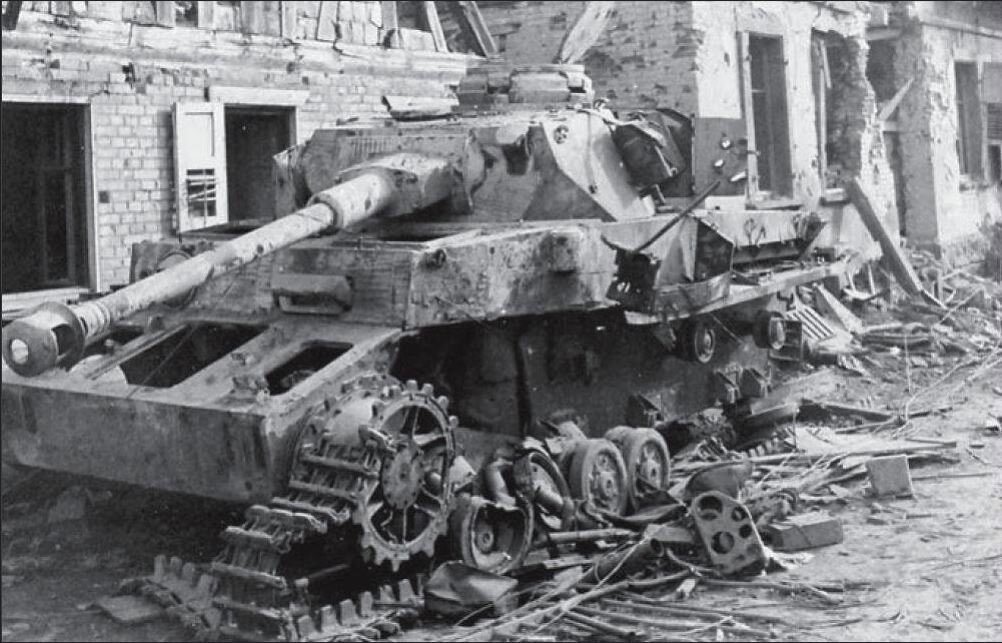
A knocked-out Panzer IV in Hatten. Photo source: NARA.

A knocked-out Panzer IV in Hatten. Photo source: NARA.

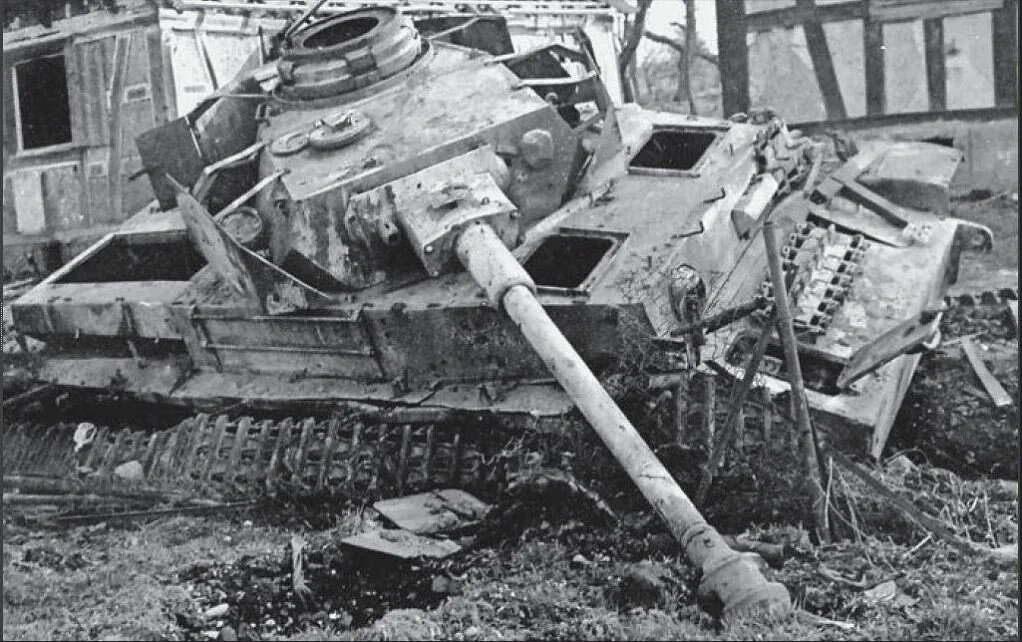
Another knocked-out Panzer IV in Hatten. Photo source: NARA.

Another knocked-out Panzer IV in Hatten. Photo source: NARA.

A knocked-out Sherman and destroyed M-18 Hellcat tank destroyer, the second probably from the 827th Tank Destroyer Battalion, in Rittershoffen after the battle. Photo source: NARA.

A knocked-out Sherman and destroyed M-18 Hellcat tank destroyer, the second probably from the 827th Tank Destroyer Battalion, in Rittershoffen after the battle. Photo source: NARA.

Another knocked-out Sherman, seen in Hatten. Photo source: 14th Armored Division website.

Another knocked-out Sherman, seen in Hatten. Photo source: 14th Armored Division website.

In this dramatic photo from the 14th Armored Division’s scrapbook, a burned-out Sherman faces a knocked-out Panther, likely in the fields outside the villages. Photo source: 14th Armored Division scrapbook.

In this dramatic photo from the 14th Armored Division’s scrapbook, a burned-out Sherman faces a knocked-out Panther, likely in the fields outside the villages. Photo source: 14th Armored Division scrapbook.

Hatten’s church after the end of the battle- this was used as a hardpoint by the Germans during the fighting- at one point, the Americans brought up a self-propelled 155mm gun to fire directly into the church. Photo source: 14th Armored Division web…

Hatten’s church after the end of the battle- this was used as a hardpoint by the Germans during the fighting- at one point, the Americans brought up a self-propelled 155mm gun to fire directly into the church. Photo source: 14th Armored Division website.

This knocked-out Panzer IV of the 21st Panzer Division was pictured months after the battle, during the spring of 1945, after the region was retaken by Allied forces. Photo: Panzerwaffe on the Battlefield, Vol. III.

This knocked-out Panzer IV of the 21st Panzer Division was pictured months after the battle, during the spring of 1945, after the region was retaken by Allied forces. Photo: Panzerwaffe on the Battlefield, Vol. III.

[1] P.495- Riviera to the Rhine

[2] https://www.dhm.de/lemo/biografie/johannes-blaskowitz

[3] P.501-504- Riviera to the Rhine

[4] P.59- Operation Nordwind, 1945

[5] P.35- Operation Nordwind, 1945

[6] P.59- Operation Nordwind, 1945

[7] P.229- Panzer Commander

[8] P.229- Panzer Commander

[9] P.147- The Final Crisis

[10] P.21- 42nd Infantry Division- A Combat History of World War II

[11] P.21- 42nd Infantry Division- A Combat History of World War II

[12] P.139- History of the 14th Armored Division

[13] P.137-138- History of the 14th Armored Division

[14] P.4- After-Action Report: 48th Tank Battalion

[15] P.1- 827th Tank Destroyer Battalion, Unit History for January 1945

[16] P.162- The Final Crisis

[17] P.164- The Final Crisis

[18] P.1- 827th Tank Destroyer Battalion, Unit History for January 1945

[19] P.168- The Final Crisis

[20] P.169- The Final Crisis

[21] P.2- 827th Tank Destroyer Battalion, Unit History for January 1945

[22] P.11- 14th Armored Division in the Battle of Hatten-Rittershoffen

[23] P.24-26- 14th Armored Division in the Battle of Hatten-Rittershoffen

[24] P.10- 813th Tank Destroyer Battalion, Action Against Enemy

[25] P.31-32- 14th Armored Division in the Battle of Hatten-Rittershoffen

[26] P.34- 14th Armored Division in the Battle of Hatten-Rittershoffen

[27] P.35- 14th Armored Division in the Battle of Hatten-Rittershoffen

[28] P.36- 14th Armored Division in the Battle of Hatten-Rittershoffen

[29] P.101- The Cross of Lorraine- the Combat History of the 79th Infantry Division

[30] P.1- VI Corps Artillery, Daily Periodic Report #128

[31] P.108- The Cross of Lorraine- the Combat History of the 79th Infantry Division

[32] P.231- Panzer Commander

[33] P.232-233- Panzer COmmander

[34] P.40- After Action Report- 47th Tank Battalion, 14th Armored Division

[35] P.2- VI Corps Artillery, Daily Periodic Report #128

[36] P.2- VI Corps Artillery, Daily Periodic Report #129

[37] P.195- The Final Crisis

[38] P.6- After Action Report- 47th Tank Battalion

[39] P.39-40- Combat History of the 19th Armored Infantry Battalion

[40] P.149- History of the 14th Armored Division

[41] P.2- 827th Tank Destroyer Battalion, Unit History for January 1945

[42] P.152- History of the 14th Armored Division

[43] P.42-14th Armored Division in the Battle of Hatten-Rittershoffen

[44] P.234- Panzer Commander

[45] P.235- Panzer Commander

[46] P.42-43- 14th Armored Division in the Battle of Hatten-Rittershoffen

[47] P.45- 14th Armored Division in the Battle of Hatten-Rittershoffen

[48] P.23- 42nd Infantry Division- A Combat History of World War II

[49] P.42 & 45- 14th Armored Division in the Battle of Hatten-Rittershoffen

[50] P.187- The Final Crisis

Sources

1.      Clarke, Jeffrey J., and Robert Ross. Smith. Riviera to the Rhine. Center of Military History, US Army, 1993.

2.      Lang, Heinke. “Johannes Blaskowitz.” Lebendiges Museum Online, Deutsches Historisches Museum, 14 Sept. 2014, www.dhm.de/lemo/biografie/johannes-blaskowitz.

3.      Zaloga, Steve, and Jim Laurier. Operation Nordwind 1945: Hitler's Last Offensive in the West. Vol. 223, Osprey, 2010.

4.      Luck, Hans von. Panzer Commander: the Memoirs of Hans Von Luck. Dell Publishing, 1989.

5.      Engler, Richard E. The Final Crisis: the Combat in Northern Alsace, January 1945. Aberjona Press, 2001.

6.      Carter, Joseph. The History of the 14th Armored Division. Albert Love Enterprises Publishers, 1945.

7.      After Action Report: 48th Tank Battalion, 14th Armored Division, EVO 44 thru APR 45. US Army, 1945, pp. 1–50, After Action Report: 48th Tank Battalion, 14th Armored Division, EVO 44 thru APR 45. Declassified June 1959.

8.      827th Tank Destroyer Battalion Unit History, January 1945. Headquarters, 827th Tank Destroyer Battalion, February 1945, pp. 1–24, 827th Tank Destroyer Battalion Unit History, January 1945.

9.      813th Tank Destroyer Battalion After Action Reports, January 1945. Headquarters, 813th Tank Destroyer Battalion, 1945, pp. 1–19, 813th Tank Destroyer Battalion After Action Reports, January 1945.

10.   Committee 1, Armored Officers Advanced Course. The Armored Division in the Defense: 14th Armored Division in the Battle of Hatten-Rittershoffen, 12-20 January 1945. Fort Knox, The Armored School, 1950, pp. 1–100.

11.   Daily Periodic Report #128. Headquarters VI Corps Artillery, 1945, pp. 1–3.

12.   Daily Periodic Report #129. Headquarters VI Corps Artillery, 1945, pp. 1–3.

13.   Carter, Joseph. After Action Report: 47th Tank Battalion, 14th Armored Division, Dec 44 thru May 45. Headquarters Company, 47th Tank Battalion, 1945, pp. 1–67, After Action Report: 47th Tank Battalion, 14th Armored Division, Dec 44 thru May 45.

14.   Daly, Hugh. 42nd "Rainbow" Infantry Division: A Combat History of World War II. US Army, 1945.

15.   Dickinson, Walter. Combat History of the 19th Armored Infantry Battalion. J.G. Weiss, 1945, pp. 1–120.

16.   The Cross of Lorraine: a Combat History of the 79th Infantry Division, June 1942-December 1945. Army & Navy Publishing Company, 1946.

Tools of War: the SA-2 Guideline

Photo source: ausairpower.com

Photo source: ausairpower.com

For American fighter-bomber pilots flying above North Vietnam in the late 1960s, ground fire and Surface-to-Air-Missiles (SAMs) were far more feared than the occasional MiG. The most dreaded of these came in the form of the SA-2 “Guideline” SAM, a telephone-pole length missile which inflicted many losses on US aircraft over the course of the war. The Guideline was destined to become the most widely-distributed SAM during the Cold War.

By Seth Marshall

            In the 1950s, with Cold War tensions only increasing, the United States had begun building large numbers of jet-powered bombers which were capable of aerial refueling and could fly all the way to their potential targets in the Soviet Union. While the Soviets possessed a substantial number of fighter aircraft, the Soviets felt that their numbers were not great enough to stop all of the bombers. In response to the US bomber threat, the Soviets began building surface-to-air missiles. The first of these was the SA-1. However, almost as soon as it was introduced, it was realized that there were problems with the new missile- it was limited to one location (the system was fixed and could not be moved), it was effective against large formations but not against smaller groups of aircraft, and it had limited targeting capabilities.[1] Subsequently, it was decided to begin designing a newer missile which would be better suited for tactical operations.

            In 1953, the Almaz design bureau presented its missile design, which had been created by Pyotr Grushin. The missile was made up of two stages. The first contained solid propellant to accelerate away from the launch site, and the second contained a hypergolic liquid propellant. The warhead for most of the earlier Guideline variants weighed 195kg, and was usually high explosive-fragmentation. Different fuses, included proximity, contact and command fuses were produced for use. The blast radius of the warhead depended on the altitude of detonation- at the high levels where U-2 reconnaissance planes flew, it could be as much as 244m. At lower altitudes against fighter-bombers, the blast radius was lethal out to 65m. A nuclear-armed variant of the SA-2 was produced, intended for use against bomber formations. This missile, the SA-2e, was armed with a 295kg warhead which had an estimated yield of 15 kilotons, the same explosive power as the bomb used against Hiroshima.[2] The new missile was designed from the start to be more mobile than its predecessor. The missile itself was launched from a SM-90 single rail launcher, which was carried by a transloader trailer and pulled by a Zil truck.[3] Each missile battery was to contain six launchers and one RSNA/SNR-75 “Fan Song” radar. This radar was also designed to be mobile- several large dishes were mounted to a single trailer. These dishes provided azimuth and altitude information for targets, which was then relayed to the missiles. Fan Song radars were provided targets by higher echelon radars, such as the Spoon Rest radar.

The “Spoon Rest” radar which provided the target acquisition information and fire control for the SA-2 battery.

The “Spoon Rest” radar which provided the target acquisition information and fire control for the SA-2 battery.

An illustration showing the ideal arrangement of the battery command, fire control radar, and other administrative functions of an SA-2 battery. (Photo source: ausairpower.com)

An illustration showing the ideal arrangement of the battery command, fire control radar, and other administrative functions of an SA-2 battery. (Photo source: ausairpower.com)

            The firing process for the new missile began at the SAM Regimental-level. There, a Spoon Rest target acquisition radar, which had greater range and altitude capabilities than the Fan Song, would acquire target aircraft entering the region. The Spoon Rest radar would then send this information to its subordinate batteries, whose Fan Songs would pick up the tracks. The missile launcher was then oriented towards the incoming aircraft while the Fan Song and computers in the command trailer plotted range and angle information. Typically, two missiles would be fired at once; a radio uplink from the launch site guided the missiles to their target and detonation.[4]

            The first S-75s began to be deployed in the late 1950s across the Soviet Union, China, and various Eastern Bloc countries. The first use of the S-75 came on October 7, 1959 near Beijing, China. An RB-57 Canberra reconnaissance aircraft, loaned by the US to the Republic of China (Taiwan) Air Force, was shot down from 65,000 feet, killing the pilot.[5] At the time, the missile was still secret, so it was claimed that the Taiwanese aircraft was shot down by fighters. However, the following year it became glaringly obvious that the Soviets had developed a new missile when on May 1, 1960 a CIA U-2 spy plane was shot down by an S-75. Several years earlier, under direction from the Eisenhower administration, U-2 overflights over the Soviet Union had begun to determine Soviet nuclear capabilities. The Soviets were well aware of the flights, but since the U-2s flew at altitudes at or above 70,000 feet, their fighters at the time were not able to intercept them. The Soviets fired a number of missiles at the U-2, flown by Francis Gary Powers; one exploded near the aircraft and a second scored a direct hit. Powers bailed out and was captured by Soviets; the U-2 wreckage was recovered remarkably intact. This led to a major incident during the Cold War, forcing the US to admit that it had been sending reconnaissance planes over the Soviet Union and was a propaganda coups for the Soviet Union and its premier, Nikita Khruschev.[6]

Francis Gary Powers, whose U-2 was shot down on May 1, 1960 by an SA-2, causing an international incident. (Photo source: Wikipedia)

Francis Gary Powers, whose U-2 was shot down on May 1, 1960 by an SA-2, causing an international incident. (Photo source: Wikipedia)

Major Rudolph Anderson, an Air Force U-2 pilot who was shot down and killed during the Cuban Missile Crisis in October 1962 (Photo source: Wikipedia)

Major Rudolph Anderson, an Air Force U-2 pilot who was shot down and killed during the Cuban Missile Crisis in October 1962 (Photo source: Wikipedia)

            Through the first five years of the 1960s, several more aircraft were shot down by S-75s, which by then had earned their own NATO designation- the SA-2 “GUIDELINE.” Several Taiwanese U-2s were shot down during the 1960s by SA-2s while flying over China. Another critical incident involving an SA-2 shootdown of a U-2 occurred on October 27, 1962 during the Cuban Missile Crisis. Unlike the Powers incident two years earlier, this shootdown was not authorized by the Soviet leadership, and was ordered by a local commander on the ground in Cuba. The pilot, USAF Major Rudolf Anderson, was killed. Despite immense pressure from the US military leadership, President John F. Kennedy resisted the demand to retaliate on the offending missile battery and ultimately negotiated a deal which defused the crisis.[7] The effectiveness of the SA-2 against the U-2 in numerous engagements during the early 1960s led directly to Lockheed developing the SR-71, an aircraft which could fly beyond the performance envelope of the SA-2.

            By the mid-1960s, the SA-2 was in wide circulation among the Soviet Union and its satellite countries. In the Soviet Union itself, the CIA estimated that SA-2 deployment was completed by the end of 1965; the CIA had identified 870 sites supporting six launchers each by that time, with another 160 possible alternate sites identified.[8] Among the Soviet client states which used the SA-2 were East Germany, Egypt, Mongolia, North Korea, North Vietnam, and China. China initially received only a small number of SA-2s, but soon copied the design and began building it in large numbers as the HQ-1. Despite the wide deployment of the weapon system, it would be in North Vietnam that the SA-2 would see its most extensive use.

            American involvement in Vietnam had begun early in the 1960s and ramped up in earnest after the Gulf of Tonkin Resolution in 1964. Soon, American aircraft were flying numerous sorties over South Vietnam and some areas of North Vietnam. To defend against this, the Soviet Union supplied the North Vietnamese Army (NVA) with SA-2s, brought its personnel to the Soviet Union for training, and sent advisors to assist the NVA in operating the new sites.[9] In April 1965, the US discovered the first five SAM sites under construction. The discovery surprised and dismayed US planners, who wanted to target the sites immediately. However, Secretary of Defense Robert McNamara believed that the US should pursue a policy of moderation, fearing an escalation in the war if US planes hit missile sites manned by Soviet advisors. As a result, the construction went on unhindered and on July 24, 1965, an SA-2 shot down one F-4, damaging two others with the resulting explosion. At the time, US aircraft were flying at higher altitudes to avoid the abundance of AAA used by Vietnam which proved deadly at low altitudes.[10] The effect of this shootdown was almost immediate. Three days later, the US Air Force launched Operation Spring High, intended to destroy several of the offending SAM sites, using 48 F-105 “Thunderchief” fighter-bombers from four different Tactical Fighter Squadrons stationed at a pair of Thai bases. However, the Vietnamese had foreseen this possibility, replaced the real SA-2s with dummies, and ringed the area with numerous AAA batteries. Four of the F-105s were shot down in the vicinity of the target, and half the remaining aircraft were damaged- while attempting to make an emergency landing, another F-105 lost control and collided with a second, killing both pilots.[11]

            US pilots were initially not well-prepared to deal with the threat of SAMs. Much of the aircraft used by the Americans were being used in ways that they had not originally been envisioned for. The F-105, the primary fighter-bomber used by the Air Force, was originally designed as a high-speed nuclear bomber, intended to fly at supersonic speeds at low-levels before zooming to higher altitudes to deliver its payload. The F-4, a large fighter used by both the Air Force and Navy, was conceived as a bomber interceptor. Neither of these aircraft, along with most other US types, were equipped with effective countermeasures to the new threat. Their pilots had also not been trained on how to defeat or evade incoming missiles. It would take several months of combat experience and analysis to develop solutions to these problems.

An RF-4C Phantom is hit by shrapnel from an exploding SA-2 on August 12, 1967- both crew survived the shoot-down, but CPT Edwin Atterberry was killed while in captivity. (Photo source: ausairpower.com)

An RF-4C Phantom is hit by shrapnel from an exploding SA-2 on August 12, 1967- both crew survived the shoot-down, but CPT Edwin Atterberry was killed while in captivity. (Photo source: ausairpower.com)

An F-105D fighter-bomber has been damaged by a near-miss from an SA-2. (Photo source: ausairpower.com)

An F-105D fighter-bomber has been damaged by a near-miss from an SA-2. (Photo source: ausairpower.com)

A typical star-shaped arrangement for an SA-2 battery- the tell-tale arrangement frequently drew the attention of American aircraft- North Vietnamese battery operators would later use different arrangements to conceal their sites as the Vietnam War …

A typical star-shaped arrangement for an SA-2 battery- the tell-tale arrangement frequently drew the attention of American aircraft- North Vietnamese battery operators would later use different arrangements to conceal their sites as the Vietnam War progressed. (Photo source: Wikipedia)

            After their initial experiences, US pilots discovered that the SA-2 had flaws which could be exploited. Because of the shear size of the missile, launches and incoming missiles could be spotted by pilots and crew after being alerted by an in-cockpit missile alarm. Then the pilots could take evasive action. One method involved diving towards the missile, forcing the SA-2 to change direction, then pulling up sharply at the appropriate moment, a maneuver which the SA- could not match.[12] Another tactic involved flying the aircraft towards the sun, which had the potential of fooling the infra-red seeker head on the missile. Soon, various improvements came to the US fighter-bombers to increase their odds against the North Vietnamese air defenses. In December 1965, radar homing and warning (RHAW) receivers were installed on the first F-105s and would become commonplace by mid-1966.[13] This system included a scope inside the cockpit with what resembled a crosshair with three concentric rings. A strobe on the scope would show the pilot or weapon officer the direction and distance to the radar station detecting the aircraft. Pilots coined the phrase “three-ringer” for an indication that was particularly close. If a launch was detected, a red light came on and a tone would sound inside the pilot’s helmet.[14] This system could also detect the radar of some of the AAA guns defending North Vietnam. Beginning in September 1966, F-4s were equipped with QRC-160 wing pods which were intended to jam the SAM battery’s radar.[15] The most radical of the US reactions to the SAM threat was the development of the so-called “Wild Weasel” units- fighter-bombers specifically modified and used to destroy SAM sites. The first of these units was equipped with the F-100F Super Saber, an aging design armed with four 20mm cannons and rockets and outfitted with the RHAW system. These aircraft arrived at Thai air bases in November 1965 and claimed its first destruction of a SAM site in December of the same year. The more common Wild Weasels were modified F-105F and F-105G aircraft, which began replacing the F-100s in the summer of 1966. The F-105s were armed with a single 20mm rotary-cannon, but more importantly with the AGM-45 “Shrike” anti-radiation missiles, which could home in on a SAM site’s radar and could be fired from outside SA-2 range. Navy aircraft also carried the “Shrike” for the same purpose. Later during the Vietnam conflict, the Air Force would introduce the AGM-78 Standard missile, an improvement of the Shrike; however, the Shrike remained in use as it was far cheaper than the new Standard missile.

            Despite the improvements in detecting and counteracting the SA-2s, the Vietnamese persisted increasing their numbers and usage. In 1965, there had only been a single SAM battalion in operation- by the following year, there were 25. In 1967 there were 30, and it was estimated that there were 35-40 operating in 1968. The number of missile firings increased correspondingly as well. In the first 11 months of SA-2 operations, about 30 missiles were fired per month. Between July 1966-October 1967, the number of monthly launches increased to 270. In November 1967, between 590-740 SA-2s were fired, a record which stood until December 1972.[16] The operators of the SAM sites also became more clever about firing their SA-2s as American responses developed. Instead of keeping their radar on all the time, NVA operators would use radar to track the incoming aircraft to a distance of 25 miles from the site, then switch the radar off and calculate the time it would take the aircraft to close to within a mile of the site before switching the guidance radar on and launching the SA-2s.[17] SA-2 crews also resorted to optical aiming with their missiles, which rendered ECM pods useless but also greatly reduced the effectiveness of the SAM.

            In general, as the Vietnam War progressed, the number of SA-2s required to shoot down a single American aircraft increased. In 1965, it took about 18 SA-2s to shoot down a single American plane. The following year, that number increased to 35. In 1967 it took 57 SA-2s to shoot down an American plane, and by 1968 it could take as many as 107 missiles to achieve a kill. Despite this drop in launch-to-kill ratio, American pilots maintained a healthy respect for this threat, as evidenced in numerous memoirs. F-105 pilot Colonel Jack Broughton’s book, “Thud Ridge”, recounts numerous run-ins with SA-2s during his tour from 1966-1967. In one passage, Broughton describes how one of the more experienced pilots was brought down by a SAM, along with the frustrations and being denied from bombing the offending launch sites.

“Our old head had bounced through the refueling sessions and managed to stick with his leader, but his wingman, who was not so fortunate. He got bounced off the tanker boom by a particularly rough piece of air and was never able to find the flight again in the murk, so number three went all the way into the target without the benefit of that wingman for mutual support. The Migs were there, but they made it in and number three beat the big guns over the target. Coming off the target at about 7,000 feet, Sam got him. Nobody saw a Sam and nobody called one, but we already had two guys down at the time and the beepers were squealing and things were moving fast. The first sign of trouble was a large rust-colored ball that enveloped his aircraft. Coming out of the ball, his aircraft appeared intact but he started a stable descent with his left win dipped slightly low. His only transmission was, “I gotta get out. I’ll see you guys.’ With that, he pulled that handles and we saw a chute and heard the beeper as he headed for Hanoi via nylon. The Sam site that got him didn’t have to be there. We let it be there. Why? As fighter pilots, none of us could understand or accept the decision to allow the Sams to move in and construct at will, but then fighter pilots must be different.”[18]

Another fighter pilot, eventual-Brigadier General Robin Olds, flew a tour in Vietnam as the commander of an F-4 Tactical Fighter Wing, as was fired on repeatedly by SA-2s over the course of his tour, remarking, “I had 22 shot at me, and the last one was as inspiring as the first.”[19] And despite the reduction in their effectiveness, they still were responsible for the loss of many US aircraft; during the period of October 1867- April 1968, between 115-128 US aircraft were lost to SA-2s.[20]

Perhaps the most successful period of SA-2 operations during the Vietnam War came near the end of American involvement during the conflict. In an effort he hoped would force the North Vietnamese back to the peace talks in Paris, President Richard Nixon ordered the bombing of Hanoi and Haiphong Harbor by B-52 strategic bombers. Over 200 of the bombers, flying from bases in Thailand and Guam formed the main impetus behind Operation Linebacker II. However, Air Force commanders made several mistakes when planning the operation; the bombers flew at 30,000 feet- an optimal range for SA-2s, they flew behind one another in trailing formations, and they generally used the same air corridors. As a result, SA-2 crews were able to volley fire into the bomber stream with little to stop them. Over the course of the eleven-day bombing campaign, over 1200 missiles were fired, shooting down 15 B-52s and damaging others beyond repair. Despite the losses, the B-52s were still able to seriously damage Hanoi’s infrastructure, while Hanoi had expended most of its SA-2s and was left vulnerable.[21] By the end of the Vietnam War, SA-2s had claimed several hundred aircraft and led the US to place much more emphasis on being able to deter missiles with electronic countermeasures, jamming, and suppression of enemy air defense (SEAD) missions.

Outside of Vietnam, the SA-2 also saw extensive service and use with Egypt against Israel during the War of Attrition and the 1973 Yom Kippur War. Egyptian SA-2s shot down several American-built Israeli Air Force aircraft with SA-2s during both conflicts. SA-2s saw use in various other conflicts as SAMs until the 1990s, by which time they were generally considered outdated and ineffective against more modern aircraft and countermeasures. In the 1980s, the Soviet Union began replacing the SA-2 in frontline usage with the S-300-series system, which had far greater range and capabilities. However, the SA-2 continues in use with many countries which have continued modifying the missile in an effort to ensure it remains a viable defense system. Oddly, the missile has also been adapted as a surface-to-surface ballistic missile in the Bosnian War and ongoing Yemeni Civil War, though its effectiveness in such a role must be questionable.

The SA-2 was the first combat-proven surface-to-air missile system. Building off of ideas initially envisioned in the Second World War and from early designs, the SA-2 became an iconic weapon of the Cold War, which drove further SAM development on both sides, and forced the US to increase its efforts in developing successful electronic warfare platforms. It was in part the development of such technologies which would allow US aircraft to experience such a degree of success over Iraq in 1991.

An Egyptian SA-2 transporter, pictured in the 1980s. (Photo source: Wikipedia)

An Egyptian SA-2 transporter, pictured in the 1980s. (Photo source: Wikipedia)


Sources

1.      “V-75 SA-2 GUIDELINE HQ-1 / HQ-2 (Chinese Versions) Tayir as Sabah (Egyptian Versions).” V-750 SA-2 GUIDELINE - Russia / Soviet Nuclear Forces, 23 June 2000, fas.org/nuke/guide/russia/airdef/v-75.htm.

2.      “SA-Guideline S-75 Dvina Desna Volchov Ground Air Defense Missile System.” Global Military Army Magazine Defence Security Industry Technology News Exhibition World Land Forces - Army Recognition, Army Recognition, 9 May 2020, www.armyrecognition.com/russia_russian_missile_system_vehicle_uk/sa-2_guideline_s-75_dvina_desna_volchov_ground_air_missile_system_technical_data_sheet_specification.html.

3.      O'Connor, Sean. “Soviet/Russian SAM Site Configuration Part 1: S-25/SA-1, S-75/SA-2, S-125/SA-3 and S-200/SA-5.” Air Power Australia, 21 Dec. 2009, www.ausairpower.net/APA-Rus-SAM-Site-Configs-A.html.

4.      Kopp, Carlo. Almaz S-75 Dvina/Desna/Volkhov Air Defence System / SA-2 Guideline / Зенитный Ракетный Комплекс С-75 Двина/Десна/Волхов, 3 July 2009, www.ausairpower.net/APA-S-75-Volkhov.html.

5.      Leone, Dario. “60 Years Ago Today, the Surface-To-Air Missile Scored the First Ever Successful Shoot-Down of an Aircraft.” The Aviation Geek Club, 6 Mar. 2020, theaviationgeekclub.com/60-years-ago-today-the-surface-to-air-missile-scored-the-first-ever-successful-shoot-down-of-an-aircraft/.

6.      History.com Editors. “U-2 Spy Incident.” History.com, A&E Television Networks, 9 Nov. 2009, www.history.com/topics/cold-war/u2-spy-incident.

7.      Carlson, Mark. “Operation Spring High: Thuds vs. SAMs.” HistoryNet, HistoryNet LLC, 23 Oct. 2019, www.historynet.com/operation-spring-high-thuds-vs-sams.htm

8.      National Intelligence Estimate, Number 11-3-67: Soviet Strategic Air and Missile Defence, CIA, 1967, pp. 9–10. Declassified October 2005.

9.      Correll, John T. “Take It Down! The Wild Weasels in Vietnam.” Air Force Magazine, Air Force Association, 1 July 2010, www.airforcemag.com/article/0710weasels/.

10.   Freed, David. “The Missile Men of North Vietnam.” Air & Space Magazine, Smithsonian Institution, Dec. 2014, www.airspacemag.com/military-aviation/missile-men-north-vietnam-180953375

11.   IPS Correspondents. “BOSNIA-HERCEGOVINA: U.N. Pledges Support For Bangladeshis in Bihac.” BOSNIA-HERCEGOVINA: U.N. Pledges Support For Bangladeshis in Bihac | Inter Press Service, Inter-Press Service, 17 Nov. 1994, www.ipsnews.net/1994/11/bosnia-hercegovina-un-pledges-support-for-bangladeshis-in-bihac/.

12.   Tillman, Barrett. “SAM SA-2: The Aviator's Real Enemy.” Flightjournal.com, Dec. 2014, www.flightjournal.com/wp-content/uploads/2016/06/SAM-SA-2.pdf.

13.   Broughton, Jack, and Hanson W. Baldwin. Thud Ridge. Crécy, 2006.

14.   Werrell, Kenneth P. Archie, Flak, AAA and SAM: a Short Operational History of Ground-Based Air Defense. Air University Press, 2005.


[1] https://fas.org/nuke/guide/russia/airdef/v-75.htm

[2] https://www.armyrecognition.com/russia_russian_missile_system_vehicle_uk/sa-2_guideline_s-75_dvina_desna_volchov_ground_air_missile_system_technical_data_sheet_specification.html


[3] http://www.ausairpower.net/APA-Rus-SAM-Site-Configs-A.html

[4] http://www.ausairpower.net/APA-Rus-SAM-Site-Configs-A.html

[5] https://theaviationgeekclub.com/60-years-ago-today-the-surface-to-air-missile-scored-the-first-ever-successful-shoot-down-of-an-aircraft/

[6] https://www.history.com/topics/cold-war/u2-spy-incident

[7] https://www.history.com/topics/cold-war/u2-spy-incident

[8] P.9, National Intelligence Estimate Number 11-3-67: “Soviet Strategic Air and Missile Defense.” CIA, 9 November 1967. Declassified October 2005.

[9] https://www.airspacemag.com/military-aviation/missile-men-north-vietnam-180953375/?page=1

[10] https://www.historynet.com/operation-spring-high-thuds-vs-sams.htm

[11] https://www.historynet.com/operation-spring-high-thuds-vs-sams.htm

[12] P.108- Archie, Flak, AAA, and SAM: A Short Operational History of Ground-Based Air Defense.

[13] https://www.historynet.com/operation-spring-high-thuds-vs-sams.htm

[14] https://www.airspacemag.com/military-aviation/missile-men-north-vietnam-180953375/?page=2

[15] https://www.historynet.com/operation-spring-high-thuds-vs-sams.htm

[16] P.107- Archie, Flak, AAA, and SAM: A Short Operational History of Ground-Based Air Defense.

[17] https://www.airspacemag.com/military-aviation/missile-men-north-vietnam-180953375/?page=2

[18] P.102- Thud Ridge

[19] “SAM SA-2: The Aviator’s Real Enemy”, p.56

[20] P.107- Archie, Flak, AAA and SAM: A Short Operational History of Ground-Based Air Defense

[21] https://www.airspacemag.com/military-aviation/missile-men-north-vietnam-180953375/?page=3