
An Alsatian Hellscape: The Battle of Hatten-Rittershoffen
/
In January 1945, amidst the smoldering ruins of two Alsatian villages, the US VI Corps fought the German XXXIX Panzer Corps to a standstill during Operation Nordwind. The Battle of Hatten-Rittershoffen, described by Americans and Germans alike as a hellacious fight, became one of the last major tank battles along the Western Front.
By Seth Marshall
In mid-December, the Wehrmacht had launched Operation Wacht am Rhein, cutting deep into Allied lines in Belgium. It would be this battle which drew public attention during the winter of 1944-45, and is frequently referred to in some circles as “Hitler’s Last Gamble.” However, in January 1945 the Germans launched another offensive into Alsace; unlike the Ardennes Offensive, the objective of this offensive was the destruction of Allied forces- in this case, the US Seventh Army and French 1st Army. Called Operation Nordwind, this armored thrust drove into the Alsatian plains, threatening to break through the Vosges Mountains to the rear of the Seventh Army. In the second week of January, Nordwind came to two small towns situated less than a mile apart- Hatten and Rittershoffen. For nearly two weeks, armored units from the US Sixth Corps and German XXXIX Panzer Corps fought each other here with such ferocity that even some of the most seasoned German veterans would have reason to later say that it had been the most difficult battle of their careers.
Even as the Battle of the Bulge dragged on, the German High Command was planning another major effort further to the south. Plans for new offensive were finalized during the last week of December 1944. Initially, the German High Command had planned to send Army Group G’s 1st Army into the Low Voges Mountains with two corps as the main effort; a third corps would be used in supporting attacks west of the mountains. However, a series of modifications beginning with Hitler altered the plans; originally the 21st Panzer Division was slated for use in the main attack. Now, along with the 25th Panzergrenadier Division, it formed an operational reserve.[1] Further modifications to Nordwind were made at the operational command level. The overall commander of Nordwind was Generaloberst Johannes Blaskowitz. Born in 1883 in East Prussia, Blaskowitz had commanded an army during the invasion of Poland. After complaining of atrocities committed in that country, he was sidelined to an occupational command in France during the years prior to D-Day. After skillfully conducting a defense against Allied forces following the invasion of southern France in August 1944, Blaskowitz had been relieved of his command in September 1944 after refusing to engage in what he believed to be a futile attack against the US Third Army. He was reinstated to his old command in December.[2]

Generaloberst Johannes Blaskowitz, the German commander of Operation Nordwind. Photo source: Wikipedia.

The opening of the Nordwind offensive on December 31, 1944, preceded by a large artillery bombardment. Illustration by Vincent Mai.
Blaskowitz’s final plan called for the retention of two panzer divisions as an operational reserve to exploit any success in breaking through American defenses in the Saare River valley or in the vicinity of Bitche. On December 31, Nordwind was launched. Unlike in the Ardennes, Nordwind was not met with immediate success. Lieutenant General Alexander Patch, commanding the US Seventh Army, had anticipated a German offensive in the area and accordingly had made defensive arrangements.[3] In several places, the Nordwind offensive bogged down quickly in the face of determined resistance. In the wake of this sturdy defense, Blaskowitz shifted the main effort of his attack. He called upon his reserve force, the 21st Panzer Division and 25th Panzergrenadier Division, to attack from the northeast and break through the old Maginot Line defenses north of Haguenau Forest.[4] Both of these units were not fully up to strength. 21st Panzer, commanded by Generalleutnant Edward Feuchtinger, possessed more than 70 tanks and tank destroyers, but had less than half of its authorized halftracks and personnel carriers. The 25th Panzergrenadier Division had similar problems, with just over 20 tanks, tank destroyers, and assault guns making up its depleted armor formations; however, it still possessed over 130 halftracks, which made it a potent mechanized force.[5]
American defenses in this region were a mix of combat veterans and newly-arrived forces. The US Sixth Corps, commanded by Major General Edward Brooks, was made up 42nd, 45th, 70th, and 79th Infantry Divisions. Elements of the 42nd, 70th Infantry, and 14th Armored Divisions had been organized into three task forces to better suit local defensive purposes. In the face of Blaskowitz’s armored thrust, Task Force Linden, made up of green troops from the 42nd Infantry Division, was forced to withdraw to new positions to west. American units were now roughly aligned along the old Maginot Line fortifications running through northern Alsace. In Hatten, the 1st Battalion of the 242nd Infantry Regiment, 42nd Infantry Division established itself in defensive positions. Just two kilometers north, 3/313th Infantry Regiment of the 79th Infantry Division situated itself in Oberroedern.[6] Both of these towns had several major pillboxes and casemates which were occupied by the Americans for use as defensive strongpoints. To complicate matters for the Germans, minefields and barbed wire were emplaced along avenues of approach to slow the tanks and dismounted Landsers.
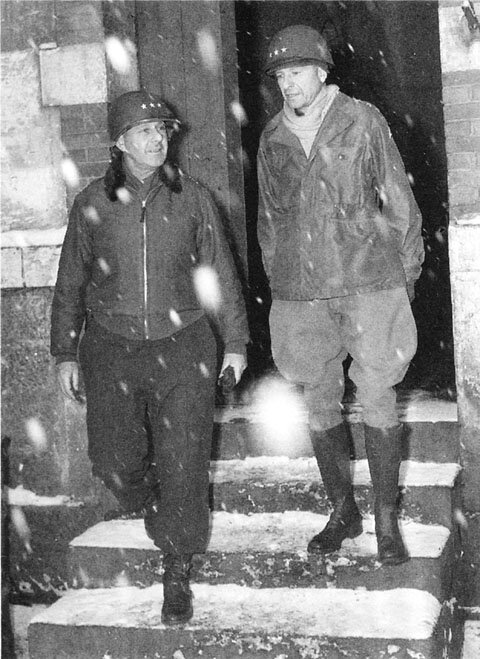
Lieutenant Generals Alexander Patch (left), commander of the US Seventh Army, and Jacob Devers (right), commander of the US Sixth Army Group. Photo source: WIkipedia.

A view of the town square in Hatten before the war.

A postcard from Rittershoffen from before the war.
The German attack commenced in the early hours of January 6th. Slowed by weather conditions and minefields, the push toward the Vosges was delayed until the following day. By January 8th, the 21st Panzer Division had broken through the Maginot Line north of Oberroedern. Turning south, Blaskowitz intended his forces to widen the gap created in the Maginot Line at Hatten, then move east through Rittershoffen and began moving south through the Haguenau Forest. This move would cut off any remaining US forces north of the Haguenau Forest.[7] On the American side, General Brooks, realizing the danger that this German armored force posed, immediately began moving reinforcements towards Hatten. His intent was to assemble and then move the entire 14th Armored Division into the area. The 14th Armored Division, commanded by Major General Albert Smith, was spread across much of northern Alsace; it would take time for the Division to pull itself back together and move as one unit.
In the early hours of January 9th, the German attack began on Hatten. German infantry crept up to a Maginot pillbox and found the Americans inside asleep- the entire crew was captured before shooting erupted all along the edge of Hatten.[8] German tanks and assault guns began moving north around Hatten, trying to cut off the village. Several pillboxes, still being held by GIs, were isolated by the fast-moving German armor. In an effort to restore his lines, the 1/242’s commander, Lieutenant Colonel Rusteberg, committed his reserve company to the fight- he succeeded in stabilizing his perimeter, but it cost C Company all of its officers.[9] In the northern portion of Hatten, B/1/242 found itself under attack by 18 tanks and 20 personnel carriers by late morning. With the tanks using direct fire and flamethrowers to burn the GIs out of their fortifications, B Company’s commander was forced to surrender.[10] By noon, parts of Hatten were under German control; fighting became desperate as cooks and headquarters personnel from 1/242 were sent to man machine guns and rifle positions. Anti-tank mines placed in the streets slowed the progress of the German tanks. When the battalion command post was forced to relocate, PFC Vito Bertoldo, a cook with the headquarters unit, took control of a machine gun and held off the attacking German infantry long enough for the CP to reestablish elsewhere. Bertoldo, concussed from receiving direct tank fire on his position, survived and was later awarded the Medal of Honor for his defense.[11]
Two platoons of Shermans from A Company, 48th Tank Battalion, a subordinate unit of the 14th Armored, rushed into Rittershoffen in the early afternoon to provide the 2-242nd with badly-needed armor support.[12] Taking up defensive positions on the northeastern and southeastern edges of town, the tankers in the north were not in position long before a group of sixteen German tanks were seen moving west from Hatten towards Rittershoffen. Waiting until the lead tank closed to 600 yards, platoon leader LT Edgar Woodard opened fire and knocked the Panzer IV out. The other three tanks in his platoon also fired- within minutes, six German tanks were knocked out. The remainder withdrew. Later in the day, the same platoon destroyed four knocked-out enemy tanks which the Germans were trying to recover. The platoon also claimed destruction of a personnel carrier and motorcycle. For these actions, the platoon would be awarded a Presidential Unit Citation.[13][14]
Further American reinforcements were on the way. Later on the 9th, elements of the 813th Tank Destroyer Battalion, operating M-10 tank destroyers, and the 827th Tank Destroyer Battalion, an African-American unit operating M-18 tank destroyers, began arriving in both towns. Several of the 813th’s M-10s were immediately relocated to Hatten to reinforce the small perimeter which 1/242 still held.[15] By nightfall, the Germans had occupied about two-thirds of Hatten, leaving the Americans with the southwestern portion of the village. Most of the tank destroyers were moved back to Rittershoffen during the night hours.
The following morning, two battalions of infantry from the 315th Infantry Regiment, 79th Infantry Division attacked with elements of 2/242 towards Hatten. This attack ground to a halt when it ran into a German force of five tanks and two companies of infantry- two US tank destroyers were knocked out, while the infantry withdrew to Rittershoffen.[16] 2/315, commanded by Lieutenant Colonel Earl Holton, was able to move into southeastern Hatten, where it was to relieve the 1/242. It was just as well- that battalion had taken serious losses. Reinforcing the 2/315th in Hatten was a company of M-18s from the 827th. One platoon led by 2LT Robert Jones knocked out three German tanks on the 10th, then held their ground for the next seven days, firing on any enemy armor that tried to approach the village on the main roads leading into southwestern Hatten. Jones found a disabled M-10 tank destroyer on one Hatten street whose gun still functioned- he put several crewmen in this vehicle and put it to use as well.[17] The remainder of his company was not as successful- three M-18s were knocked out or destroyed, with fifteen men missing on January 10th alone.[18]

A Panther tank of the 25th Panzer-Grenadier Division moves through Dragon’s Teeth during the Nordwind offensive. Photo source: Bundesarchiv.

A line of Panthers move through Haguenau Forest during Nordwind. Photo source: Bundesarchiv.
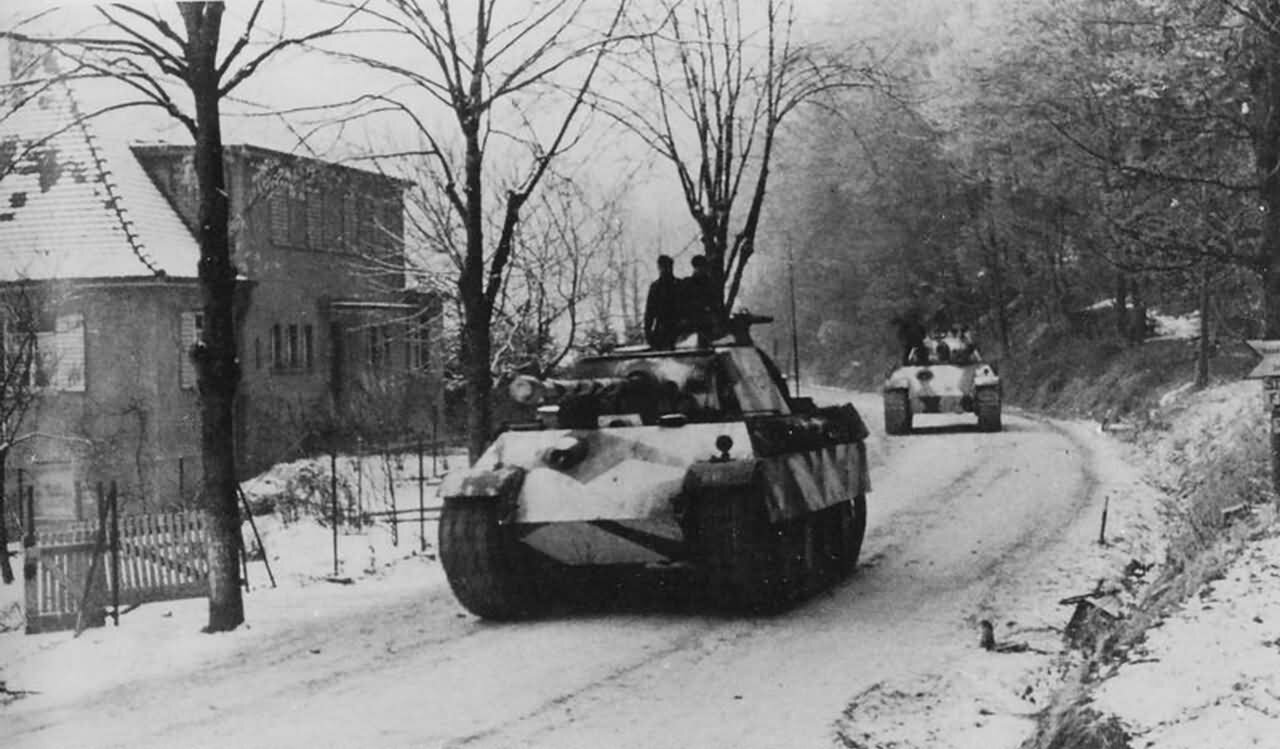
Another photo of Panthers moving through the Haguenau Forest. The zig-zag pattern seems to have been used exclusively during the Nordwind offensive. Photo source: Bundesarchiv.

Several US Shermans from the 48th Tank Battalion are seen maneuvering towards Hatten in this photo taken from the church tower in Rittershoffen. The smoke in the background is from burning German tanks, hit by tank or artillery fire. Photo source: NARA.
Fierce fighting continued the following day- a German counterattack in the morning hit particularly hard. Preceded by a bombardment, tanks and artillery attacked towards Rittershoffen. C/48th Tank BN lost four tanks with another two hit- 8 of its men were killed.[19] The tanks pressed their attack, breaking through the lines of I Company, 3/315th and cutting off several of its positions located in Maginot fortifications. Many of 2/242’s men remained in the town and received orders to withdraw towards Kuhlendorf in the west, even as German tanks rolled through the streets of Rittershoffen.[20] With the help of the 827th’s tank destoyers, the Germans were prevented from completely overrunning the town- the M-18s claimed the destruction of four tanks.[21] Without additional reinforcements however, both battalions were likely to be overrun.
After a lengthy process of assembling its subordinate battalions, Brooks’ 14th Armored Division was ready for a counterattack by the morning of January 12th. Brooks ordered his forces to conduct a two-pronged attack. Combat Command A (CCA), built around the 48th Tank Battalion and 68th Armored Infantry Battalion would attack to take back Rittershoffen. CCB, with its 25th Tank Battalion and 62nd Armored Infantry Battalion would attempt to seize and hold Hatten until relieved by additional infantry units from the 79th ID. CCR, with the 47th Tank Battalion and 19th Armored Infantry Battalion, were held in reserve.[22] After a fifteen-minute artillery bombardment, the attack began the following morning at 0750. However, despite support of the 48th’s Shermans, CCA was unable to advance further than the southern edge of Rittershoffen. The tanks and halftracks of CCA met heavy artillery, tank and small arms fire which was particularly heavy around the church in the eastern portion of town. However, the 68th AIB made contact with elements of the 3/315th in town and cleared several houses and buildings in the western end of Rittershoffen. CCB fared worse north of Rittershoffen- C/47th Tank Battalion lost two tanks as it advanced across the rolling plains and also encountered heavy anti-tank fire. The 62nd’s infantry dismounted from their halftracks and dug in under fire along the Rittershoffen-Leiterswiller road- the battalion’s commander was wounded during the attack. With the apparent failure of the armor to gain a foothold in the towns, the tanks withdrew for the night to resupply in Hohwiller.[23] Inside Rittershoffen, the 813th’s tank destroyers reported that ten German tanks had been operating around the village, including one Mark IV tank emplaced at the church.[24]
The following day, the Americans launched another attack. This time, CCB provided support by fires with its tanks, while CCR was tasked with securing Hatten. CCA was also augmented with 3/315th, and attacked towards Rittershoffen. Another artillery bombardment preceded the attack, with smoke being laid on the southern edge of Hatten. CCA made good progress, advancing into Hatten until one tank was knocked out by German fire from the church, which was still a strongpoint.[25] CCR was able to advance into Hatten a link up with 2/315th and several survivors from 1/242 who had refused the order to withdraw and remained in the town. However, the armored vehicles pulled back from the town in the afternoon. General Smith then ordered a second attack in the evening. This time, the Americans changed tactics. Colonel Daniel Hudelson, the commander of CCR, formed one light tank company of Stuarts from the 94th Cavalry Reconnaissance Squadron and two companies of Shermans from the 47th Tank BN into one column. The 12 light tanks and 23 medium tanks were then loaded up with infantry from the 19th AIB, and moved swiftly without a preceding artillery bombardment. Meeting little resistance on the way in, the tanks dropped their infantry inside the town- most of the armor then withdrew, leaving behind a platoon to assist the infantry. Meanwhile, the infantry was engaged in house-to-house fighting. By midnight, when the attack finally petered out, the Americans had retaken three-fourths of the town- they had discovered 91 dead Germans in the houses they captured. While no tanks were lost by the column during its movement, three Shermans were lost inside Hatten and were replaced.[26] CCB had tried to carry out its own small attacks during the day, but had paid for it with three tanks.[27] Late on the 13th, the Germans launched a counterattack of their own, supported by flame-throwing tanks, and recaptured most of the parts of Hatten that the Americans had taken earlier in the day. However, the Germans lost at least three of their own tanks in the process. The Germans also lost 158 men as prisoners to the GIs.[28][29][30]
The American attacks on the 13th would be the last major coordinated attack that the Americans mounted in the area. For the next week, vicious small-unit attacks would surge back and forth through both villages, gradually reducing both to furiously burning piles of rubble. The infantry from the 315th reported firing mortars at “impossible” ranges of 75 to 150 yards, and firing 40 rounds of bazooka rockets in five minutes.[31] It was not uncommon for GIs to occupy the upstairs of a building while German soldiers were in the cellar, and vice versa.[32] For the civilians from both villages who were caught in the middle, it was worse. Major Hans von Luck, commanding one of the panzer units, would later write that Rittershoffen “… became a phantom village… Almost all the buildings, including the church… were in ruins. Many of the houses were on fire and lit up the scene at night. The dead lay about the streets, among them many civilians. We couldn’t recover their bodies, since the enemy here was no more than 15 or 20 yards away. The cows bellowed in their stalls, unattended; the cadavers of animals stank and infected the air.”[33] Tanks and tank destroyers were frequently used for direct fire on buildings. On the 14th, in an attempt to reduce the church strongpoint in Rittershoffen, five Shermans were attached to 3/315 to provide fire support, along with a self-propelled 155mm gun which fired directly into the church. The SPG had to withdraw after a time owing to anti-tank fire.[34] A second attempt the following day met with similar results.[35][36]
On the 15th, the Germans launched several small counterattacks to retake Hatten. Richard Engler, a veteran of the 79th ID, described the kind of fighting which took place:
“Now they seemed intent on burning Hatten to the ground. Tanks hammered holes through houses with machine guns and cannon, then flame throwers spurted fire through the apertures while tracers from the tank and infantry guns set fire to the hay in barns. By afternoon, there was little cover- houses or other structures- left beyond “the bend” where the Americans continued to hold…”[37]
Another after-action report described a typical tank engagement inside the towns:
“A German tank would move up a wreck-strewn street, climbing over the piles of rock and timbers; and an American tank would move to meet it. The German tank would stop just short of a curve and the American would wait, just around the corner. And so they would sit. They would try to move to get a shot without being hit- blow holes with HE through the walls of houses to fire through. And then the other would maneuver out of the way.”[38]
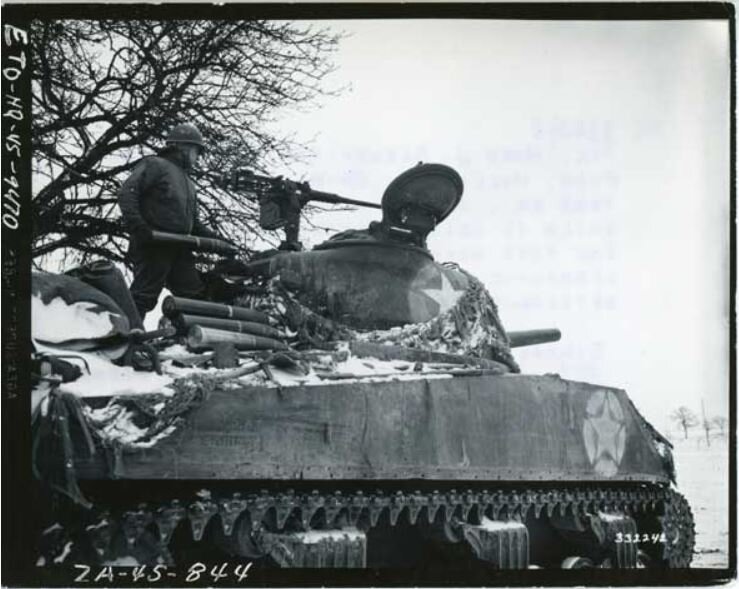
In this picture taken on January 20th, PFC Hugo Scearpitti loads ammunition into a Sherman with the 48th Tank Battalion. Photo source: NARA.
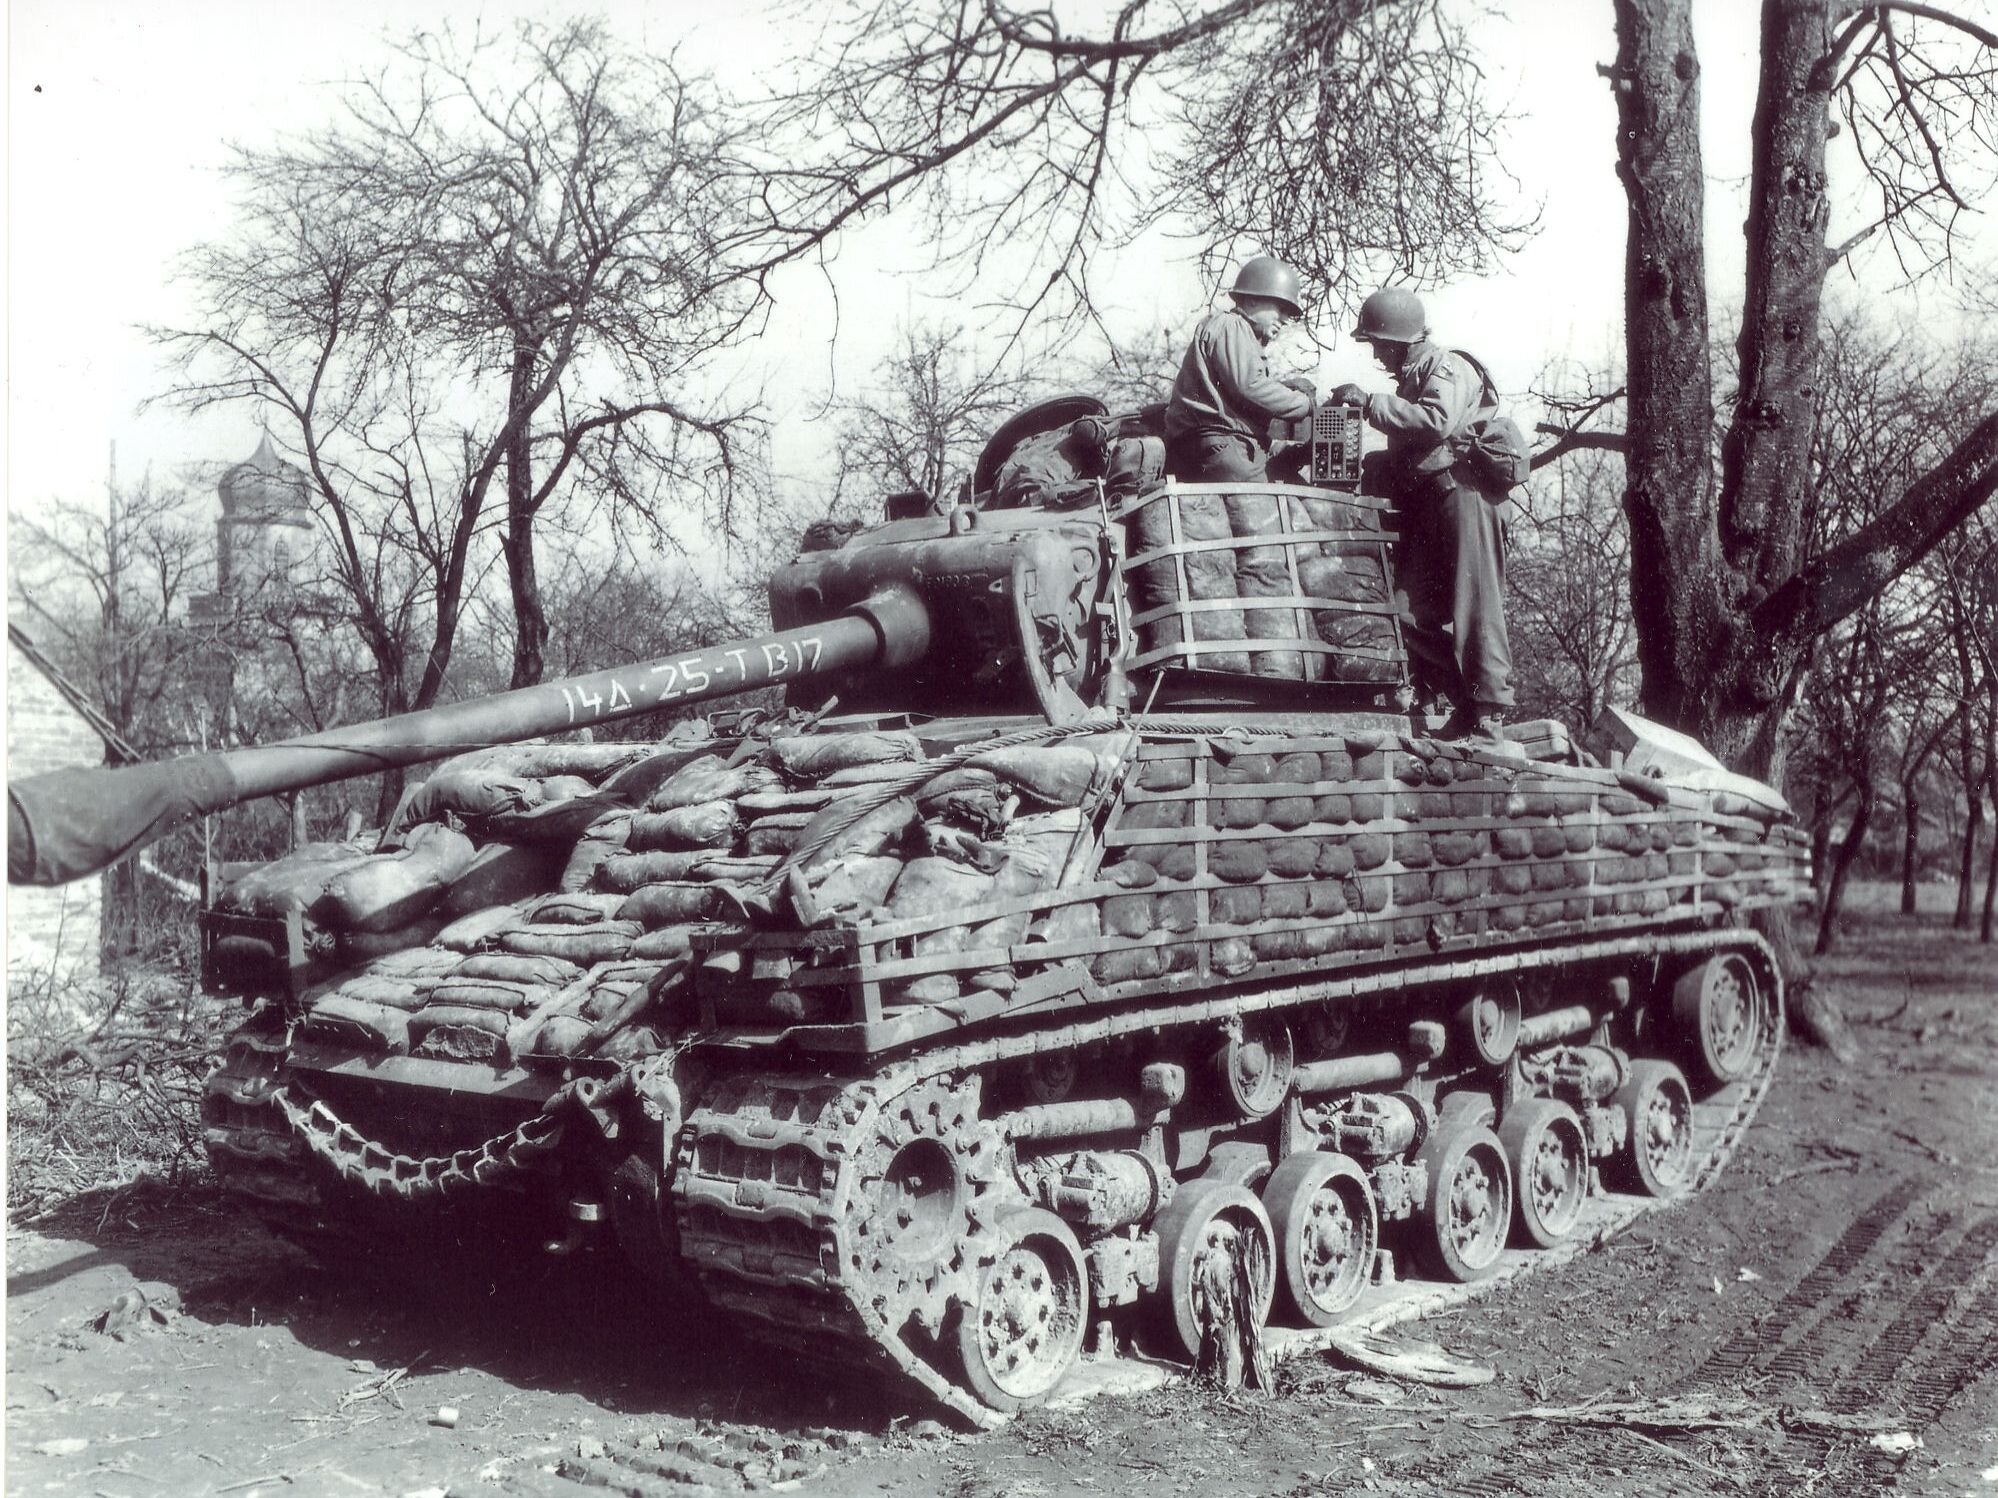
This M4A376W is assigned to B Company, 25th Tank Battalion, 14th Armored Division. As was common with many tanks in this division, the crew have outfitted the tank with sandbag armor. While it is possible that this might have had some effectiveness against portable HEAT weapons like Panzerfausts, it would have provided little protection against tank or anti-tank gun fire, and it would have added a substantial amount of weight to the tank. Photo source: NARA.
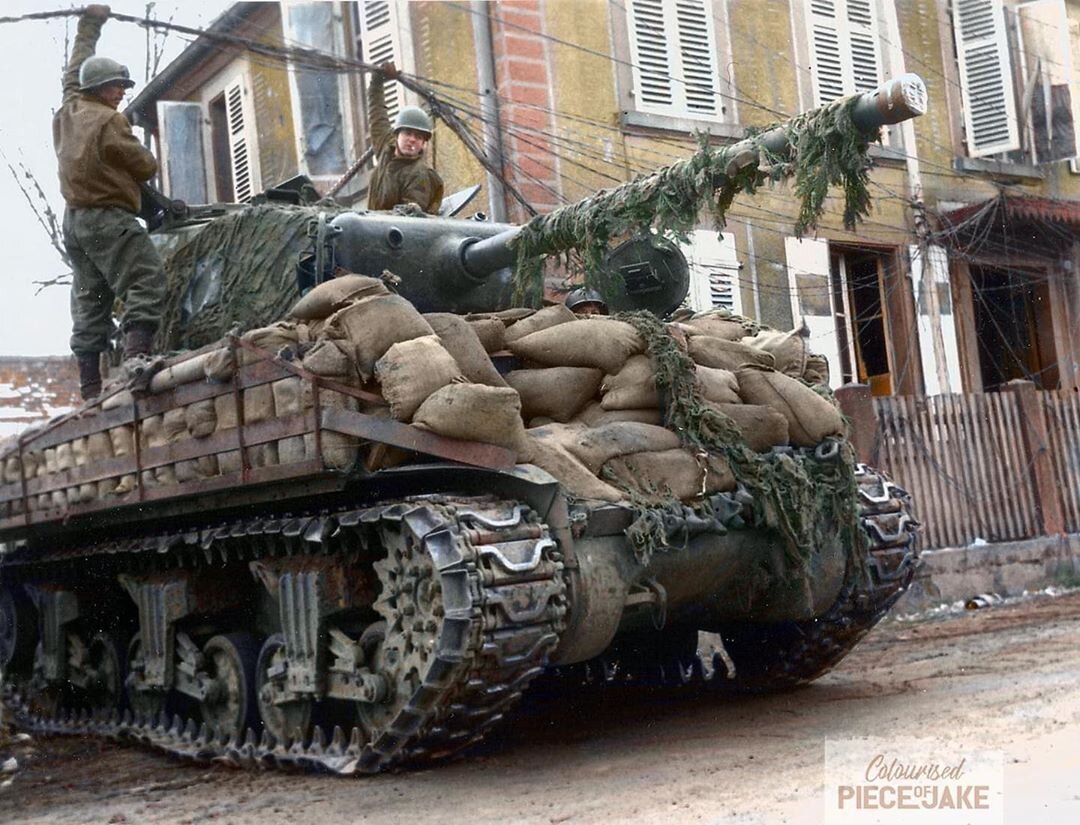
Another M4A376W Sherman of the 14th Armored Division equipped with sandbag armor. The crew is lifting telephone cables over the turret while tank maneuvers into the town of Niederbetschdorf in early 1945. Original photo source: NARA, colorized by Piece of Jake.

A Flammpanzer 38(t), an infantry-support version of the Jagdpanzer 38(t), also known as the Hetzer. Flamm Panzer Kompanie was equipped with about 20 of these armored vehicles during the fighting for Hatten and Rittershoffen. Photo source: NARA.

In this illustration, German Panzer-Grenadiers are supported in their attacks on Maginot bunkers by Flamm-Panzers on January 9th. These vehicles were capable of firing some 60-70 flame bursts at up to 50m, making them effective vehicles to take on the bunkers. However, half of these vehicles were lost in the fighting. Illustration by Jim Laurier.
Anti-tank fire and artillery concentrations were frequently used to break up the German attacks. The artillery observers with the infantry units became adept at adjusting fire to within 35-50 yards of American positions.[39] The German counterattacks on the 15th were broken up. As the Germans also had the villages under artillery fire, the wounded could not be evacuated by foot. Expedient aid stations were set up in cellars- a Stuart from the 94th Cavalry Reconnaissance Squadron made 13 trips back and forth from the villages, carrying loads of wounded back to the relative safety of Haguenau Forest.[40]
By now, fighting had been raging around Hatten and Rittershoffen for nearly a week. Instead of a quick capture by the German armored forces, both the 21st Panzer and 25th Panzergrenadier Divisions had become bogged down and taken heavy losses. Consequently, after the first several days of fighting, when it had become apparent that his attack had stalled, Blaskowitz asked for the release of several divisions which had been earmarked for Operation Zahnartzt, a cancelled offensive which had been intended to drive further into the Allied rear. Four divisions, including the 7th Parachute Division and 47th Volksgrenadier Division, were released to Blaskowitz. To the Hatten-Rittershoffen battlefield he committed the 20th Regiment of the 7th Parachute Division, along with the 104th Regiment of the 47th Volksgrenadiers Division. These reinforcements began arriving between January 15-16th. However, they did not decisively tip the advantage to the Germans.
January 15-16th saw the same kind of fighting as the previous two days, with the battle seesawing back and forth through the towns. Attrition from the fighting was taking its toll. The 827th Tank Destroyer Battalion recorded that two of its M-18s were destroyed by artillery during these days, and an officer wounded.[41] One tank company reported that both its first and second platoons had just one Sherman left apiece.[42] However, additional armor reinforcements were not forthcoming. Artillery fire would continue to pound the villages, and occasionally Me-262 jet fighters would swoop overhead to drop bombs and strafe ground targets. On the morning of the 17th, CCA made one last attempt to clear Rittershoffen with the support of 1/315th. Under cover of heavy snowfall, the attack began at 0730- some companies reached the village and initially had some success. Hans von Luck recorded that this attack captured a large number of battalion and regimental staff members. His unit then counterattacked, freeing the captured men and in turn capturing some 80 GIs. This was likely B/1/315, which was reported as first being cut off, then was reported missing almost in its entirety.[43][44]
Following this final major American attack, fighting finally began to taper off. The 18th was noted as a relatively quiet day in the villages, though the weather cleared enough for P-47 fighter-bombers to strafe German targets in the area. Late on January 19th, the Germans launched their own final attack. Preceded by a large bombardment, Von Luck recorded that this last attack: “Only in Hatten did the paratroops, supported by a few tanks, once again attack the brave 79th Infantry Division. The Americans defended themselves with guns, pistols, bazookas, and knives house by house, so that the attack had to be broken off.”[45] Even before this last attack was beaten off, General Brooks had made arrangements to pull the 14th Armored Division and the 315th Infantry Regiment back from Hatten and Rittershoffen. Losses among his units had been heavy, and supporting artillery units were running low on ammunition. Consequently, on the night of January 20th, under the cover of darkness the Americans began withdrawing from the battlefield. They were first pulled back to Kuhlendorf, then were pulled back to positions along the Moder River, which would allow them to shorten their lines and provided a better place to defend against the Germans. The Germans awoke the next day to silence- Alsatian villagers peeked out from under the ruins of their homes and began coming outside for the first time in days.
The battle had been costly for both sides. Total casualties remain unknown for both sides and can only be estimated. CCA’s casualties for the month of January included 41 killed, 202 wounded, and 29 missing- the 68th had absorbed the bulk of these casualties, with 160 total.[46] CCR took 362 casualties, including 26 killed.[47] The 242nd Infantry Regiment had suffered heavily as well. When 1/242 arrived in Hatten on January 9th, it had 33 officers and 748 enlisted men- just two days later, it could count only 11 officers and 253 enlisted men present for duty.[48] Given these casualty figures for CCA, CCR, and one battalion from the 242nd Infantry Regiment, it is reasonable to assume that total US casualties for the battle were likely around 1,500-1,700. German losses are also unknown, but a post-war paper written in 1950 estimates their losses at at least 3200 killed and wounded with an unknown number of prisoners.[49] Materiel losses were also heavy in the battle, though these again cannot be tallied with absolute certainty. When Hatten and Rittershoffen were recaptured by Allied forces in March 1945, the shattered and burned-out husks of 31 Shermans, 9 Stuart light tanks, 8 M3 halftracks, 51 German tanks and assault guns, and 12 German halftracks were found lying among streets and fields around the villages. Civilians from the two villages suffered greatly as well- both Hatten and Rittershoffen had 90% of their structures destroyed or damaged. It Hatten, 83 civilians were killed. Another 30 died in Rittershoffen.[50]
A few days following the end of the battle, Operation Nordwind was called to an end. Blaskowitz had committed all of his available reserves without achieving a decisive breakthrough. On the Eastern Front, the Red Army had launched the Vistula-Oder offensive- the remaining mechanized units which had not been utterly spent in Nordwind were now desperately needed to defend western Poland and Prussia. The operation was a failure, and would be the last time that a large offensive operation was mounted along the Western Front.
The Battle of Hatten-Rittershoffen could not in any seriousness be claimed as a tactical victory for either side. The Germans had been unable to breakthrough the American defenses, even during the opening phases when they had the advantage in armor and firepower. Likewise, the Americans had failed to retake either town even once an entire armored division, infantry regiment, and two tank destroyer battalions and their supporting artillery had arrived in the area. However, the Germans had suffered so greatly in terms of men and equipment that they had been forced to commit their reserves, intended for use elsewhere. Even these were not enough to crack the resolute American units holding their little corners of Hatten and Rittershoffen. This was an expenditure in men and equipment that the Germans could ill afford to replace at this juncture in the war. Viewed in this manner, the battle was an operational American victory. In any case, this terrible battle would prove one of the last large armored clashes along the Western Front, and was remembered on both sides- even among the most experienced Germans- as one of the most difficult fights of their careers.
Today, the scenery of both towns have changed significantly, along with that of neighboring towns. Since so much of Hatten and Rittershoffen were obliterated in the fighting, they had to be rebuilt following the end of the war. The buildings look decidedly postwar, and are generally the same slab-sided monochrome concrete structures which are common throughout Central Europe. Surrounding villages near Hatten and Rittershoffen were clearly similarly affected; three kilometers to the north in Stundwiller, which was captured early in the battle by the Germans and used to stage attacks but subjected to American artillery and air strikes, has been reconstructed in a like fashion. While most of the original buildings are long since gone along with the burned out husks of tanks and assault guns, numerous traces of the battle remain. Most of the Maginot Line bunkers remain in place; many continued to be used for a time by the French Army in the post-war era (in fact, a few ouvrages remain in use further to the northwest). The most prominent of these bunkers are two located in Hatten itself. A very large bunker on the southern edge of the village, known as Casemate D’Esch, was a strong point in the battle- it remains heavily cratered by tank and shell fire, with numerous parts showing exposed rebar. The inside of this bunker has been converted into a museum, which preserves both the original fittings of the fort, but also displays a large collection of artifacts recovered from the battlefield, along with numerous pictures from the period. Another large bunker is located just up the road, and has been converted into a museum called Musée de l'Abri de Hatten. This museum preserves nearly 30 underground rooms as they would have appeared in the late 1930s and early 1940s when the French occupied the fortification. A number of buildings have been built on the premises which contain vehicles, weapons, and other artifacts from the battle.
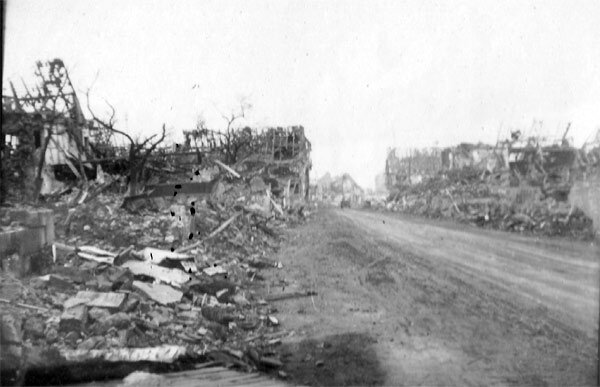
The ruins of one of the towns following the battle. Photo source: 14th Armored Division website.

Both Hatten and Rittershoffen were devastated in the battle, with nearly all buildings in the towns destroyed or damaged. Photo source: 14th Armored Division website.

This Sherman from the 48th Tank Division was hit repeatedly in Rittershoffen. Photo source: NARA.

A knocked-out Sherman in the ruins of Hatten. Photo source: 14th Armored Division website.

Another knocked-out Sherman. Photo source: History of the 21st Panzer Division.
A knocked-out Panzer IV in Hatten. Photo source: NARA.
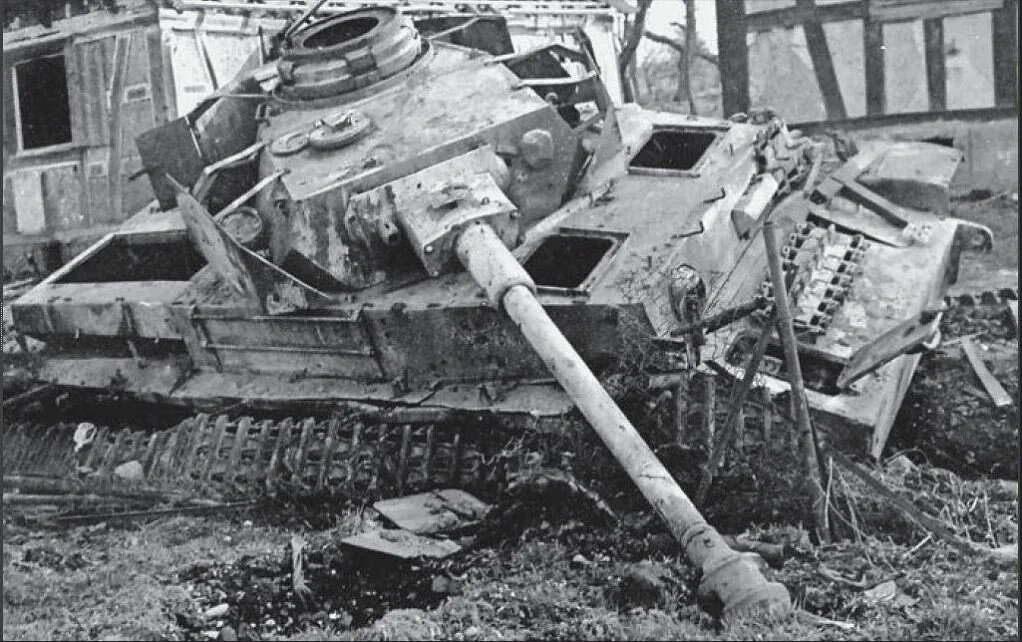
Another knocked-out Panzer IV in Hatten. Photo source: NARA.

A knocked-out Sherman and destroyed M-18 Hellcat tank destroyer, the second probably from the 827th Tank Destroyer Battalion, in Rittershoffen after the battle. Photo source: NARA.

Another knocked-out Sherman, seen in Hatten. Photo source: 14th Armored Division website.

In this dramatic photo from the 14th Armored Division’s scrapbook, a burned-out Sherman faces a knocked-out Panther, likely in the fields outside the villages. Photo source: 14th Armored Division scrapbook.

Hatten’s church after the end of the battle- this was used as a hardpoint by the Germans during the fighting- at one point, the Americans brought up a self-propelled 155mm gun to fire directly into the church. Photo source: 14th Armored Division website.

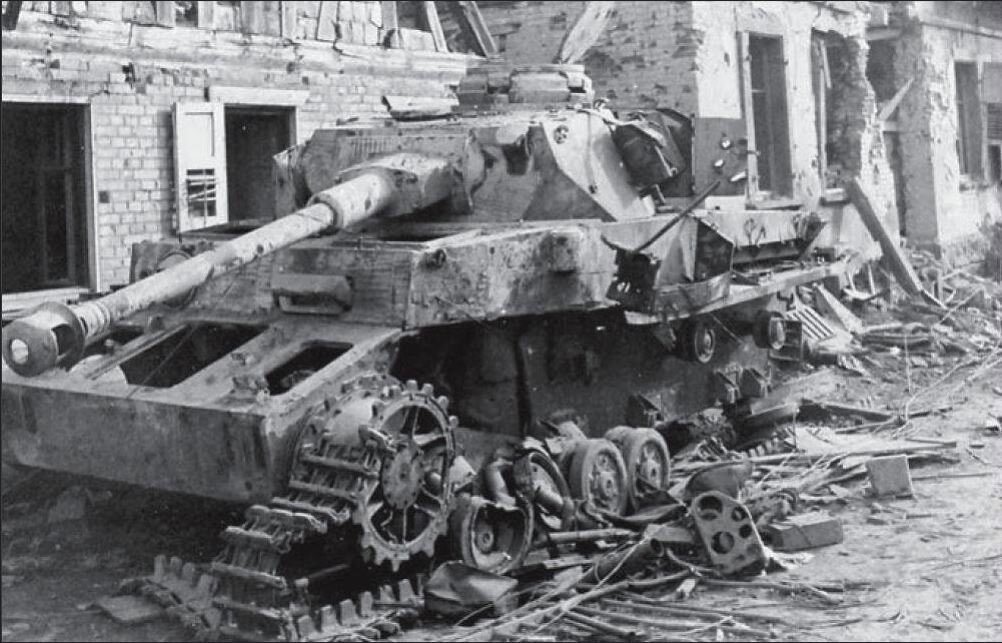
This knocked-out Panzer IV of the 21st Panzer Division was pictured months after the battle, during the spring of 1945, after the region was retaken by Allied forces. Photo: Panzerwaffe on the Battlefield, Vol. III.
[1] P.495- Riviera to the Rhine
[2] https://www.dhm.de/lemo/biografie/johannes-blaskowitz
[3] P.501-504- Riviera to the Rhine
[4] P.59- Operation Nordwind, 1945
[5] P.35- Operation Nordwind, 1945
[6] P.59- Operation Nordwind, 1945
[7] P.229- Panzer Commander
[8] P.229- Panzer Commander
[9] P.147- The Final Crisis
[10] P.21- 42nd Infantry Division- A Combat History of World War II
[11] P.21- 42nd Infantry Division- A Combat History of World War II
[12] P.139- History of the 14th Armored Division
[13] P.137-138- History of the 14th Armored Division
[14] P.4- After-Action Report: 48th Tank Battalion
[15] P.1- 827th Tank Destroyer Battalion, Unit History for January 1945
[16] P.162- The Final Crisis
[17] P.164- The Final Crisis
[18] P.1- 827th Tank Destroyer Battalion, Unit History for January 1945
[19] P.168- The Final Crisis
[20] P.169- The Final Crisis
[21] P.2- 827th Tank Destroyer Battalion, Unit History for January 1945
[22] P.11- 14th Armored Division in the Battle of Hatten-Rittershoffen
[23] P.24-26- 14th Armored Division in the Battle of Hatten-Rittershoffen
[24] P.10- 813th Tank Destroyer Battalion, Action Against Enemy
[25] P.31-32- 14th Armored Division in the Battle of Hatten-Rittershoffen
[26] P.34- 14th Armored Division in the Battle of Hatten-Rittershoffen
[27] P.35- 14th Armored Division in the Battle of Hatten-Rittershoffen
[28] P.36- 14th Armored Division in the Battle of Hatten-Rittershoffen
[29] P.101- The Cross of Lorraine- the Combat History of the 79th Infantry Division
[30] P.1- VI Corps Artillery, Daily Periodic Report #128
[31] P.108- The Cross of Lorraine- the Combat History of the 79th Infantry Division
[32] P.231- Panzer Commander
[33] P.232-233- Panzer COmmander
[34] P.40- After Action Report- 47th Tank Battalion, 14th Armored Division
[35] P.2- VI Corps Artillery, Daily Periodic Report #128
[36] P.2- VI Corps Artillery, Daily Periodic Report #129
[37] P.195- The Final Crisis
[38] P.6- After Action Report- 47th Tank Battalion
[39] P.39-40- Combat History of the 19th Armored Infantry Battalion
[40] P.149- History of the 14th Armored Division
[41] P.2- 827th Tank Destroyer Battalion, Unit History for January 1945
[42] P.152- History of the 14th Armored Division
[43] P.42-14th Armored Division in the Battle of Hatten-Rittershoffen
[44] P.234- Panzer Commander
[45] P.235- Panzer Commander
[46] P.42-43- 14th Armored Division in the Battle of Hatten-Rittershoffen
[47] P.45- 14th Armored Division in the Battle of Hatten-Rittershoffen
[48] P.23- 42nd Infantry Division- A Combat History of World War II
[49] P.42 & 45- 14th Armored Division in the Battle of Hatten-Rittershoffen
[50] P.187- The Final Crisis
Sources
1. Clarke, Jeffrey J., and Robert Ross. Smith. Riviera to the Rhine. Center of Military History, US Army, 1993.
2. Lang, Heinke. “Johannes Blaskowitz.” Lebendiges Museum Online, Deutsches Historisches Museum, 14 Sept. 2014, www.dhm.de/lemo/biografie/johannes-blaskowitz.
3. Zaloga, Steve, and Jim Laurier. Operation Nordwind 1945: Hitler's Last Offensive in the West. Vol. 223, Osprey, 2010.
4. Luck, Hans von. Panzer Commander: the Memoirs of Hans Von Luck. Dell Publishing, 1989.
5. Engler, Richard E. The Final Crisis: the Combat in Northern Alsace, January 1945. Aberjona Press, 2001.
6. Carter, Joseph. The History of the 14th Armored Division. Albert Love Enterprises Publishers, 1945.
7. After Action Report: 48th Tank Battalion, 14th Armored Division, EVO 44 thru APR 45. US Army, 1945, pp. 1–50, After Action Report: 48th Tank Battalion, 14th Armored Division, EVO 44 thru APR 45. Declassified June 1959.
8. 827th Tank Destroyer Battalion Unit History, January 1945. Headquarters, 827th Tank Destroyer Battalion, February 1945, pp. 1–24, 827th Tank Destroyer Battalion Unit History, January 1945.
9. 813th Tank Destroyer Battalion After Action Reports, January 1945. Headquarters, 813th Tank Destroyer Battalion, 1945, pp. 1–19, 813th Tank Destroyer Battalion After Action Reports, January 1945.
10. Committee 1, Armored Officers Advanced Course. The Armored Division in the Defense: 14th Armored Division in the Battle of Hatten-Rittershoffen, 12-20 January 1945. Fort Knox, The Armored School, 1950, pp. 1–100.
11. Daily Periodic Report #128. Headquarters VI Corps Artillery, 1945, pp. 1–3.
12. Daily Periodic Report #129. Headquarters VI Corps Artillery, 1945, pp. 1–3.
13. Carter, Joseph. After Action Report: 47th Tank Battalion, 14th Armored Division, Dec 44 thru May 45. Headquarters Company, 47th Tank Battalion, 1945, pp. 1–67, After Action Report: 47th Tank Battalion, 14th Armored Division, Dec 44 thru May 45.
14. Daly, Hugh. 42nd "Rainbow" Infantry Division: A Combat History of World War II. US Army, 1945.
15. Dickinson, Walter. Combat History of the 19th Armored Infantry Battalion. J.G. Weiss, 1945, pp. 1–120.
16. The Cross of Lorraine: a Combat History of the 79th Infantry Division, June 1942-December 1945. Army & Navy Publishing Company, 1946.