Hilfskreuzer!
/
Kormoran, seen during her cruise from another German ship, 1940-1941. Source: Wikipedia.
During the Second World War, the German Kriegsmarine mounted a large-scale campaign aimed at the destruction of Allied commerce. Today, this campaign is primarily remembered for its extensive use of U-Boats and even a few surface warships. However, a small number of cargo ships converted to auxiliary cruisers managed to cause an impact that far outweighed their cost.
By Seth Marshall
The Second World War in the Atlantic is frequently remembered for the use of hundreds of German submarines, resulting in numerous Allied counter-measures, including convoys, escort ships, sonar, anti-submarine patrol aircraft, and more. Additionally, German surface combatants, such as the Scharnhorst and Gneisenau, are similarly recalled for their occasional forays into the Atlantic to harass shipping. However, the Kriegsmarine utilized a third form of anti-commerce warship that has received far less attention: auxiliary cruisers.
Auxiliary cruisers were former cargo ships that had been converted to serve as warships. The Kriegsmarine’s intention with these ships was multi-faceted: it was hoped that in addition to sinking or capturing merchant ships, it was hoped that they would instill some measure of chaos in the scheduling of merchant shipping as well as spread out British naval forces even more than they already were.[1] Aided through resupply rendezvous with supply ships and submarines around the world, the auxiliary cruisers frequently mounted cruisers that lasted for over a year. The cruisers came from several different types of ships. The first group of auxiliary cruisers, known to the Kriegsmarine as Hilfkreuzers, were made up of two ship types. The Atlantis, Pinguin, and Thor had previously been modern diesel freighters, capable of very long ranges. The Pinguin, previously known as the Kandelfels, was a 7,766-ton freighter launched in 1936 and operated by the Deutsche Dampfshiffahrts Gesellschaft (Hansa) line.[2] The second group, the Orion and Widder, had served with the Hamburg-Amerika Line as the Kurmark and Neumark. Both of these ships were outfitted with boiler-turbine engines that were not considered the most reliable.[3]
After purchase by the Kriegsmarine, the ships were equipped with six 150mm guns taken from outdated dreadnought-type battleships, two to six torpedo tubes mounted at deck level, four to six 37mm dual-purpose anti-aircraft guns, one 75mm gun, and dozens of mines to disrupt shipping lanes. These weapons were hidden behind fake hull plates and cargo, and were camouflaged in order to conceal their identity. All of the cruisers also carried at least one floatplane, usually either a Heinkel He-114 or Arado Ar-196. To maximize the ships’ value, the cruisers also carried spare torpedoes and mines to resupply U-Boats at sea. Despite these alterations, the only change to the exterior that might have indicated that the ships were not commercial was the raked bow installed of some of them to increase speed. The crews for these ships were unusual for the Kriegsmarine- they had volunteered for service on the auxiliary cruisers, and their officers were drawn from the reserve.[4][5]
The first Hilfskreuzer to sortie was the Atlantis. After adopting a paint scheme that disguised her as a ship from the Fred Olsen line, the Atlantis sailed on March 23rd, 1940 from Suderpiep Bay. The Atlantis’ first victim was the steamer Scientist, a 6,199-ton ship carrying a mixed cargo that included maize, metals and chemical compounds, and tanning bark, on May 3rd, 1940.[6] Over the next 622 days, the Atlantis sank 22 ships totaling 145,697 tons. Commanded by Bernhard Rogge, the Atlantis had a remarkable career. Her cruise lasted longer than any other Hilfskreuzer and perhaps made the most significant impact on the war. Among her victims was the SS Automedon, a 7,528-ton merchant ship of the Blue Funnel Line. On the morning of November 11, 1940, the Atlantis closed on the Automedan and opened fire on the ship after it had sent out a warning radio signal and refused to stop as ordered. After firing several salvoes into the Automedon, the merchant ship came to a halt and was boarded by a group of sailors from the German vessel. By chance, the Germans broke into a room filled with luggage and mail bags- the bags were filled with correspondence and classified documents intended for British military and intelligence personnel, including a report that detailed the strength of Britain’s Asia Empire- and the weaknesses of its military. Ultimately, this captured intelligence was passed to the Abwehr (the German intelligence agency) and along to the Japanese. The information possibly influenced Japan’s decision to attack British colonial possessions in the Pacific, including Singapore.[7] The Atlantis’ long cruise came to an end on November 22, 1941, when it encountered the heavy cruiser HMS Devonshire while rendezvousing with a U-boat. Hit by eight rounds from the cruiser, Rogge ordered his ship abandoned. After Atlantis sank, the U-boat it had been resupplying surfaced and took on survivors. The survivors of the Atlantis sinking endured a perilous journey to Brazil while being towed by the U-boat they had been supplying, before boarding the supply ship Python. On December 1st, while the Python was refueling more U-boats, the HMS Dorsetshire found and sank the Python. The survivors of both ships were forced to take refuge first among lifeboats, then among the submarines. After a lengthy voyage, the remainder of the Atlantis crew landed in St. Nazaire, France.

The Atlantis, one of the two most successful German raiders. After over a year and a half at sea, the Atlantis was finally sunk on November 22, 1941. Photo source: Wikipedia.
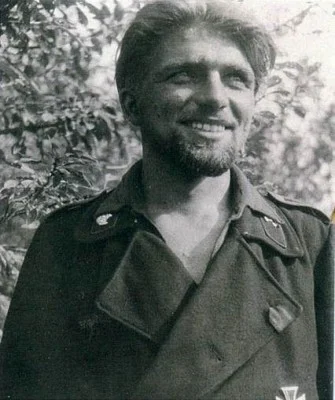
Captain Berhard Rogge, the commander of the Atlantis. Rogge began his service in the navy during the First World War. After surviving the sinking of the Atlantis, Rogge spent the rest of the war as a POW. Rogge was commended for his excellent treatment of prisoners he captured while commanding the Atlantis. After the war, Rogge served in the West German Navy, reaching the rank of Rear Admiral. He died in 1982. Photo source: bismarck-class.dk.
Other German Hilfskreuzer met with success as well. “Schiff 33”, known as the Pinguin, put to sea in June 1940 and over the course of the next 11 months sank or captured 28 ships totaling 136,000 tons. Commanded by Ernst Felix Kruder, the Pinguin caused tremendous damage to the Norwegian whaling fleet in early 1941, with the capture of two whaling factory ships and their support vessels.[8] Pinguin and one of her prizes, the Passat, were also responsible for laying 230 mines off the coast of Australia, which over the course of the next several months sank five ships. Penguin’s luck came to an end in the Indian Ocean on May 8, 1941, when she was intercepted and sunk by the heavy cruiser HMS Cornwall. 342 of Pinguin’s crew, including Kruder, were killed, along with over 200 prisoners on board. Just 60 crew and 22 prisoners were recovered.[9] Another ship which took to the sea around the same time as the Pinguin was the Orion, commanded by Kurt Weyer. The Orion was at sea for over a year, returning in August 1941 after having sunk or captured 8 ships by itself, totaling 48, 400 tons, and cooperated in operations with Kormoran for another two ships.[10] Among the Hilfskreuzer sailing in 1940 was the Widder, which had the shortest cruise out of any of the auxiliary cruisers, lasting a “scant” six months. Nonetheless, Widder, commanded by Helmut von Ruckteschell, sank or captured 10 ships totaling 58,000 tons.[11] The last of the first five auxiliary cruisers was the Thor, a 3800-ton ship commanded by Otto Kahler. Setting sail on June 6, 1940, the Thor had a colorful first cruise during which she sank or captured 12 ships totaling over 96,000 tons and had the distinction of successfully battling three Allied Armed Merchant Cruisers on separate occasions- this will be discussed further later. The Thor returned to Germany in April 1941 after nine months at sea.[12]

The Pinguin in home waters. After a successful career, particularly against the Norwegian whaling fleet, Pinguin was sunk in the Indian Ocean by the cruiser HMS Cornwall on May 8, 1941. Only 60 of Pinguin's crew of 400 survived to be captured. Photo source: bismarck-class.dk

The Norwegian factory ship Pellagos, one of the Norwegian whaling vessels captured by the Pinguin in January 1941. Photo source: Wikipedia.

The Orion proceeding under disguise. A number of panels are visible along the side of the ship which would be dropped to reveal guns. Orion survived her cruise and made it nearly to the end of the war, only to be sunk by bombs in waters off Denmark on May 4, 1945. Photo source: bismarck-class.dk.
The results of the first five raiders to put to sea were not unsubstantial. They had sunk or captured 84 ships totaling over 450,000 tons.[13] In return, the Germans had lost two of the cruisers- the Atlantis and Pinguin, along with 347 officers and crewmen killed.[14] The success of the raiders was owed to a number of factors. First was the Kriegsmarine’s Ettapendienst, a secret supply division which kept caches of ammunition, food and supplies in neutral ports all over the world. The raiders had the ability to either sail to those ports or arrange a meeting at sea with a supply ship via signal. Second, the raiders primary hunting grounds were generally isolated stretches of ocean away from heavily trafficked and protected shipping lanes, such as the South Atlantic and Indian Ocean. Generally speaking, raiders avoided fights and mostly targeted single vessels, improving their odds for success. Additionally, because the raiders chose targets in remote areas, the Allied navies simply did not have the means to provide escorts to protect every ship in every corner of the ocean. Huge numbers of escort ships were tasked with protecting convoys and shipping lanes in the North Atlantic and North Sea, where U-boats prowled in large numbers. On top of this, the British Admiralty was forced to wait for the distress signals of merchant ships to determine where the German ships were, and could only guess at where the raiders next attack would occur.[15] The ongoing success of the first several raiders meant that Hitler and the Kriegsmarine leadership readily agreed to send several more raiders to sea.
The first of the second wave of auxiliary cruisers was the Komet, a small 3200-ton ship commanded by Robert Essyen. Sailing in early July 1940, Komet was oddly an example of Nazi-Soviet cooperation- the Komet entered the Pacific after following the path of a Soviet icebreaker along the northern coast of the Soviet Union. The Komet did not meet substantial success, sinking or capturing six ships totaling 31,000 tons. She returned to occupied Europe in the November 1941. The next raider to set out was the Kormoran. Originally built as the 8700-ton passenger freighter Steiermark, the Kormoran was the largest of the auxiliary cruisers, and was twice the size of both the Thor and the Komet. Kormoran was captained by Theodore Detmers, who sortied on December 4, 1940. In the next eleven months, the Kormoran sank or captured 12 ships, mostly in the Indian Ocean. Kormoran was sunk on November 19, 1941 in a mutually-destructive engagement with the light cruiser HMAS Sydney- this will be discussed in further detail later.

The Komet, displaying a Japanese disguise. Komet was much smaller than most of her fellow raiders, displacing just 3300 tons. Photo source: bismarck-class.dk.
The last two raiders to see action did not sail until the spring of 1942. By this time, it was becoming increasingly difficult for German ships to find success on the seas. Increasing numbers of escort ships meant that cruisers were more readily available to patrol remote sealanes. As a result, several raiders fell victim to Allied patrols, despite the best efforts of the Germans’ disguise crews. Merchant ships continued to send radio signals when attacked, giving away the raiders’ position. Perhaps most difficult of all was breaking out of European ports; the both the English Channel and the North Sea were heavily guarded by British air and sea patrols. The potency of these patrols was driven home when the Komet attempted a second cruise in October 1942. Two task forces composed of seven Royal Navy destroyers, three patrol boats, and a Polish warship ambushed the Komet along with her escort of four torpedo boats. After a brief exchange of gunfire during which Komet’s gunners appeared to hit one of her escorts in panic, Komet was hit and set afire. A short time later one of her forward magazines exploded and she quickly sank, taking all 251 crew with her.[16]
Despite the increasing odds, the Kriegsmarine persisted in sending more raiders to sea. After Kormoran, the next raider to leave was the Michel. Michel had been 4700-ton Polish ship named Bielsko which was seized in 1939 when the Germans invaded. With Hellmuth von Ruckteschell as captain, Michel sailed on March 9, 1942. Almost a year to the day later, after sinking 14 ships totaling 99,386 tons, Michel tied up in port at Kobe, Japan.[17] After two months in Kobe, Michel set sail on a second cruise in May 1943 with Guther Gumprich in command. Focusing on the Pacific as her hunting ground, Michel did not meet as much success the second time round. In seven months, Michel only sank three ships for 27,600 tons. Early on the morning of October 17th, Michel was spotted by the submarine USS Tarpon. Launching four torpedoes, Michel was damaged and began to list. Tarpon submerged, passed beneath the raider, then launched a second attack from the opposite direction. Michel’s stern was blown off, then the Michel sank after a large explosion. Out of the 373 crew on board, 263 were killed, including Captain Gumprich.[18]
As evidenced by the fates of Atlantis, Pinguin, Komet, it was in the best interest of the raiders to avoid fights when possible. Raiders were tasked with disrupting commerce, sinking merchant ships, and capturing valuable cargo when possible- they were not built to take on heavily armed allied cruisers. Despite this, raiders encountered resistance in a number of forms. As previously mentioned, the Atlantis and Pinguin fell victim to cruisers, while the Komet was sunk by destroyers. However, not every meeting between a raider and Allied warship ended badly for the raider. On July 28, 1940 the tiny raider Thor, displacing just 3100 tons, encountered the British armed merchant cruiser Alcantara. Armed Merchant Cruisers (AMCs) were merchant ships which had been equipped with numerous guns and served as a deterrent to Hilfskreuzer; in Alcantara’s case, 8 6-inch guns and 3 4-inch guns. When the Thor attempted to escape, Alcantara gave chase. Recognizing that the Thor couldn’t outrun her pursuer, Kapitan Kahler turned his ship toward the Alcantara, dropped Thor’s disguise and opened fire. Thor hit the Alcantara numerous times before the British ship landed a hit, a round which passed through Thor completely without exploding. With the Alcantara on fire and slowing, Thor turned and disengaged. Kahler had taken an additional two hits which killed three. Alcantara’s crew eventually restored power and managed to limp to Rio de Janiero.[19] Four months later, on December 5th, Thor encountered a second AMC, this time the Carnarvon Castle. Carnarvon Castle was a former liner which had been armed with eight 6-inch guns and two 3-inch guns.[20] Again, Kahler tried to flee from the AMC, but the British ship ordered Thor to halt. Carnarvon Castle opened fire when the raider refused to stop, then Thor returned fire. Kahler launched two torpedoes, which missed, and fired his guns as quickly as he could, obtaining numerous hits on the AMC. With many casualties and several fires, Carnarvon Castle broke off and withdrew at a slowed rate. Thor had not been hit once.[21] Carnarvon Castle later reached Montevideo, albeit with a ten-degree list after sustaining twenty-seven hits and suffering four killed and thirty-two wounded.[22] Remarkably, on April 5th, 1941, Thor engaged a third AMC- the 13,400-ton Voltaire. This time Kahler’s crew hit the AMC critically with the first salvoes, setting her superstructure on fire. Soon after, the Voltaire was ablaze and slowly circling, having lost control. After fifty-five minutes of firing, Voltaire’s crew hoisted a white flag and abandoned ship. Thor picked up 197 survivors out of the crew of 269.[23]

Raider Thor disguised as the Santa Cruz. Despite her diminutive size at just 3800 tons, Thor proved to be one of the two most successful raiders. After two successful cruises during which she took on three Armed Merchant Cruisers, Thor docked in Yokohama, Japan. Unfortunately, she was destroyed in a fire that broke out in the docks.

A prewar postcard of the Carnarvon Castle Heavily damaged by Thor, Carnarvon Castle was heavily damaged and had to make for Montevideo for repairs. Photo source: Wikipedia.
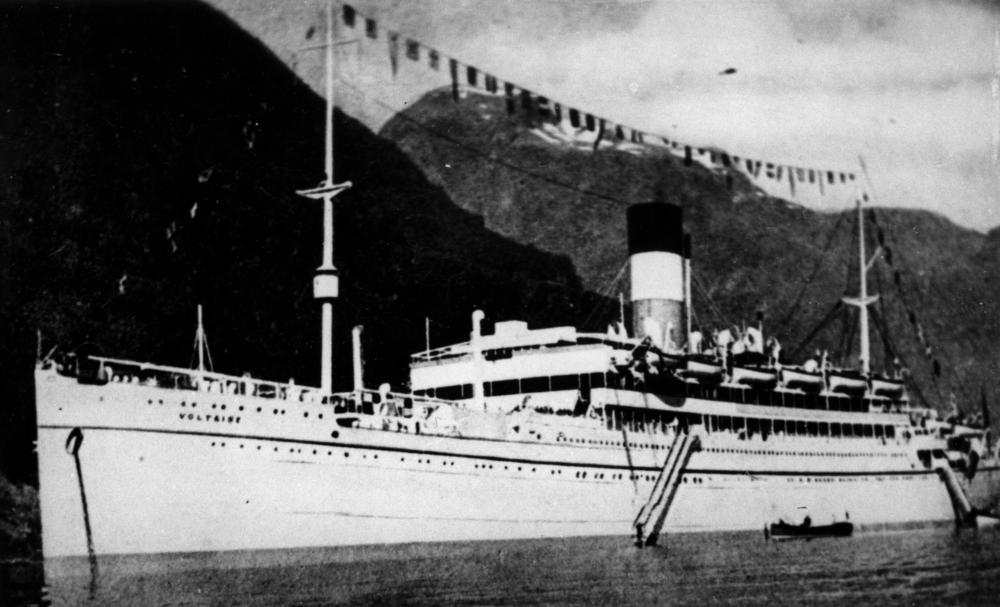
The AMC Voltaire, which was sunk during a battle with Thor in April 1941. 100 of Voltaire's crew were killed, but the surviving 196 were picked up by the German raider. Photo source:Wikipedia.
Aside from the Thor, one other raider experienced a degree of success against an Allied warship. On November 19, 1941 the Kormoran, which had been raiding in the Indian Ocean, detected the HMAS Sydney, a 6,830-ton Perth-class cruiser. Sydney was an English-built cruiser commissioned in 1935. Sydney was armed with 8 x 6-inch guns in four turrets, along with a secondary armament including 4 x 4-inch guns, 12 x .50 caliber machine guns, 4 x 3-pounder AA guns, and 8 x 21-inch torpedo tubes. Sydney was also equipped with a floatplane. The Kormoran’s captain, Theodore Detmers, wrote later:
“Evasion was out of the question. There were three hours until dusk at 1900 hours, but the cruiser coming up could move at 32.5 knots compared with our best speed of 18 knots, which we were unable to do on account of the barnacles and so on clinging to our bottom and sides. About the best we could manage was 16.5 knots… No, the only thing to do was keep my course and wait and see what happened; remaining alert all the time to take advantage of any mistakes he might make and see to it at least that I had a favorable opening position.”[24]

The raider Kormoran during an at-sea rendevous with a U-boat. Photo source: Wikipedia.

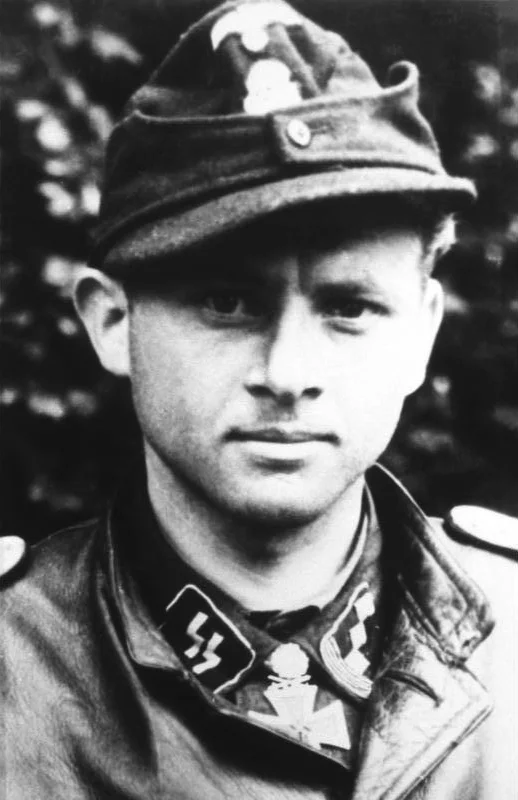
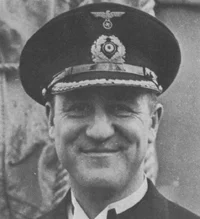
Captain Theodore Detmers. A veteran of the German Navy during the Inter-war period, Detmers was held as a prisoner in Australia following the battle with Sydney. He was released in 1947, but was unable to serve in the postwar navy owing to a stroke he suffered in captivity. He died in 1976 at the age of 74. Photo source: Wikipedia.

The light cruiser HMAS Sydney. Despite being well-armed in comparison with the Kormoran, the Sydney unwittingly closed within lethal range of the Kormoran's guns and was mortally damaged. Photo source: Wikipedia.
Detmers kept his disguise up while the cruiser began to close and request the Kormoran give its identity. Despite several requests, Detmers held his course and did not respond, eventually sending out a “strange ship” signal via radio. Finally, presumably exasperated, the captain of the Sydney signaled the Komoran, “show your secret signal.” By this point, Sydney had closed to approximately 1000 yards from the Kormoran. Detmers later recorded,
“The enemy cruiser was now coming within the range that I considered suitable for my guns, and she was already so close that through our glasses we could see every detail clearly. In particular we could see that her four double turrets with their 6-in guns and also the port torpedo tube battery were all directed at us. As far as I could make out her eight 4-inch anti-aircraft guns were not manned… There were so many white caps on the bridge that I would almost assume officers from other battle posts had assembled there. To all appearances, it looked as though our camouflage was effective and they believed our information.”[25]
At that point, with the Sydney so close at hand, Detmers made the decision to drop the disguise. After ordering the disguise dropped, Kormoran’s guns were swung into position just seconds after Detmers’ command. The second salvo from the German ship hit home, while Sydney, clearly surprised at the turn of events, cut loose with a salvo that went high. Kormoran’s anti-aircraft guns raked the exposed surfaces of Sydney, preventing the cruiser’s crew from manning its smaller caliber weapons. Kormoran’s third salvo impacted the Sydney’s bridge and fire direction tower. These hits likely killed Captain Burnett along with much of the bridge crew and eliminated Sydney’s ability to fire accurately. Additional hits ignited the seaplane on the cruiser and started a large fire. Sydney also seemed to have lost the ability to fire with her forward guns, which did not respond. Eventually, the after turrets began firing and soon scored damaging hits on the raider. Sydney also fired a number of torpedoes, all of which missed. Sydney’s guns went silent after a time, and the cruiser slowly made its way away towards the south, on fire and down by the stern. Kormoran, its engines disabled and with a destructive fire of its own, began sinking. Sydney was last seen 10 miles away, still on fire- later during the night, the glow from the cruiser’s fire was still visible until midnight.[26] Meanwhile, Detmers ordered his ship abandoned- 20 crew had been killed in the fighting, and another 60 died when a lifeboat overturned- 315 personnel . Fires eventually reached Kormoran’s mine storage area and detonated their explosive contents, obliterating the back half of the ship. Sydney faired no better- she sank at some point that night, taking all 645 officers and men aboard with her.[27] Detmers and his remaining crew were eventually picked up by Allied ships- they would spend the remainder of the war as prisoners in Australia. Detmers was accused later of violating the rules of war by firing on Sydney while in neutral colors- however, it seems more likely that Detmers had dropped his disguise prior to opening fire, and that the captain of the Sydney was caught unawares by the raider; Burnett was likely simply used to stopping merchant vessels. He made the mistake of bringing his ship far too close to an unknown vessel without having determined its identity. In doing so, he allowed Detmers rapid-firing guns to quickly achieve serious damage on the cruiser.

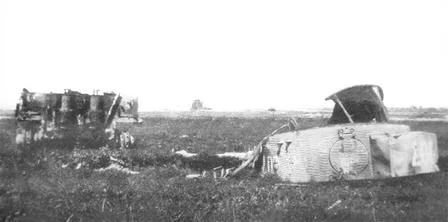
One of the Kormoran's 150mm guns as seen today on the ocean flow. Kormoran's wreck was discovered in 2008 at a depth of 8400 ft. Photo source: dailymail.uk.

Also discovered in 2008, the wreck of the HMAS Sydney lies about 13 miles southeast of the Kormoran's final resting place. Photo source: Business Insider.
Another mutually destructive engagement took place between a raider and a target merchant ship. On the morning of September 27, 1942, the raider Stier emerged from a rain squall and began to fire upon an unknown ship, anticipating an easy victory. However, Stier quickly began to receive accurate counter-fire and received numerous hits, setting the raider afire. Stier’s crew claimed that she had encountered an Allied AMC, with an estimated armament of 1 x 5.9-inch stern-mounted gun, 6 x 4- or 5-inch guns, and numerous 20-40mm AA guns. However, in actuality, the Stier’s opponent was the 7,181-ton Liberty ship SS Stephen Hopkins, which was only lightly armed with 2 x 37mm, 4 x .50-caliber MGs, 2 x .30-caliber MGs, and 1 x 4-inch stern gun. Stier’s crew included several naval auxiliary personnel, who manned the rear gun and hit Stier with 15 4-inch shells, punching several holes below the raider’s waterline, setting the fuel bunker afire, hits to the crew quarters, hospital, and diesel generator, and disabling her steering, and damaging her hydraulics. Withering fire from the Stier took its toll on the Hopkins, which finally sank at 10 AM with the loss of three killed, five severely wounded, and 28 other wounded. Hopkins’ crew abandoned ship- one month later, 15 survivors from the valiant Liberty ship landed near the Brazilian villae of Barro de Stapanoana- the other 42 members of the crew had perished. The Stier meanwhile was scuttled, and her crew picked up by the resupply vessel Tannenfels.[28]

The Stier was perhaps the least successful of the German raiders, only sinking three ships during 1942 before meeting an unexpected end at the hands of a Liberty ship in September 1942. Photo source: bismarck-class.dk.
The sinking of the Stier, which had only sank a handful of ships to date, marked the decline of the raider as an effective means of waging war on Allied shipping. Convoys had become more effective at protecting against enemy ships, and warship patrols were ever-increasing, as evidenced by the number of raiders sunk by such ships. In November 1942, the raider Thor, which had successfully engaged in two cruises each nearly a year long and sank 22 ships for 150,000 tons, was destroyed in a fire while docked in Yokohama. Thor’s crew was forced to watch dismayed as the fire spread from a neighboring tanker to their cherished vessel. The last raider to sail was the Michel, which set out for its second cruise on May 1, 1943 and patrolled the Pacific. Michel’s second cruise was much less successful than its first- in five months of sailing, Michel sank just three ships for 27,000 tons before being sunk on October 17, 1943 by the submarine USS Tarpon.[29]
Though the effectiveness of the raiders dropped off substantially after the first half of 1941, their accomplishments were not unsubstantial. For a very reasonable cost, the Kriegsmarine had modified 10 former-civilian ships which sank 890,000 tons of Allied shipping. This made the raiders more successful than their vastly more expensive warship brethren such as the Scharnhorst and Gneisenau, and second only to the U-boats, in which the Navy also invested far more funding. Perhaps more importantly, the impact these ten ships had on Allied naval practices far outweighed their cost. Raiders disrupted trade flow and broke up timetables, forced Allied navies to dedicate extra cruisers and destroyers to patrol sea lanes. The Allies also had to use additional aircraft for patrol duties. All of these ships and aircraft were assets that could have been used in combat theaters such as the Mediterranean or North Atlantic. Finally, occasional intelligence finds, most notably that of the Automedon, were highly useful to the Axis cause. Overall, the raiders performed admirably and achieved remarkable results.
Sources
1. Muggenthaler, August Karl. German Raiders of World War II. Pan Books, 1980.
2. Langenberg, William H. “German Kriegsmarine: Applying Deception to Harass Allied Shipping.” Warfare History Network, Sovereign Media, 20 Aug. 2015. warfarehistorynetwork.com/daily/wwii/german-kriegsmarine-applying-deception-to-harass-allied-shipping/
3. Asmussen, John. “Hilfskreuzer Penguin.” www.bismarck-class.dk, John Asmussen, 2000, www.bismarck-class.dk/hilfskreuzer/pinguin.html. Accessed 2 NOV 2017
4. Asmussen, John. “Hilfskreuzer.” www.bismarck-class.dk, John Asmussen, 2000, www.bismarck-class.dk/hilfskreuzer/hilfskreuzer_introduction.html. Accessed 2 NOV 2017
5. Asmussen, John. “Hillfkreuzer Atlantis.” www.bismarck-class.dk, John Asmussen, 2000, www.bismarck-class.dk/hilfkreuzer/atlantis.html . Accessed 2 NOV 2017
6. Hastings, Max. The Secret War: Spies, Ciphers, and Guerrillas 1939-1945. Harper, an Imprint of HarperCollinsPublishers, 2015.
7. Robinson, Stephen. False Flags: Disguised German Raiders of World War II. Exisle Publishing, 2016.
8. Woodward, David. The Secret Raiders; the Story of the German Armed Merchant Raiders in the Second World War. W.W. Norton, 1955.
9. Asmussen, John. “Hilfskreuzer Widder.” www.bismarck-class.dk, John Asmussen, 2000, www.bismarck-class.dk/hilfskreuzer/widder.html . Accessed 2 NOV 2017
10. Asmussen, John. “Hilfskreuzer Thor.” www.bismarck-class.dk, John Asmussen, 2000, www.bismarck-class.dk/hilfskreuzer/thor.html . Accessed 2 NOV 2017
11. Asmussen, John. “Hilfskreuzer Komet.” www.bismarck-class.dk, John Asmussen, 2000, www.bismarck-class.dk/hilfskreuzer/komet.html. Accessed 2 NOV 2017
12. Asmussen, John. “Hilfskreuzer Michel.” www.bismarck-class.dk, John Asmussen, 2000, www.bismarck-class.dk/hilfskreuzer/michel.html . Accessed 2 NOV 2017
13. Detmers, Theodor. The Raider Kormoran. Tandem, 1975.
14. Langenberg, William H. “German Merchant Raider Kormoran & HMAS Sydney's Deadly Duel.” Warfare History Network, Sovereign Media, 20 Aug. 2015, warfarehistorynetwork.com/daily/wwii/german-merchant-raider-kormoran-hmas-sydneys-deady-duel/+.
15. Guttman, Jon. “The Last Raider - July '97 World War II Feature.” HistoryNet, HistoryNet, 19 Aug. 1997, www.historynet.com/the-last-raider-july-97-world-war-ii-feature.htm.
[1] http://warfarehistorynetwork.com/daily/wwii/german-kriegsmarine-applying-deception-to-harass-allied-shipping/ (11/2/16)
[2] http://www.bismarck-class.dk/hilfskreuzer/pinguin.html (11/2/16)
[3] http://www.bismarck-class.dk/hilfskreuzer/hilfskreuzer_introduction.html (11/2/16)
[4] http://www.bismarck-class.dk/hilfskreuzer/pinguin.html
[5] http://www.bismarck-class.dk/hilfskreuzer/hilfskreuzer_introduction.html (11/2/16)
[6] http://www.bismarck-class.dk/hilfskreuzer/atlantis.html 27 JAN 2018
[7] The Secret War, Max Hastings- p.135-140
[8] False Flags: Disguised German Raiders of World War II, P.102
[9] http://www.warsailors.com/raidervictims/pinguin.html
[10] German Raiders of World War II, p. 45
[11] http://www.bismarck-class.dk/hilfskreuzer/widder.html
[12] http://www.bismarck-class.dk/hilfskreuzer/thor.html
[13] http://www.bismarck-class.dk/hilfskreuzer
[14] http://www.bismarck-class.dk/hilfskreuzer
[15] False Flags: German Raiders of World War II, p.54
[16] http://www.bismarck-class.dk/hilfskreuzer/komet.html
[17] http://www.bismarck-class.dk/hilfskreuzer/michel.html
[18] http://www.bismarck-class.dk/hilfskreuzer/michel.html
[19] The Secret Raiders, p.140
[20] http://www.bismarck-class.dk/hilfskreuzer/thor.html
[21] The Secret Raiders, p.145-146
[22] http://www.bismarck-class.dk/hilfskreuzer/thor.html
[23] The Secret Raiders, p. 151-152
[24] The Raider Kormoran, p. 178
[25] False Flags: , p.276-279
[26]http://warfarehistorynetwork.com/daily/wwii/german-merchant-raider-kormoran-hmas-sydneys-deady-duel/
[27] http://warfarehistorynetwork.com/daily/wwii/german-merchant-raider-kormoran-hmas-sydneys-deady-duel/
[28] http://www.historynet.com/the-last-raider-july-97-world-war-ii-feature.htm
[29] German Raiders of World War II, p. 207