Film Review: Dunkirk
/
By Seth Marshall
Christopher Nolan, director of the Dark Knight Trilogy, Inception and Interstellar has turned his attention on the miraculous evacuation of the Allied forces from Dunkirk in late May and early June 1940.
On May 10th, 1940, the so-called Phoney War, a period of relative inactivity along the Western Front in Europe, came to a sudden and dramatic end when the German Army invaded France and the Low Countries. Over the course of the next several weeks, the Wehrmacht would conquer the Netherlands, Belgium, and ultimately France. Fall Gelb, Case Yellow, called for Army Group A under the command of General Gerd von Rundstedt to advance through the Ardennes, break through French defenses along the Meuse River at Sedan, and ultimately advance to the Channel coast, with the objective of cutting the Allied forces in half. Army Group B, under the command of General Fedar von Bock, was to drive into Belgium and the Netherlands, with the objective of occupying those countries. [1] After several days of French resistance, the Wehrmacht successfully broke the French lines at Sedan, lead by armor commanders General Ewald von Kleist and General Heinz Guderian. By May 20th, Guderian’s tanks had captured Amiens and Abbeville, bisecting the Allied forces and leaving the entirety of the British Expeditionary Force (BEF) cut off from the rest of France. In an effort to stem the German advance and reserve the rapidly deteriorating situation, the commander of French forces, General Maurice Gamelin, ordered French forces in their increasingly poor position to attack towards the south. However, Gamelin was replaced on May 19th, and his replacement, General Maxime Weygand, delaying the counterattack proposed by Gamelin for three days while he inspected the front lines. By the time Weygand ordered the attack forward on May 22nd, the time for an effective counterattack had passed.[2]
It was in this perilous situation that the BEF found itself in late May 1940. Commanding the BEF was Lord Field Marshal John Gort. Born in 1886 in County Durham, Gort had served with distinction during the First World War and was decorated with the Military Cross, the Distinguished Service Order with two bars, and the Victoria Cross, Britain’s highest military honor. Advancing through the ranks between the Wars, Gort had held various command positions, including Chief of the Imperial General Staff, prior to his promotion to full general in 1937.[3] Appointed as commander of the BEF in 1939, Gort encountered difficulties in working with his French allies. This would become apparent in the wake of the German invasion of France, as the BEF’s position became more and more tenuous. Ignoring calls for reinforcement by the French and London, Gort began ordering his forces to pull back- on the night of May 18-19th, Gort ordered the British I and II Corps to pull back to the Dendre River from the Senne River. On May 21st, tired of the dallying of French forces, Gort ordered the 5th and 50th Divisions, supported by 100 tanks, to attack south from Arras, with the objective of breaking through the German encirclement. Initially, the attack achieved a modicum of success, and the British forces began pushing back the Germans, causing some panic among local German commanders, including then-Major General Erwin Rommel: “Powerful armored forces had swarmed out of Arras, subjecting us to heavy losses in men and equipment. The anti-tank guns that we speedily brought into action proved too light to be effective against the heavily-armored British tanks. Most of them were put of action by the enemy artillery...”[4] The British Matilda tanks, more heavily armed and armored than most of their German counterparts, proved difficult to disable. In the end, only by resorting to artillery guns and 88mm anti-aircraft guns were the Germans able to blunt the British offensive.[5] On May 22nd, Guderian’s tanks began moving again, advancing north into Boulogne. At Boulogne, they encountered stiff resistance and fought for three days before finally taking the city on May 25th. By then, Gort had decided that the only viable option left to him was to evacuate the BEF. On the evening of May 23rd, Gort ordered the BEF to begin withdrawing to the port of Dunkirk, the last major port available for evacuation.[6] Withdrawing from Belgium, Gort ordered the garrison at Calais to remain behind as a rearguard and placed various forces at ideal locations to slow the German advance and buy time for an evacuation to take place. It was at this time that one of the more controversial decisions of the war in 1940 took place when on May 24th Hitler gave an order to halt the advance of the panzers, leaving the final capture of Dunkirk up to the infantry with the support of the Luftwaffe. After the war, various German officers offered their explanations for the delay. Von Kleist said that Luftwaffe commander Herman Goring had lobbied Hitler to give the Luftwaffe the opportunity to finish off the BEF from the air; “Goring had undertaken to settle Dunkirk’s hash with planes alone… He begged Hitler to bestow the honor not on the army but on the Luftwaffe, thereby making the battle of Dunkirk a victory for the regime.”[7] Von Rundstedt believed Hitler had halted the advance to create a more advantageous position for Germany to negotiate surrender terms with Britain; “The Fuhrer had counted on a speedy end to western operations… He deliberately let the bulk of the BEF escape, so as to make peace negotiations easier.” Von Rundstedt’s claim is negated by the fact that his own diary recorded him as having made the suggestion to halt to Hitler himself.[8] In any case, the combination of the delayed advance of the panzers and the stubborn resistance of pockets of BEF forces in locations such as Calais served to buy additional time for the BEF to organize an evacuation. Gort continued to withdraw his forces, forming a defensive perimeter around Dunkirk. In the meantime, the British Navy began preparing to carry out the evacuation.

Lord Field Marshal John Gort's official portrait. Despite Gort's difficult situation as commander of the BEF, he would come under heavy criticism as having perceived to have abandoned the French. Gort would later serve in the Mediterranean as Governor of Gibraltar, as the Governor of Malta, and lastly in the position of High Commissioner for Palestine and Transjordan. Photo: Wikipedia.

General Gerd von Rundstedt, commander of German Army Group A, which successfully broke through French defenses and swept into France. Rundstedt had retired in 1938 only to be recalled to active service when Germany invaded Poland. Rundstedt would be subsequently be dismissed in late 1941, the summer of 1944, and March 1945- by Hitler each time. An excellent commander, he was recalled to service several times to salvage defensive situations. Photo source: Wikipedia.

The campaign in France from 21 May to 31 May, ending with the encirclement of the BEF and elements of the French and Belgian armies at Dunkirk. Source: Warfare History Network.
In command of the evacuation was Vice Admiral Sir Bertram Ramsey, who was the commander of Royal Navy forces at the port of Dover. Overseeing the operations from his headquarters in the catacombs beneath Dover castle, Ramsey ordered Captain William Tennant, the chief of staff to the First Sea Lord, to proceed to Dunkirk to function as the senior naval officer in place and send his recommendations back to Ramsey as to the best means of evacuating the BEF. On May 27th, the day following London’s official order to begin evacuation, Tennant proceeding across the Channel on the destroyer HMS Wolfhound, under frequent attack by Luftwaffe dive-bombers. On his arrival, Tennant made two observations that would prove critical in the evacuation. First, with the bombing of Dunkirk harbor by the Luftwaffe having caused serious damage, Tennant recognized that naval units would be unable to use the docks to embark men. Second, he realized that the harbor’s moles, which served as breakwaters for the harbor, were relatively undamaged and could be used in place of the devastated docks. Tennant tested the moles’ capability by directing the steamship Queen of the Channel to dock alongside one of the moles, which it accomplished successfully. Tennant recommended to Ramsey that he send every ship available to Dunkirk, first asking him to send them to the beaches, then advising that the moles be used as the primary means to extricate the soldiers. [9] Ramsey ordered the 129 ships at his disposal, including fast modern destroyers prized by the Admiralty as convoy escorts, into action to carry out the evacuation. In order to assist the evacuation, a call was put out to owners of private boats in southern England to take their vessels across the Channel and assist the evacuation by ferrying men from the beach to larger ships further out in the Channel, which would in turn take them to Dover. Some 1400 small ships, including fishing trawlers, motorboats, yachts, ferries, and barges, made their way from their home ports along the Channel and the Thames River estuary to Dunkirk to take part.[10]

Vice Admiral Sir Bertram Ramsey, in overall command of the evacuation of the BEF from Dunkirk. Working almost constantly in Dover castle, Ramsey's dedication and ultimate success in orchestrating the operation earned him a visit with King George VI as well as the title of Knight Commander of the Order of the Bath. Photo: Wikipedia.

As the senior Royal Navy officer on the ground, at-that-time Captain William Tenant (later Admiral Sir William Tenant) was in charge of overseeing evacuation efforts at Dunkirk. Photo: Wikipedia.

Among the most famous images captured during the evacuation of Dunkirk was this: the image of thousands of British troops waiting on the sands of the French coast in hopes of being evacuated. Photo source: Warfare History Network.
By May 28th, the evacuation was proceeding at full speed. Destroyers began picking up boatloads of soldiers from the moles, while small boats ferried teams of men from the beaches to ships waiting further offshore. All the while, German artillery continued to rain down on Dunkirk and the Luftwaffe continued to torment the occupants of the harbor and beaches with constant machine-gun fire and bombing runs, coupled with the sounds of their sirens. The RAF attempted to disrupt the Luftwaffe’s operations by sending fighter patrols across the Channel, but their ability to provide protection was limited by their range, which meant that they could only spend a short time overhead. The RAF also had to provide aircraft for protecting sealanes, which limited the number of aircraft they could commit to the evacuation. As a result, the Stuka dive-bombers merely had to wait for RAF fighters to turn for home to refuel before renewing their attacks. During the day, the Queen of the Channel was sunk by aerial attacks, resulting in the civilian ships being limited to nighttime operations only.[11] Despite these difficulties, the British were able to evacuate 17,804 men on the 28th.

Amidst one of the seemingly endless Luftwaffe attacks, BEF soldiers take aim at attacking bombers with their rifles. Source: Warfare History Network.
May 29th saw a turn for the better for the BEF. A number of French warships arrived to assist in the evacuation, and despite continuing German artillery fire, over 47,000 soldiers were taken off the beaches. Three Royal Navy destroyers were lost on this day to Luftwaffe raids, a U-boat attack, and one by Kriegsmarine E-boat torpedo attacks. The merchant ship Mona Queen was sunk by a mine, while six more ships were sunk by air raids.[12] Losses were such that the Admiralty forbade the use of modern destroyers in order to preserve them for convoy escort duty.[13] By May 31st, so many British troops had been taken off the beaches that the decision was made to remove Lord Gort from his position, as a Corps commander could take over from there. He therefore turned over command to General Harold Alexander.[14]

The Mona Queen, a liner from the Isle of Man Steam Packet Company, sinks after striking a mine on 29 May. Photo source: Wikipedia.

The French destroyer Bourrasque sinks after striking a mine on 30 May after having taken on a load of soldiers, who are now jumping overboard. Photo source: Warfare History Network.
While the evacuation was proceeding, the scene at Dunkirk remained hellish, with artillery fire and Stuka dive bombers incessantly raining down destruction. On the beaches, there were still thousands of men waiting their chance to escape from the advancing Germans. Arthur Devine, the captain of a small boat shuttling men from the beach to larger ships offshore, recalled the scene years later:
“The picture will always remain sharp-etched in my memory- the lines of men wearily and sleepily staggering across the beach from the dunes to the shallows, falling into little boats, great columns of men thrust out into the water among bomb and shell splashes. The foremost ranks were shoulder deep, moving forward under the command of young subalterns, themselves with their heads just above the little waves that rode into the sand. As the front ranks were dragged aboard the boats, the rear ranks moved up, from ankle deep to knee deep, from knee deep to waist deep, until they, too, came to shoulder depth and their turn.”[15]
By the morning of June 1st, 200,000 Allied troops had been taken off the beaches. That day however saw the loss of four more destroyers within a short period, while four more were damaged. Even more civilian vessels were lost or damaged. Despite the ever-present artillery fire and Stukas, 68,000 more men were evacuated to Britain. Among the soldiers evacuated on this day was Norman Wickman, an engineer with the 62nd Chemical Warfare Company. Wickman was evacuated on board the destroyer HMS Worcester.
“Urging the men along the mole, I took a last look around, making sure everyone had gone, and then raced down the walkway. The destroyer was pulling away from its berth. I hesitated. The gap was too wide. “Jump, you silly bugger, jump” yelled a burly sailor at the ship’s rail. So I jumped. Immediately, I realized I had made a big mistake. In mid-air, I glanced down. The foaming water churned wildly where the destroyer’s sharp propeller blades were waiting to chop me to pieces. Leaning far out, the muscular sailor grabbed my shredded epaulette, flapping loosely from my uniform. With a crash, I slammed against the ship’s rail. Using brute strength, the sailor hauled me over, where I fell in a crumpled heap on the deck. Unbridled joy and relief overwhelmed me. I was on the destroyer, safe and on my way home. Then, all hell let loose. “Get up against the bulkhead,” shouted the sailor. Stunned and winded, I stumbled across the deck. As I pressed against the gray metal, I heard the planes. Stukas, 30-40 of them, dived on the Worcester time and time again. Bombs rained down like confetti all around the ship. The destroyer, so filled with troops it was top heavy, heeled over wildly at heart-stopping, stomach-lurching angles to evade the falling bombs. Bombs to the rear lifted the stern clear of the water. The massive propellers screamed until the ship crashed down again. Colossal columns of water washed over the ship. I closed my eyes and tried to make my body disappear into the bulkhead.By some miracle, none of the 100 bombs made a direct hit on the ship. Shrapnel killed 46 and wounded another 180 before the attacks tapered off. As sanity returned, I opened my eyes and looked round. The planes had disappeared. The Worcester, with its crowded decks, was steaming across the channel to the British coast. I may have been exhausted by the day’s events, but I felt exhilarated.”[16]

British soldiers board a destroyer at the mole at Dunkirk. Photo source: Warfare History Network.

British soldiers crowded on board of a destroyer following evacuation prepare to dock at Dover on 31 May. Photo source: Wikipedia.
The following day, June 2nd, Ramsey ordered a halt to the daylight evacuation, fearing disproportionate losses in ships and naval personnel; instead, he planned to continue the evacuation under the cover of darkness that night. Some 4,000 British soldiers remained ashore functioning as a rear guard, while another 50-60,000 French troops continued to hold the defensive perimeter, which was gradually being reduced by the Germans. For the next day and half, ships would continue to make the approach to Dunkirk at night and take even more men. By 11PM on June 2nd, the last of the BEF rearguard had been evacuated; Tennant reported back to Ramsey, “Operation Dynamo complete. Returning to Dover,” before leaving the beach.[17] While the BEF had now been extricated, ships continued to embark French soldiers. On the night of June 3rd-4th, the odd assembly of ships crossed the Channel for the final night of the operation. Over 26,000 French soldiers were taken back to Britain before the operation was finally called off in the early hours of June 4th.[18] The destroyer Shikari, with 383 soldiers on board, was the last ship to leave Dunkirk, pulling away at 3:40AM.[19]
For an evacuation that was initially estimated to be capable of saving 40,000 men, Operation Dynamo had been an astounding success. Some 198,000 British and 140,000 French and Belgian troops were taken back to England from the pocket at Dunkirk. [20] Some 40,000 Frenchmen remained behind as a rearguard in Dunkirk and were killed or captured. While nearly 200,000 British soldiers were saved, the BEF still suffered heavily- 11,014 killed, 14,074 wounded, and 41,338 captured since the campaign had begun.[21] In addition, the BEF had left nearly all of its heavy equipment- it left behind 2,472 guns, 63,879 vehicles, 20,548 motorcycles, and 500,000 tons of supplies. In the air, the RAF had lost 106 fighters, inflicting a roughly equal number of losses on the Luftwaffe. The Royal Navy had lost six of its destroyers, while 19 more suffered damage. Including the lost destroyers, 243 ships of all types had been sunk.[22] Nonetheless, the manpower of the BEF had in large part been saved. However, for Lord Gort, his command of the BEF would prove to be his last major command. He was appointed to several Governor positions, most notable in Malta while the island was under siege, before his retirement. Gort died in 1946 just shy of his 60th birthday.

British soldiers, just having arrived at Dover exhausted from their ordeal in France, await a train to take them north. Photo source: Wikipedia.

Not all soldiers were successfully evacuated from Dunkirk. Some 40,000 French soldiers, left behind as a rearguard to hold off the Germans, were captured when the Wehrmacht finally overran the port. Photo source: Warfare History Network.
Christopher Nolan’s film is the third film to be released that focuses on the subject of the evacuation at Dunkirk, though the evacuation has appeared in other films as a background. At 106 minutes, Dunkirk is one of Christopher Nolan’s shortest films, particularly in light of his more recent films, Interstellar and The Dark Knight Rises, both of which were well over two hours long.[23] Much of the film was shot on location at present-day Dunkirk, which certainly lends an air of authenticity to the film. Among the cast are previous actors who have appeared in Nolan films, including Tom Hardy, starring as Spitfire pilot Farrier, and Cillian Murphy, who appears as a distressed BEF soldier. Other members of the cast include: Kenneth Branaugh as Commander Bolton, James D’Arcy as Captain Winnant, Fionn Whitehead as a young soldier named Tommy, and Mark Rylance as Dawsett. In an effort to make the film accurate, Nolan used three Spitfires and a Hispano Buchon painted as an ME-109 to depict the aerial sequences. Additionally, he used the French destroyer Maille-Breze as a stand-in for a period destroyer. While this ship wasn’t commissioned until the 1950s, it is visually similar to destroyers of the period.
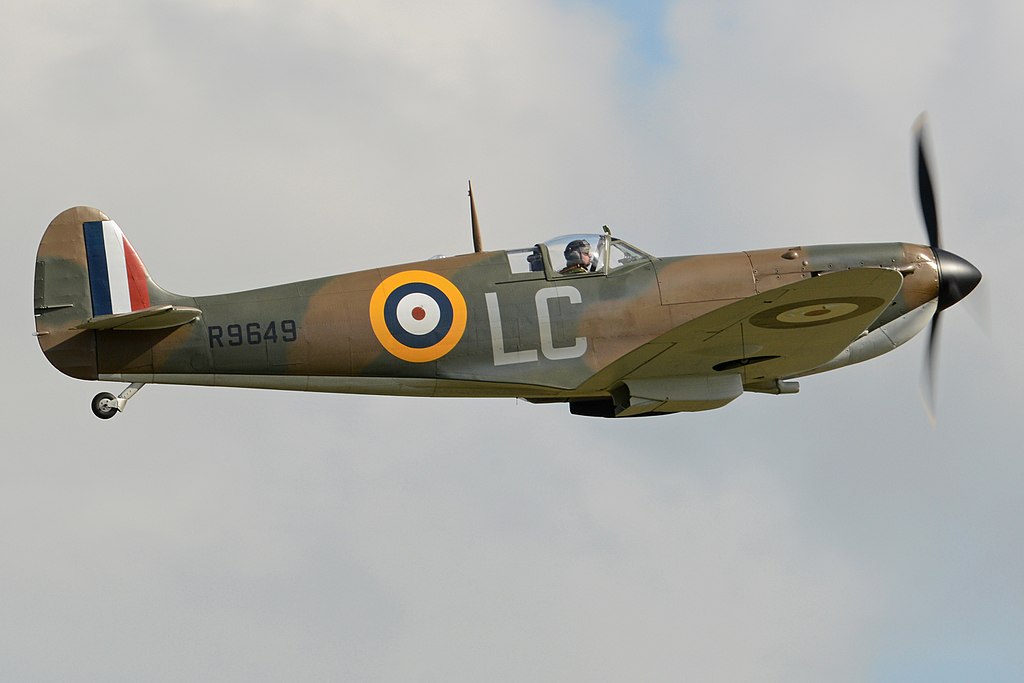
Nolan wanted to use as much period-correct vehicles as possible to lend historical accuracy to the film. Pictured is one of several Supermarine Spitfires used in the film. Photo: Wikipedia.

Though there are a number of ME-109s that remain airworthy, none are the correct version that would have been flying in 1940. As a result, Nolan used a Hispano HA 1112 "Buchon" as a substitute. This aircraft is a post-war design based on the airframe of the ME-109 paired with the engine of the Spitfire. Buchons have been used as ME-109s in film before, most notably in the 1968 film "Battle of Britain." Photo source: Wikipedia.

The retired French destroyer Maille-Breze, built in the 1950s, was used as a substitute for British destroyers in the film. Photo source: Wikipedia.

The MLV Castor was one of several ships used to portray a number of minesweepers in the film. Photo source: Wikipedia.
With all of these efforts to maintain a semblance of historical accuracy then, the film is surely a knockout, right? Well, this is not so easy to say. Readers should be warned that hereafter will be spoilers. The film is presented along three timeframes that eventually converge at the climax of the movie. We are first introduced to the perspective of the soldier Tommy, played by Fionn Whitehead. His story, one of scarcely avoiding death and escape, is told over the course of a week. The story of the crew of a small pleasure boat, captained by Dawson (played by Mark Rylance), takes place over the course of a single day. The third timeline is told from the perspective of Farrier, played by Tom Hardy, a RAF Spitfire pilot flying a hour-long patrol towards Dunkirk. Each of the individual’s stories are very unique and are well-crafted examples of the types of experiences that were had by those who were actually there. Tommy’s story as the soldier frequently alternates be long stretches of boredom interspersed with moments of sheer terror. One of the most striking moments of the film occurs in its opening moments when Stuka dive bombers plummet downwards towards Tommy’s location on the beach. Their howling sirens overwhelm all other sound and we can clearly see the panic on soldiers’ faces. Later, there are moments when Tommy seems safe and everything is suddenly upended by a torpedo strike. With Dawson, the viewer gains the sense of the dedication to sailing across the Channel out of either patriotism or duty, and also of the moments of indecision that suddenly creep up upon the boat captain and his two crew members. Farrier’s story is the opposite of Tommy’s- everything that the pilot does is relegated by time limits and fuel consumption. Eventually, he is decides to set his own personal safety aside by sacrificing his precious fuel in an effort to save ships attempting to make their way across the Channel. These converging personal stories make for a very intricate film- but not one without faults.
The primary issue that I have with Dunkirk is that the evacuation from Dunkirk was absolutely massive, almost incomprehensibly huge. Over 330,000 men were successfully taken off the beaches, and thousands more remained ashore as a rear guard against the advancing German forces. Yet, despite these numbers of men and the correspondingly large numbers of ships and aircraft engaged on both sides, we never truly get a sense of the scale of the evacuation in this film. Dunkirk the film works well as a microcosm of the evacuation, but fails on presenting the big picture of the operation. Watching Nolan’s film, the viewer hears the number of men taken off the beach, but never sees anything amounting to near that number of people- taking the film at face value, one might be left to conclude that only a fraction of the true number were even involved at Dunkirk. I think that this problem lies rooted in Nolan’s general dislike of computer effects. CGI could have been used to great effect to illustrate how vast the evacuation of the BEF really was, and how many people were involved both in operating the boats that take the men off and in the aircraft attempting to prevent the Luftwaffe from ceaselessly bombing the ships and beaches.
So how then does the film measure up? I think that Dunkirk works well as both a relatively historically accurate movie and as a well-directed film. Viewers would do well to remember that the movie primarily tells the stories of three people involved in different aspects of the evacuation and not the operation as a whole. It’s worth saying this again- Nolan’s Dunkirk provides a glimpse into this momentous event, a microcosm of Operation Dynamo; it is by no means a panoramic of Dunkirk.
Sources
1. Rickard, J. “Operation Dynamo: The Evacuation from Dunkirk, 27 May- 4 June 1940.” History of War, Historyofwar.org, 16 Feb. 2008, www.historyofwar.org/articles/operation_dynamo.html, 17JUN2017.
2. “Lord John Gort.” History Learning Site, Moocow, 20 Apr. 2015, www.historylearningsite.co.uk/world-war-two/military-commanders-of-world-war-two/lord-john-gort/, 17JUN2017.
3. Diamond, Jon. “Site Navigation.” Warfare History Network, Sovereign Media, 1 Dec. 2016, warfarehistorynetwork.com/daily/wwii/miracle-at-dunkirk, 17JUN2017.
4. “The Evacuation at Dunkirk, 1940.” Eyewitness to History, Ibis Communications, Inc., 2008, www.eyewitnesstohistory.com/dunkirk.htm, 17JUN2017.
5. “History.” Dunkirk 1940 Museum, dynamo-dunkerque.com/en/history, 17JUN2017.
6. Wickman, Norman, and Pauline Hayton. “Site Navigation.” Warfare History Network, Sovereign Media, 2 Sept. 2016, warfarehistorynetwork.com/daily/wwii/a-royal-engineer-at-dunkirk-tells-his-story, 17JUN2017.
7. Robinson, Bruce. “History - World Wars: Dunkirk.” BBC, BBC, 17 Feb. 2011, www.bbc.co.uk/history/worldwars/wwtwo/ff2_dunkirk.shtml. 17JUN2017
8. Dunkirk (2017).” IMDb, Amazon.com, 2017, www.imdb.com/title/tt5013056/. 17JUN2017
[1] http://www.historyofwar.org/articles/operation_dynamo.html
[2] http://www.historyofwar.org/articles/operation_dynamo.html
[3] http://www.historylearningsite.co.uk/world-war-two/military-commanders-of-world-war-two/lord-john-gort/
[4] http://warfarehistorynetwork.com/daily/wwii/miracle-at-dunkirk/
[5] http://warfarehistorynetwork.com/daily/wwii/miracle-at-dunkirk/
[6] http://www.eyewitnesstohistory.com/dunkirk.htm
[7] http://warfarehistorynetwork.com/daily/wwii/miracle-at-dunkirk/
[8] http://warfarehistorynetwork.com/daily/wwii/miracle-at-dunkirk/
[9] http://warfarehistorynetwork.com/daily/wwii/miracle-at-dunkirk/
[10] http://dynamo-dunkerque.com/en/history/
[11] http://www.historyofwar.org/articles/operation_dynamo.html
[12] http://www.historyofwar.org/articles/operation_dynamo.html
[13] http://warfarehistorynetwork.com/daily/wwii/miracle-at-dunkirk/
[14] http://www.historyofwar.org/articles/operation_dynamo.html
[15] http://www.eyewitnesstohistory.com/dunkirk.htm
[16] http://warfarehistorynetwork.com/daily/wwii/a-royal-engineer-at-dunkirk-tells-his-story/
[17] http://warfarehistorynetwork.com/daily/wwii/miracle-at-dunkirk/
[18] http://warfarehistorynetwork.com/daily/wwii/miracle-at-dunkirk/
[19] http://www.historyofwar.org/articles/operation_dynamo.html
[20] http://www.bbc.co.uk/history/worldwars/wwtwo/ff2_dunkirk.shtml
[21] http://warfarehistorynetwork.com/daily/wwii/miracle-at-dunkirk/
[22] http://www.historyofwar.org/articles/operation_dynamo.html