Tools of War: USS LST-325
/
USS LST-325 visits Clarksville, Tennessee in September 2017. Photo: author.
During the Second World War, the Allies found themselves in need of large numbers of amphibious transport capable of navigating the world’s oceans and delivering heavy equipment to beachheads. The Landing Ship, Tank, or LST, was developed to meet this demand. Today, the USS LST-325 remains one of the last LSTs in existence, and is a fully operational museum ship.
By Seth Marshall
In May-June 1940, the BEF was evacuated from the shores of Dunkirk by a variety of small craft, destroyers, and requisitioned steamers. While the evacuation successfully removed over 300,000 soldiers from France, nearly all of their heavy equipment was left behind, including artillery, vehicles, tanks, etc. This event, along with subsequent operations, demonstrated the Allied need for amphibious vehicles that could effectively deliver both troops and vehicles directly to the beachhead. Additionally, it became soon apparent that a craft delivering heavy vehicles would also need to be capable of traversing the world’s oceans. What resulted was the Landing Ship, Tank (LST), an amphibious vessel capable of navigating both deep and shallow water in order to deliver tanks straight to a beachhead.
The first LSTs were actually converted tankers. The three ships, the Bachaquero, the Misoa, and the Tasajera, were medium-sized tankers in use in Venezuela and specifically designed to safely pass over shallow sand bars. All three ships had originally been built in the late 1930s in Britain by Furness Shipbuilding. Bachaquero and Misoa were sister ships and both displaced 4,193 tons, while the Tasajera displaced 3,952 tons. Following their requisitioning by the Royal Navy in late 1940 and early 1941, they were sent on to Belfast, Ireland for conversion into landing ships. Their original bows were removed and replaced with a bow that featured a ramp, and much of the interior deck space was cleared to make room for vehicles. The conversion process was completed by the end of 1941, upon which the ex-tankers were capable of carrying two Landing Craft Mechanized (LCM), or 22 25-ton or 18 30-ton tanks, or 33 3-ton vehicles, along with 210 soldiers.[1] These converted vessels eventually saw action during Operation Torch, the invasion of Morroco, in November 1942. However, they were more of a proof-of-concept rather than a final product. Purpose-built designs would quickly overtake these ships.
In 1941, following an agreement between President Franklin Roosevelt and Prime Minister Winston Churchill, a group from the British Admiralty arrived in the United States to collaborate on the design of landing vessels with the US Navy’s Bureau of Ships. John Niedermair, a member of the Bureau of Ships, is credited with originating the basic outline of what would become the mass-produced LST- a ship capable of moving through both deep and shallow water, equipped with a ballast system that would allow the landing ship to pump water in and out for beaching operations and ocean travel. The design, approved on November 5, 1941, called for a ship 280 feet in length. This was modified several times over the coming months and eventually was settled at a length of 328 feet, with a 50-foot beam and minimum draft of three feet 9 ½ inches. The LST could accommodate 2100 tons worth of tanks which would enter and exit via a clamshell-type door at the front with a 12-14 foot ramp. The tank deck was ventilated, allowing the vehicles to run their engines without fear of asphyxiation. Model testing of the design began in early 1942.[2]
Following testing, construction of LSTs began in earnest in mid-1942. The first LST was laid down on June 10, 1942 at New News, Virginia- by the end of the year, twenty-three were in commission. Owing to the priority of coastal shipyards for building warships, a large portion of LSTs were built at inland shipyards along rivers, which the shallow-water going LSTs could navigate. The first production LSTs entered combat in the Solomon Islands in 1943.

The USS LST-942 underway in late 1944. Photo source: Wikipedia.
Not long after the first LSTs began entering service, they began to be modified for missions apart from ferrying tanks and vehicles to beaches. Some LSTs were converted into landing craft repair ships, and featured additional cranes, booms, winches, and workshops necessary to repair damaged vessels. Thirty-eight LSTs were converted to small hospital ships, a number of which ferried wounded troops back from the beaches of Normandy to England. Fifteen LSTs were converted to move railcars to France. Locomotives and heavier rolling stock were moved on larger ships, leaving boxcars and flatcars to be carried by the LSTs.[3] Late during World War II, several LSTs were modified to be able to launch and recover light observation aircraft. Initially, LSTs were give a plywood runway 197 feet long, which allowed Piper L-4 observation aircraft to take off. In this configuration, ten aircraft could be carried. Later, Lieutenant James Brodie of the Office of Strategic Services developed a trapeze system in which an L-4 or L-5 could be launched and recovered from an LST. A bar with a hook above the cockpit was used to hook onto a trapeze bar suspended by two gantries over the side of the ship. This version of the LST could actually carry out normal transportation operations. The Brodie system was developed late in the war, and saw action only during the Battle of Okinawa.[4]


A side view of USS LST-325 equipped with a Brodie system. This photo was likely taken in 1945 around the end of the war. Photo source: lstmemorial.org.

A view from the deck of an LST converted for use as an "aircraft carrier". The aircraft in this picture are Piper L-4 observation aircraft, frequently used for artillery spotting.
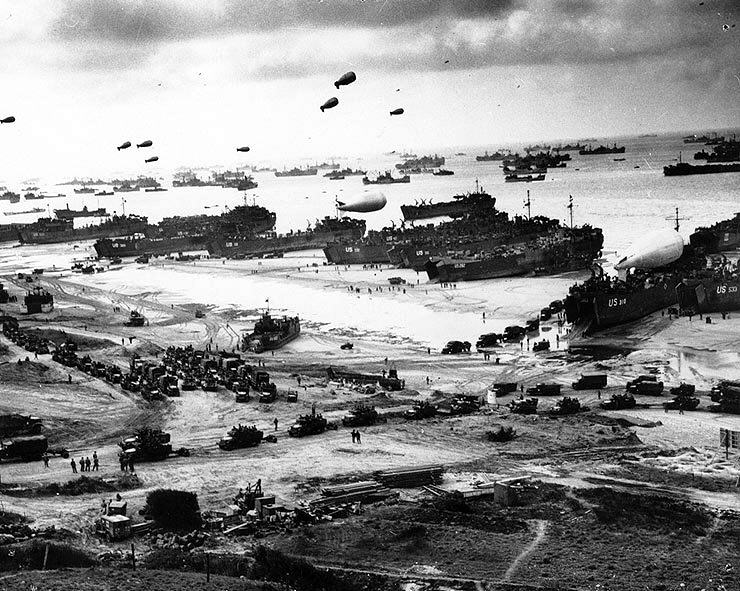
One of the most iconic images of the war, this photograph shows numerous LSTs offloading men and vehicles at the beaches of Normandy not long after D-Day. Photo source: Wikipedia.
During the course of the war, production time of the LST was drastically reduced from four months to two months. Armament was increased as the war progressed and additional anti-aircraft armament became a priority in the Pacific.[5] By the end of the war, 1,051 had been produced. Of these 113 were given to Britain under the terms of the Lend Lease program. An additional four were given to the Greek Navy. A further 116 were converted to other missions and given different hull designations.[6] Though derisively referred to as “Large Slow Target” by crew members and soldiers in reference to its top speed of 11 knots, LSTs were surprisingly durable and relatively few were lost during the war. Twenty-six were lost to enemy fire, and another thirteen were lost to weather or accidents.[7] Following World War II, LSTs continued to see service in the US Navy during the Korean War and the Cold War. As these ships were decommissioned from the USN, many were given to foreign navies. Though the war that was the impetus behind these ships ended over seventy years ago, a few LSTs still remain in service to this day.

USS LST-325 beached at Slapton Sands in January 1944 during one of the exercises rehearsing the invasion of Normandy. Photo source: navsource.org.

USS LST-325 beached off the coast of Normandy at low tide on June 12, 1944. Photo source: navsource.org.
The USS LST-325 is a fully functional LST which has been restored to its World War II configuration. LST-325 was laid down on August 10, 1942 at the Philadelphia Navy Yard and launched on October 27, 1942. She was commissioned on February 1, 1943 with Lieutenant Ira Ehrensall in command.[8] Her compliment included thirteen officers and 104 enlisted personnel. In addition to her vehicle-carrying capability, had accommodations for sixteen officers and 147 enlisted personnel. LST-325 was equipped with two twin 40mm gun mounts with Mk. 51 fire control directors, four single 40mm gun mounts, and twelve 20mm gun mounts. [9] Not long after her commissioning in February 1943, Lt. Ehrensall was transferred to the USS LST-391 and replaced by Ensign Clifford E. Mosier, who would remain the commanding officer until June 1945. Upon completing her shakedown cruise, she was sent to Algeria, where she spent three months practicing loading and beaching operations. She was then sent to the Bay of Tunis to prepare for Operation Husky, the invasion of Sicily.[10] On July 13th, LST-325 unloaded soldiers and vehicles of the 1st Armored Division at the Bay of Gela. The LST made five more trips between Africa and Sicily, bringing back Italian prisoners on two of those trips.[11]

German prisoners debarking USS LST-325 in England following the invasion of Normandy. Photo source: navsource.org.
LST-325 first came under fire on September 6th at Bizerte, Tunisia, when the ship came under attack by enemy aircraft. Four crew members were injured in the attack. A week later, the LST took part in the invasion of Salerno, Italy by offloading part of the 40th Royal Tank Regiment. During this operation, the LST again came under air attack during an attack by German fighter-bombers. Another four crew members and four British soldiers were wounded during the attack. After further supporting the invasion of the Italian mainland, LST-325 formed up with a large convoy in November 1943 bound for England. On November 21, the convoy came under attack by German bombers using Fritz X glide bombs, which sank a number of ships. One passenger aboard the LST was wounded by shrapnel from a nearby explosion.
After reaching England, the LST spent the next several months engaged in exercises along the English coast, preparing for the invasion of France. On June 5th, 1944, members of the 5th Special Engineer Brigade were loaded aboard as part of a backup force supporting the main force landing at Omaha Beach. The LST unloaded her cargo at Omaha Beach on June 7th. She would spend the next nine months making 43 trips between England and France for supply runs. On December 28, 1944, LST-325 assisted in the rescue of 700 survivors of the torpedoed transport Empire Javelin; Mosier, now a Lieutenant Commander, was awarded a Bronze Star for his efforts. On May 11, 1945, LST-325 formed up with a convoy to return to the United States. The next day, the ship was badly damaged in a storm after striking a large wave bow first, which caused a large crack to develop across the main deck. Steel plates were welded in place onto the damaged hull, which allowed the LST to limp back to the US for repairs. She arrived in Norfolk, Virginia on May 31, 1945.[12]
After arriving in the US, LST-325 moved to New Orleans to receive repairs. While in New Orleans, she was also fitted with a “Brodie” system to launch light aircraft. It was assumed the ship would move to the Pacific Theater for operations against Japan, but the war ended before the LST could move there. She was decommissioned at Green Cove Springs, Florida on July 2, 1946. She was reactivated in 1951 and became part of the Military Sea Transport Service, where she was tasked with assisting in the construction of radar sites along the eastern coasts of Greenland and Canada, which would provide the US with early warning against a Soviet bomber strike. In 1961, LST-325 was decommissioned a second time. Two years later, the ship was transferred to the Greek Navy and named Syros (L-144). She would remain active with Greece until December 1999, when was decommissioned a third and final time.
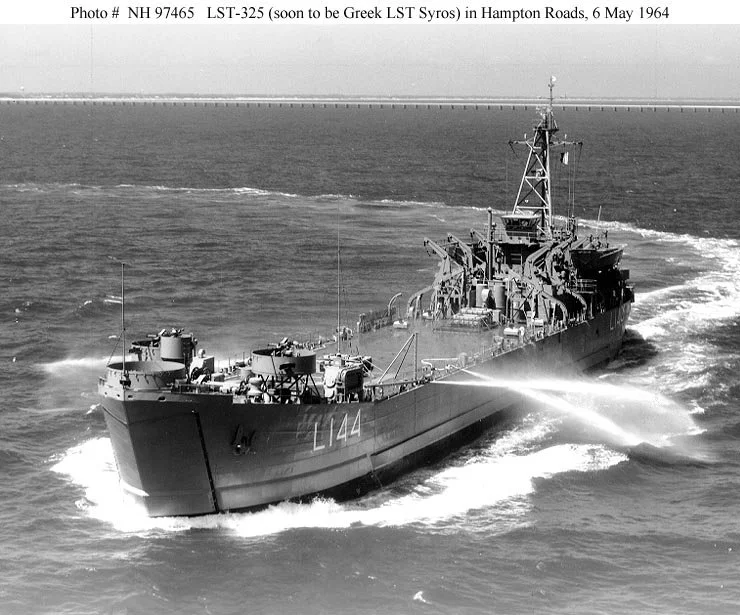
USS LST-325 in 1964, not long before she was transferred to the Greek Navy. Photo source: navsource.org.

USS LST-325 in service with the Greek Navy. Photo source: navsource.org.
Following her final decommissioning, LST-325 was acquired by The USS Ship Memorial, Inc. in 2000. A small crew was sent to Greece to bring the LST across the Atlantic- it arrived in Mobile, Alamaba on January 10, 2001. It spent the next few years being restored to its World War II appearance. In 2004, following the completion of the restoration process, the LST arrived in Evansville, Indiana, where it would be home-ported. Evansville was the site of one of the inland LST production facilities, and had produced 171 LSTs during the war.[13]

USS LST-325 moored at its home port in Evansville, Indiana in April 2017. Photo: author.
Today, LST-325 is open to the public as a floating museum. Most of the year she can be found moored in Evansville, not far from the downtown area. One month out of the year, the LST travels many of the rivers in the Upper South and Midwest areas, stopping at cities and towns to give tours to local residents. According to members of the crew, the ship undergoes one-month maintenance periods twice a year, once in the spring and once at the completion of their late summer river tour. Despite being 75 years old, the LST is in very good condition, and appears to be an accurate representation of World War II LSTs. While for the most part the ship has been returned to its World War II configuration, a number of modern additions have been made to make operations more practical. Newer engines have replaced the originals, which were not as reliable. A modern bridge has been added to the top of the superstructure, allowing much better visibility while cruising rivers. Modern generators have been added to provide power, and new radar systems have been mounted. Nonetheless, the LST definitely retains a wartime appearance. Having visited a number of museum ships in the past, LST-325 differs from others in that it has a sense of life about it- crew members are routinely seen moving about to operate systems or conduct routine maintenance. The LST has the sounds and smells of active ship, as opposed the smell of cleaners and the silence of a long-stationary ship. The tank deck houses a number of displays which discuss the history of LSTs, including the 325, and a number of artifacts donated by former LST crewmen can be seen in various locations around the vessels. Volunteer crewmen are generally friendly and are happy to answer questions posed by visitors. LST-325 is an excellent example of a preserved vessel, and will provide a unique museum dedicated to the LSTs for years too come.

The tank deck of USS LST-325 looking aft from the bow. Much of the tank deck is currently used as exhibit space. Photo: Author.

Another view of the tank deck, closer towards the aft of the ship. Photo: author.

One of the troop berthing areas located in the sides of the ship. A standard LST was capable of transporting over 100 combat-loaded troops in addition to tanks and vehicles. Photo: author.

One of the hallways in the officer cabin area. These cabins are located in the superstructure of the ship. Photo: Author.

The interior of the original bridge. Today, the USS LST-325 has a modern bridge mounted on the top of the superstructure to meet current requirements for operation. Photo: Author.

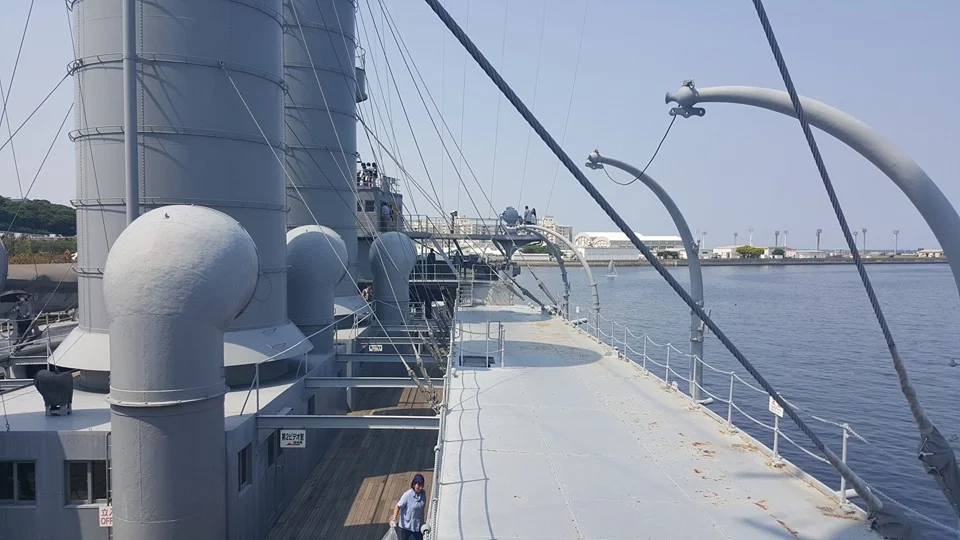
The superstructure of the LST as viewed from the deck. Photo: author.
Sources
1. Toppan, Andrew. “Tank Landing Ships.” Tank Landing Ships History, Index, 2004, www.hazegray.org/danfs/amphib/lst.htm.
2. Toppan, Andrew C. “Tank Landing Ships.” Hazegray.org, 2003, www.hazegray.org/danfs/amphib/lst.htm
3. Priolo, Gary P. “MV LST-325.” Navsource Naval History, 9 Oct. 2015, www.navsource.org/archives/10/16/160325.htm
4. Bronson, Dave. “A History of USS LST-325, 1942-2001.” LST Memorial 325, The USS LST Ship Memorial, Inc, 2017, www.lstmemorial.org/pages/history.html.
5.
[1] http://www.globalsecurity.org/military/systems/ship/lst.htm
[2] http://www.hazegray.org/danfs/amphib/lst.htm
[3] http://www.globalsecurity.org/military/systems/ship/lst.htm
[4] http://www.globalsecurity.org/military/systems/ship/lst.htm
[5] http://www.hazegray.org/danfs/amphib/lst.htm
[6] http://www.hazegray.org/danfs/amphib/lst.htm
[7] http://www.hazegray.org/danfs/amphib/lst.htm
[8] http://www.navsource.org/archives/10/16/160325.htm
[9] http://www.navsource.org/archives/10/16/160325.htm
[10] http://www.lstmemorial.org/pages/history.html
[11] http://www.lstmemorial.org/pages/history.html