Tools of War: USS LST-325

USS LST-325 visits Clarksville, Tennessee in September 2017. Photo source: author.

USS LST-325 visits Clarksville, Tennessee in September 2017. Photo source: author.

During the Second World War, the Allies found themselves in need of large numbers of amphibious transport capable of navigating the world’s oceans and delivering heavy equipment to beachheads. The Landing Ship, Tank, or LST, was developed to meet this demand. Today, the USS LST-325 remains one of the last LSTs in existence, and is a fully operational museum ship.

By Seth Marshall

                In May-June 1940, the BEF was evacuated from the shores of Dunkirk by a variety of small craft, destroyers, and requisitioned steamers. While the evacuation successfully removed over 300,000 soldiers from France, nearly all of their heavy equipment was left behind, including artillery, vehicles, tanks, etc. This event, along with subsequent operations, demonstrated the Allied need for amphibious vehicles that could effectively deliver both troops and vehicles directly to the beachhead. Additionally, it became soon apparent that a craft delivering heavy vehicles would also need to be capable of traversing the world’s oceans. What resulted was the Landing Ship, Tank (LST), an amphibious vessel capable of navigating both deep and shallow water in order to deliver tanks straight to a beachhead.

                The first LSTs were actually converted tankers. The three ships, the Bachaquero, the Misoa, and the Tasajera, were medium-sized tankers in use in Venezuela and specifically designed to safely pass over shallow sand bars. All three ships had originally been built in the late 1930s in Britain by Furness Shipbuilding. Bachaquero and Misoa were sister ships and both displaced 4,193 tons, while the Tasajera displaced 3,952 tons. Following their requisitioning by the Royal Navy in late 1940 and early 1941, they were sent on to Belfast, Ireland for conversion into landing ships. Their original bows were removed and replaced with a bow that featured a ramp, and much of the interior deck space was cleared to make room for vehicles. The conversion process was completed by the end of 1941, upon which the ex-tankers were capable of carrying two Landing Craft Mechanized (LCM), or 22 25-ton or 18 30-ton tanks, or 33 3-ton vehicles, along with 210 soldiers.[1] These converted vessels eventually saw action during Operation Torch, the invasion of Morroco, in November 1942. However, they were more of a proof-of-concept rather than a final product. Purpose-built designs would quickly overtake these ships.

                In 1941, following an agreement between President Franklin Roosevelt and Prime Minister Winston Churchill, a group from the British Admiralty arrived in the United States to collaborate on the design of landing vessels with the US Navy’s Bureau of Ships. John Niedermair, a member of the Bureau of Ships, is credited with originating the basic outline of what would become the mass-produced LST- a ship capable of moving through both deep and shallow water, equipped with a ballast system that would allow the landing ship to pump water in and out for beaching operations and ocean travel. The design, approved on November 5, 1941, called for a ship 280 feet in length. This was modified several times over the coming months and eventually was settled at a length of 328 feet, with a 50-foot beam and minimum draft of three feet 9 ½ inches. The LST could accommodate 2100 tons worth of tanks which would enter and exit via a clamshell-type door at the front with a 12-14 foot ramp. The tank deck was ventilated, allowing the vehicles to run their engines without fear of asphyxiation. Model testing of the design began in early 1942.[2]

                Following testing, construction of LSTs began in earnest in mid-1942. The first LST was laid down on June 10, 1942 at New News, Virginia- by the end of the year, twenty-three were in commission. Owing to the priority of coastal shipyards for building warships, a large portion of LSTs were built at inland shipyards along rivers, which the shallow-water going LSTs could navigate. The first production LSTs entered combat in the Solomon Islands in 1943.

                Not long after the first LSTs began entering service, they began to be modified for missions apart from ferrying tanks and vehicles to beaches. Some LSTs were converted into landing craft repair ships, and featured additional cranes, booms, winches, and workshops necessary to repair damaged vessels. Thirty-eight LSTs were converted to small hospital ships, a number of which ferried wounded troops back from the beaches of Normandy to England. Fifteen LSTs were converted to move railcars to France. Locomotives and heavier rolling stock were moved on larger ships, leaving boxcars and flatcars to be carried by the LSTs.[3] Late during World War II, several LSTs were modified to be able to launch and recover light observation aircraft. Initially, LSTs were give a plywood runway 197 feet long, which allowed Piper L-4 observation aircraft to take off. In this configuration, ten aircraft could be carried. Later, Lieutenant James Brodie of the Office of Strategic Services developed a trapeze system in which an L-4 or L-5 could be launched and recovered from an LST. A bar with a hook above the cockpit was used to hook onto a trapeze bar suspended by two gantries over the side of the ship. This version of the LST could actually carry out normal transportation operations. The Brodie system was developed late in the war, and saw action only during the Battle of Okinawa.[4]

USS LST-325 landing vehicles in Italy. Photo source: Navsource.org.

USS LST-325 landing vehicles in Italy. Photo source: Navsource.org.

A side view of USS LST-325 equipped with a Brodie system. This photo was likely taken in 1945 near the end of the war. Photo source: lstmemorial.org.

A side view of USS LST-325 equipped with a Brodie system. This photo was likely taken in 1945 near the end of the war. Photo source: lstmemorial.org.

A view from the deck of an LST converted for use as an "aircraft carrier." The aircraft in this picture are Piper L-4 observation aircraft, frequently used for artillery spotting. Photo source: Wikipedia.

A view from the deck of an LST converted for use as an "aircraft carrier." The aircraft in this picture are Piper L-4 observation aircraft, frequently used for artillery spotting. Photo source: Wikipedia.

One of the most iconic images of the war, this photograph shows numerous LSTs offloading men and vehicles at the beaches of Normandy not long after D-Day. Photo source: Wikipedia.

One of the most iconic images of the war, this photograph shows numerous LSTs offloading men and vehicles at the beaches of Normandy not long after D-Day. Photo source: Wikipedia.

                During the course of the war, production time of the LST was drastically reduced from four months to two months. Armament was increased as the war progressed and additional anti-aircraft armament became a priority in the Pacific.[5] By the end of the war, 1,051 had been produced. Of these 113 were given to Britain under the terms of the Lend Lease program. An additional four were given to the Greek Navy. A further 116 were converted to other missions and given different hull designations.[6] Though derisively referred to as “Large Slow Target” by crew members and soldiers in reference to its top speed of 11 knots, LSTs were surprisingly durable and relatively few were lost during the war. Twenty-six were lost to enemy fire, and another thirteen were lost to weather or accidents.[7] Following World War II, LSTs continued to see service in the US Navy during the Korean War and the Cold War. As these ships were decommissioned from the USN, many were given to foreign navies. Though the war that was the impetus behind these ships ended over seventy years ago, a few LSTs still remain in service to this day.

USS LST-325 beached at Slapton Sands in January 1944 during one of the exercises rehearsing the invasion of Normandy. Photo source: author.

USS LST-325 beached at Slapton Sands in January 1944 during one of the exercises rehearsing the invasion of Normandy. Photo source: author.

USS LST-325 beached off the coast of Normandy at low tide on June 12, 1944. Photo source: Navsource.org.

USS LST-325 beached off the coast of Normandy at low tide on June 12, 1944. Photo source: Navsource.org.

                The USS LST-325 is a fully functional LST which has been restored to its World War II configuration. LST-325 was laid down on August 10, 1942 at the Philadelphia Navy Yard and launched on October 27, 1942. She was commissioned on February 1, 1943 with Lieutenant Ira Ehrensall in command.[8] Her compliment included thirteen officers and 104 enlisted personnel. In addition to her vehicle-carrying capability, had accommodations for sixteen officers and 147 enlisted personnel. LST-325 was equipped with two twin 40mm gun mounts with Mk. 51 fire control directors, four single 40mm gun mounts, and twelve 20mm gun mounts. [9] Not long after her commissioning in February 1943, Lt. Ehrensall was transferred to the USS LST-391 and replaced by Ensign Clifford E. Mosier, who would remain the commanding officer until June 1945. Upon completing her shakedown cruise, she was sent to Algeria, where she spent three months practicing loading and beaching operations. She was then sent to the Bay of Tunis to prepare for Operation Husky, the invasion of Sicily.[10] On July 13th, LST-325 unloaded soldiers and vehicles of the 1st Armored Division at the Bay of Gela. The LST made five more trips between Africa and Sicily, bringing back Italian prisoners on two of those trips.[11]

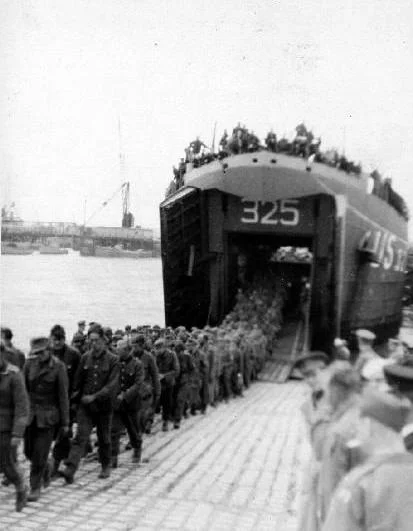
German prisoners debarking USS LST-325 in England following the invasion of Normandy. Photo source: Navsource.org.

German prisoners debarking USS LST-325 in England following the invasion of Normandy. Photo source: Navsource.org.

                LST-325 first came under fire on September 6th at Bizerte, Tunisia, when the ship came under attack by enemy aircraft. Four crew members were injured in the attack. A week later, the LST took part in the invasion of Salerno, Italy by offloading part of the 40th Royal Tank Regiment. During this operation, the LST again came under air attack during an attack by German fighter-bombers. Another four crew members and four British soldiers were wounded during the attack. After further supporting the invasion of the Italian mainland, LST-325 formed up with a large convoy in November 1943 bound for England. On November 21, the convoy came under attack by German bombers using Fritz X glide bombs, which sank a number of ships. One passenger aboard the LST was wounded by shrapnel from a nearby explosion.

                After reaching England, the LST spent the next several months engaged in exercises along the English coast, preparing for the invasion of France. On June 5th, 1944, members of the 5th Special Engineer Brigade were loaded aboard as part of a backup force supporting the main force landing at Omaha Beach. The LST unloaded her cargo at Omaha Beach on June 7th. She would spend the next nine months making 43 trips between England and France for supply runs. On December 28, 1944, LST-325 assisted in the rescue of 700 survivors of the torpedoed transport Empire Javelin; Mosier, now a Lieutenant Commander, was awarded a Bronze Star for his efforts. On May 11, 1945, LST-325 formed up with a convoy to return to the United States. The next day, the ship was badly damaged in a storm after striking a large wave bow first, which caused a large crack to develop across the main deck. Steel plates were welded in place onto the damaged hull, which allowed the LST to limp back to the US for repairs. She arrived in Norfolk, Virginia on May 31, 1945.[12]

                After arriving in the US, LST-325 moved to New Orleans to receive repairs. While in New Orleans, she was also fitted with a “Brodie” system to launch light aircraft. It was assumed the ship would move to the Pacific Theater for operations against Japan, but the war ended before the LST could move there. She was decommissioned at Green Cove Springs, Florida on July 2, 1946. She was reactivated in 1951 and became part of the Military Sea Transport Service, where she was tasked with assisting in the construction of radar sites along the eastern coasts of Greenland and Canada, which would provide the US with early warning against a Soviet bomber strike. In 1961, LST-325 was decommissioned a second time. Two years later, the ship was transferred to the Greek Navy and named Syros (L-144). She would remain active with Greece until December 1999, when was decommissioned a third and final time.

USS LST-325 in 1964, not long before she was transferred to the Greek Navy. Photo source: Navsource.org.

USS LST-325 in 1964, not long before she was transferred to the Greek Navy. Photo source: Navsource.org.

USS LST-325 in service with the Greek Navy. Photo source: Navsource.org.

USS LST-325 in service with the Greek Navy. Photo source: Navsource.org.

                Following her final decommissioning, LST-325 was acquired by The USS Ship Memorial, Inc. in 2000. A small crew was sent to Greece to bring the LST across the Atlantic- it arrived in Mobile, Alamaba on January 10, 2001. It spent the next few years being restored to its World War II appearance. In 2004, following the completion of the restoration process, the LST arrived in Evansville, Indiana, where it would be home-ported. Evansville was the site of one of the inland LST production facilities, and had produced 171 LSTs during the war.[13] 

USS LST-325 moored at its home port in Evansville, Indiana in April 2017. Photo source: author.

USS LST-325 moored at its home port in Evansville, Indiana in April 2017. Photo source: author.

                Today, LST-325 is open to the public as a floating museum. Most of the year she can be found moored in Evansville, not far from the downtown area. One month out of the year, the LST travels many of the rivers in the Upper South and Midwest areas, stopping at cities and towns to give tours to local residents. According to members of the crew, the ship undergoes one-month maintenance periods twice a year, once in the spring and once at the completion of their late summer river tour. Despite being 75 years old, the LST is in very good condition, and appears to be an accurate representation of World War II LSTs. While for the most part the ship has been returned to its World War II configuration, a number of modern additions have been made to make operations more practical. Newer engines have replaced the originals, which were not as reliable. A modern bridge has been added to the top of the superstructure, allowing much better visibility while cruising rivers. Modern generators have been added to provide power, and new radar systems have been mounted. Nonetheless, the LST definitely retains a wartime appearance. Having visited a number of museum ships in the past, LST-325 differs from others in that it has a sense of life about it- crew members are routinely seen moving about to operate systems or conduct routine maintenance. The LST has the sounds and smells of active ship, as opposed the smell of cleaners and the silence of a long-stationary ship. The tank deck houses a number of displays which discuss the history of LSTs, including the 325, and a number of artifacts donated by former LST crewmen can be seen in various locations around the vessels. Volunteer crewmen are generally friendly and are happy to answer questions posed by visitors. LST-325 is an excellent example of a preserved vessel, and will provide a unique museum dedicated to the LSTs for years too come.

The tank deck of the USS LST-325 looking aft from the bow. Much of the tank deck is currently used as exhibit space. Photo source: author.

The tank deck of the USS LST-325 looking aft from the bow. Much of the tank deck is currently used as exhibit space. Photo source: author.

Another view of the tank deck, closer towards the aft of the ship. Photo source: author.

Another view of the tank deck, closer towards the aft of the ship. Photo source: author.

One of the troop berthing areas located in the sides of the ship. A standard LST was capable of transporting over 100 combat-loaded troops in addition to tanks and vehicles. Photo source: author.

One of the troop berthing areas located in the sides of the ship. A standard LST was capable of transporting over 100 combat-loaded troops in addition to tanks and vehicles. Photo source: author.

One of the hallways in the officer cabin area. These cabins are located in the superstructure of the ship. Photo source: author.

One of the hallways in the officer cabin area. These cabins are located in the superstructure of the ship. Photo source: author.

The interior of the original bridge. Today, the USS LST-325 has a modern bridge mounted on top of the superstructure to meet current requirements for operation. Photo source: author.

The interior of the original bridge. Today, the USS LST-325 has a modern bridge mounted on top of the superstructure to meet current requirements for operation. Photo source: author.

The superstructure of the LST as viewed from the deck. Photo source: author.

The superstructure of the LST as viewed from the deck. Photo source: author.

Film Review: Dunkirk

Dunkirk_Film_poster wikipedia.jpg

By Seth Marshall

Christopher Nolan, director of the Dark Knight Trilogy, Inception and Interstellar has turned his attention on the miraculous evacuation of the Allied forces from Dunkirk in late May and early June 1940.


                On May 10th, 1940, the so-called Phoney War, a period of relative inactivity along the Western Front in Europe, came to a sudden and dramatic end when the German Army invaded France and the Low Countries. Over the course of the next several weeks, the Wehrmacht would conquer the Netherlands, Belgium, and ultimately France. Fall Gelb, Case Yellow, called for Army Group A under the command of General Gerd von Rundstedt to advance through the Ardennes, break through French defenses along the Meuse River at Sedan, and ultimately advance to the Channel coast, with the objective of cutting the Allied forces in half. Army Group B, under the command of General  Fedar von Bock, was to drive into Belgium and the Netherlands, with the objective of occupying those countries. [1] After several days of French resistance, the Wehrmacht successfully broke the French lines at Sedan, lead by armor commanders General Ewald von Kleist and General Heinz Guderian. By May 20th, Guderian’s tanks had captured Amiens and Abbeville, bisecting the Allied forces and leaving the entirety of the British Expeditionary Force (BEF) cut off from the rest of France. In an effort to stem the German advance and reserve the rapidly deteriorating situation, the commander of French forces, General Maurice Gamelin, ordered French forces in their increasingly poor position to attack towards the south. However, Gamelin was replaced on May 19th, and his replacement, General Maxime Weygand, delaying the counterattack proposed by Gamelin for three days while he inspected the front lines. By the time Weygand ordered the attack forward on May 22nd, the time for an effective counterattack had passed.[2]

                It was in this perilous situation that the BEF found itself in late May 1940. Commanding the BEF was Lord Field Marshal John Gort. Born in 1886 in County Durham, Gort had served with distinction during the First World War and was decorated with the Military Cross, the Distinguished Service Order with two bars, and the Victoria Cross, Britain’s highest military honor. Advancing through the ranks between the Wars, Gort had held various command positions, including Chief of the Imperial General Staff, prior to his promotion to full general in 1937.[3] Appointed as commander of the BEF in 1939, Gort encountered difficulties in working with his French allies. This would become apparent in the wake of the German invasion of France, as the BEF’s position became more and more tenuous. Ignoring calls for reinforcement by the French and London, Gort began ordering his forces to pull back- on the night of May 18-19th, Gort ordered the British I and II Corps to pull back to the Dendre River from the Senne River. On May 21st, tired of the dallying of French forces, Gort ordered the 5th and 50th Divisions, supported by 100 tanks, to attack south from Arras, with the objective of breaking through the German encirclement. Initially, the attack achieved a modicum of success, and the British forces began pushing back the Germans, causing some panic among local German commanders, including then-Major General Erwin Rommel: “Powerful armored forces had swarmed out of Arras, subjecting us to heavy losses in men and equipment. The anti-tank guns that we speedily brought into action proved too light to be effective against the heavily-armored British tanks. Most of them were put of action by the enemy artillery...”[4] The British Matilda tanks, more heavily armed and armored than most of their German counterparts, proved difficult to disable. In the end, only by resorting to artillery guns and 88mm anti-aircraft guns were the Germans able to blunt the British offensive.[5] On May 22nd, Guderian’s tanks began moving again, advancing north into Boulogne. At Boulogne, they encountered stiff resistance and fought for three days before finally taking the city on May 25th. By then, Gort had decided that the only viable option left to him was to evacuate the BEF. On the evening of May 23rd, Gort ordered the BEF to begin withdrawing to the port of Dunkirk, the last major port available for evacuation.[6] Withdrawing from Belgium, Gort ordered the garrison at Calais to remain behind as a rearguard and placed various forces at ideal locations to slow the German advance and buy time for an evacuation to take place. It was at this time that one of the more controversial decisions of the war in 1940 took place when on May 24th Hitler gave an order to halt the advance of the panzers, leaving the final capture of Dunkirk up to the infantry with the support of the Luftwaffe. After the war, various German officers offered their explanations for the delay. Von Kleist said that Luftwaffe commander Herman Goring had lobbied Hitler to give the Luftwaffe the opportunity to finish off the BEF from the air; “Goring had undertaken to settle Dunkirk’s hash with planes alone… He begged Hitler to bestow the honor not on the army but on the Luftwaffe, thereby making the battle of Dunkirk a victory for the regime.”[7] Von Rundstedt believed Hitler had halted the advance to create a more advantageous position for Germany to negotiate surrender terms with Britain; “The Fuhrer had counted on a speedy end to western operations… He deliberately let the bulk of the BEF escape, so as to make peace negotiations easier.” Von Rundstedt’s claim is negated by the fact that his own diary recorded him as having made the suggestion to halt to Hitler himself.[8] In any case, the combination of the delayed advance of the panzers and the stubborn resistance of pockets of BEF forces in locations such as Calais served to buy additional time for the BEF to organize an evacuation. Gort continued to withdraw his forces, forming a defensive perimeter around Dunkirk. In the meantime, the British Navy began preparing to carry out the evacuation.

LORD FIELD MARSHAL JOHN GORT'S OFFICIAL PORTRAIT. DESPITE GORT'S DIFFICULT SITUATION AS COMMANDER OF THE BEF, HE WOULD COME UNDER HEAVY CRITICISM AS HAVING PERCEIVED TO HAVE ABANDONED THE FRENCH. GORT WOULD LATER SERVE IN THE MEDITERRANEAN AS GOVERN…

LORD FIELD MARSHAL JOHN GORT'S OFFICIAL PORTRAIT. DESPITE GORT'S DIFFICULT SITUATION AS COMMANDER OF THE BEF, HE WOULD COME UNDER HEAVY CRITICISM AS HAVING PERCEIVED TO HAVE ABANDONED THE FRENCH. GORT WOULD LATER SERVE IN THE MEDITERRANEAN AS GOVERNOR OF GIBRALTAR, AS THE GOVERNOR OF MALTA, AND LASTLY IN THE POSITION OF HIGH COMMISSIONER FOR PALESTINE AND TRANSJORDAN. PHOTO: WIKIPEDIA.

GENERAL GERD VON RUNDSTEDT, COMMANDER OF GERMAN ARMY GROUP A, WHICH SUCCESSFULLY BROKE THROUGH FRENCH DEFENSES AND SWEPT INTO FRANCE. RUNDSTEDT HAD RETIRED IN 1938 ONLY TO BE RECALLED TO ACTIVE SERVICE WHEN GERMANY INVADED POLAND. RUNDSTEDT WOULD BE…

GENERAL GERD VON RUNDSTEDT, COMMANDER OF GERMAN ARMY GROUP A, WHICH SUCCESSFULLY BROKE THROUGH FRENCH DEFENSES AND SWEPT INTO FRANCE. RUNDSTEDT HAD RETIRED IN 1938 ONLY TO BE RECALLED TO ACTIVE SERVICE WHEN GERMANY INVADED POLAND. RUNDSTEDT WOULD BE SUBSEQUENTLY BE DISMISSED IN LATE 1941, THE SUMMER OF 1944, AND MARCH 1945- BY HITLER EACH TIME. AN EXCELLENT COMMANDER, HE WAS RECALLED TO SERVICE SEVERAL TIMES TO SALVAGE DEFENSIVE SITUATIONS. PHOTO SOURCE: WIKIPEDIA.

The campaign in France from 21 May to 31 May, ending with the encirclement of the BEF and elements of the French and Belgian armies at Dunkirk. Source: Warfare History Network.

The campaign in France from 21 May to 31 May, ending with the encirclement of the BEF and elements of the French and Belgian armies at Dunkirk. Source: Warfare History Network.

                In command of the evacuation was Vice Admiral Sir Bertram Ramsey, who was the commander of Royal Navy forces at the port of Dover. Overseeing the operations from his headquarters in the catacombs beneath Dover castle, Ramsey ordered Captain William Tennant, the chief of staff to the First Sea Lord, to proceed to Dunkirk to function as the senior naval officer in place and send his recommendations back to Ramsey as to the best means of evacuating the BEF. On May 27th, the day following London’s official order to begin evacuation, Tennant proceeding across the Channel on the destroyer HMS Wolfhound, under frequent attack by Luftwaffe dive-bombers. On his arrival, Tennant made two observations that would prove critical in the evacuation. First, with the bombing of Dunkirk harbor by the Luftwaffe having caused serious damage, Tennant recognized that naval units would be unable to use the docks to embark men. Second, he realized that the harbor’s moles, which served as breakwaters for the harbor, were relatively undamaged and could be used in place of the devastated docks. Tennant tested the moles’ capability by directing the steamship Queen of the Channel to dock alongside one of the moles, which it accomplished successfully. Tennant recommended to Ramsey that he send every ship available to Dunkirk, first asking him to send them to the beaches, then advising that the moles be used as the primary means to extricate the soldiers. [9] Ramsey ordered the 129 ships at his disposal, including fast modern destroyers prized by the Admiralty as convoy escorts, into action to carry out the evacuation. In order to assist the evacuation, a call was put out to owners of private boats in southern England to take their vessels across the Channel and assist the evacuation by ferrying men from the beach to larger ships further out in the Channel, which would in turn take them to Dover. Some 1400 small ships, including fishing trawlers, motorboats, yachts, ferries, and barges, made their way from their home ports along the Channel and the Thames River estuary to Dunkirk to take part.[10]

VICE ADMIRAL SIR BERTRAM RAMSEY, IN OVERALL COMMAND OF THE EVACUATION OF THE BEF FROM DUNKIRK. WORKING ALMOST CONSTANTLY IN DOVER CASTLE, RAMSEY'S DEDICATION AND ULTIMATE SUCCESS IN ORCHESTRATING THE OPERATION EARNED HIM A VISIT WITH KING GEORGE VI …

VICE ADMIRAL SIR BERTRAM RAMSEY, IN OVERALL COMMAND OF THE EVACUATION OF THE BEF FROM DUNKIRK. WORKING ALMOST CONSTANTLY IN DOVER CASTLE, RAMSEY'S DEDICATION AND ULTIMATE SUCCESS IN ORCHESTRATING THE OPERATION EARNED HIM A VISIT WITH KING GEORGE VI AS WELL AS THE TITLE OF KNIGHT COMMANDER OF THE ORDER OF THE BATH. PHOTO: WIKIPEDIA.

As the senior Royal Navy officer on the ground, at-that-time Captain William Tennant (later Admiral Sir William Tennant) was in charge of overseeing evacuation efforts at Dunkirk. Photo source: Wikipedia.

As the senior Royal Navy officer on the ground, at-that-time Captain William Tennant (later Admiral Sir William Tennant) was in charge of overseeing evacuation efforts at Dunkirk. Photo source: Wikipedia.

Among the most famous images captured during the evacuation of Dunkirk was this: the image of thousands of British troops waiting on the sands of the French coast in the hopes of being evacuated. Photo source: Warfare History Network.

Among the most famous images captured during the evacuation of Dunkirk was this: the image of thousands of British troops waiting on the sands of the French coast in the hopes of being evacuated. Photo source: Warfare History Network.

                By May 28th, the evacuation was proceeding at full speed. Destroyers began picking up boatloads of soldiers from the moles, while small boats ferried teams of men from the beaches to ships waiting further offshore. All the while, German artillery continued to rain down on Dunkirk and the Luftwaffe continued to torment the occupants of the harbor and beaches with constant machine-gun fire and bombing runs, coupled with the sounds of their sirens. The RAF attempted to disrupt the Luftwaffe’s operations by sending fighter patrols across the Channel, but their ability to provide protection was limited by their range, which meant that they could only spend a short time overhead. The RAF also had to provide aircraft for protecting sealanes, which limited the number of aircraft they could commit to the evacuation. As a result, the Stuka dive-bombers merely had to wait for RAF fighters to turn for home to refuel before renewing their attacks. During the day, the Queen of the Channel was sunk by aerial attacks, resulting in the civilian ships being limited to nighttime operations only.[11] Despite these difficulties, the British were able to evacuate 17,804 men on the 28th.

Amidst the seemingly endless Luftwaffe attacks, BEF soldiers take aim at attacking bombers with their rifles. Photo source: Warfare History Network.

Amidst the seemingly endless Luftwaffe attacks, BEF soldiers take aim at attacking bombers with their rifles. Photo source: Warfare History Network.

                May 29th saw a turn for the better for the BEF. A number of French warships arrived to assist in the evacuation, and despite continuing German artillery fire, over 47,000 soldiers were taken off the beaches. Three Royal Navy destroyers were lost on this day to Luftwaffe raids, a U-boat attack, and one by Kriegsmarine E-boat torpedo attacks. The merchant ship Mona Queen was sunk by a mine, while six more ships were sunk by air raids.[12] Losses were such that the Admiralty forbade the use of modern destroyers in order to preserve them for convoy escort duty.[13] By May 31st, so many British troops had been taken off the beaches that the decision was made to remove Lord Gort from his position, as a Corps commander could take over from there. He therefore turned over command to General Harold Alexander.[14]

The Mona Queen, a liner from the Isle of Man Steam Packet Company, sinks after striking a mine on 29 May. Photo source: Wikipedia.

The Mona Queen, a liner from the Isle of Man Steam Packet Company, sinks after striking a mine on 29 May. Photo source: Wikipedia.

The French destroyer Bourrasque sinks after striking a mine on 30 May after having taken on a load of soldiers, who are now seen jumping overboard. Photo source: Warfare History Network.

The French destroyer Bourrasque sinks after striking a mine on 30 May after having taken on a load of soldiers, who are now seen jumping overboard. Photo source: Warfare History Network.

                While the evacuation was proceeding, the scene at Dunkirk remained hellish, with artillery fire and Stuka dive bombers incessantly raining down destruction. On the beaches, there were still thousands of men waiting their chance to escape from the advancing Germans. Arthur Devine, the captain of a small boat shuttling men from the beach to larger ships offshore, recalled the scene years later:

“The picture will always remain sharp-etched in my memory- the lines of men wearily and sleepily staggering across the beach from the dunes to the shallows, falling into little boats, great columns of men thrust out into the water among bomb and shell splashes. The foremost ranks were shoulder deep, moving forward under the command of young subalterns, themselves with their heads just above the little waves that rode into the sand. As the front ranks were dragged aboard the boats, the rear ranks moved up, from ankle deep to knee deep, from knee deep to waist deep, until they, too, came to shoulder depth and their turn.”[15]

By the morning of June 1st, 200,000 Allied troops had been taken off the beaches. That day however saw the loss of four more destroyers within a short period, while four more were damaged. Even more civilian vessels were lost or damaged. Despite the ever-present artillery fire and Stukas, 68,000 more men were evacuated to Britain. Among the soldiers evacuated on this day was Norman Wickman, an engineer with the 62nd Chemical Warfare Company. Wickman was evacuated on board the destroyer HMS Worcester.

“Urging the men along the mole, I took a last look around, making sure everyone had gone, and then raced down the walkway. The destroyer was pulling away from its berth. I hesitated. The gap was too wide. “Jump, you silly bugger, jump” yelled a burly sailor at the ship’s rail. So I jumped. Immediately, I realized I had made a big mistake. In mid-air, I glanced down. The foaming water churned wildly where the destroyer’s sharp propeller blades were waiting to chop me to pieces. Leaning far out, the muscular sailor grabbed my shredded epaulette, flapping loosely from my uniform. With a crash, I slammed against the ship’s rail. Using brute strength, the sailor hauled me over, where I fell in a crumpled heap on the deck. Unbridled joy and relief overwhelmed me. I was on the destroyer, safe and on my way home. Then, all hell let loose. “Get up against the bulkhead,” shouted the sailor. Stunned and winded, I stumbled across the deck. As I pressed against the gray metal, I heard the planes. Stukas, 30-40 of them, dived on the Worcester time and time again. Bombs rained down like confetti all around the ship. The destroyer, so filled with troops it was top heavy, heeled over wildly at heart-stopping, stomach-lurching angles to evade the falling bombs. Bombs to the rear lifted the stern clear of the water. The massive propellers screamed until the ship crashed down again. Colossal columns of water washed over the ship. I closed my eyes and tried to make my body disappear into the bulkhead.By some miracle, none of the 100 bombs made a direct hit on the ship. Shrapnel killed 46 and wounded another 180 before the attacks tapered off. As sanity returned, I opened my eyes and looked round. The planes had disappeared. The Worcester, with its crowded decks, was steaming across the channel to the British coast. I may have been exhausted by the day’s events, but I felt exhilarated.”[16]

British soldiers board a destroyer at the mole at Dunkirk. Photo source: Warfare History Network.

British soldiers board a destroyer at the mole at Dunkirk. Photo source: Warfare History Network.

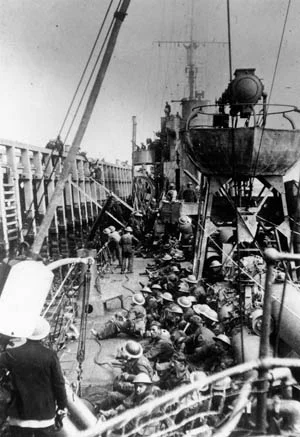
British soldiers crowded aboard a destroyer following evacuation prepare to dock at Dover on 31 May. Photo source: Wikipedia.

British soldiers crowded aboard a destroyer following evacuation prepare to dock at Dover on 31 May. Photo source: Wikipedia.

                The following day, June 2nd, Ramsey ordered a halt to the daylight evacuation, fearing disproportionate losses in ships and naval personnel; instead, he planned to continue the evacuation under the cover of darkness that night. Some 4,000 British soldiers remained ashore functioning as a rear guard, while another 50-60,000 French troops continued to hold the defensive perimeter, which was gradually being reduced by the Germans. For the next day and half, ships would continue to make the approach to Dunkirk at night and take even more men. By 11PM on June 2nd, the last of the BEF rearguard had been evacuated; Tennant reported back to Ramsey, “Operation Dynamo complete. Returning to Dover,” before leaving the beach.[17] While the BEF had now been extricated, ships continued to embark French soldiers. On the night of June 3rd-4th, the odd assembly of ships crossed the Channel for the final night of the operation. Over 26,000 French soldiers were taken back to Britain before the operation was finally called off in the early hours of June 4th.[18] The destroyer Shikari, with 383 soldiers on board, was the last ship to leave Dunkirk, pulling away at 3:40AM.[19]

                For an evacuation that was initially estimated to be capable of saving 40,000 men, Operation Dynamo had been an astounding success. Some 198,000 British and 140,000 French and Belgian troops were taken back to England from the pocket at Dunkirk. [20] Some 40,000 Frenchmen remained behind as a rearguard in Dunkirk and were killed or captured. While nearly 200,000 British soldiers were saved, the BEF still suffered heavily- 11,014 killed, 14,074 wounded, and 41,338 wounded since the campaign had begun.[21] In addition, the BEF had left nearly all of its heavy equipment- it left behind 2,472 guns, 63,879 vehicles, 20,548 motorcycles, and 500,000 tons of supplies. In the air, the RAF had lost 106 fighters, inflicting a roughly equal number of losses on the Luftwaffe. The Royal Navy had lost six of its destroyers, while 19 more suffered damage. Including the lost destroyers, 243 ships of all types had been sunk.[22] Nonetheless, the manpower of the BEF had in large part been saved. However, for Lord Gort, his command of the BEF would prove to be his last major command. He was appointed to several Governor positions, most notable in Malta while the island was under siege, before his retirement. Gort died in 1946 just shy of his 60th birthday.

British soldiers, having just arrived at Dover exhausted from their ordeal in France, await a train to take them North. Photo source: Wikipedia.

British soldiers, having just arrived at Dover exhausted from their ordeal in France, await a train to take them North. Photo source: Wikipedia.

Not all soldiers were successfully evacuated from Dunkirk. Some 40,000 French soldiers, left behind as a rearguard to hold off the Germans, were captured when the Wehrmacht finally overran the port. Photo source: Warfare History Network.

Not all soldiers were successfully evacuated from Dunkirk. Some 40,000 French soldiers, left behind as a rearguard to hold off the Germans, were captured when the Wehrmacht finally overran the port. Photo source: Warfare History Network.

                Christopher Nolan’s film is the third film to be released that focuses on the subject of the evacuation at Dunkirk, though the evacuation has appeared in other films as a background. At 106 minutes, Dunkirk is one of Christopher Nolan’s shortest films, particularly in light of his more recent films, Interstellar and The Dark Knight Rises, both of which were well over two hours long.[23] Much of the film was shot on location at present-day Dunkirk, which certainly lends an air of authenticity to the film.  Among the cast are previous actors who have appeared in Nolan films, including Tom Hardy, starring as Spitfire pilot Farrier, and Cillian Murphy, who appears as a distressed BEF soldier. Other members of the cast include: Kenneth Branaugh as Commander Bolton, James D’Arcy as Captain Winnant, Fionn Whitehead as a young soldier named Tommy, and Mark Rylance as Dawsett. In an effort to make the film accurate, Nolan used three Spitfires and a Hispano Buchon painted as an ME-109 to depict the aerial sequences. Additionally, he used the French destroyer Maille-Breze as a stand-in for a period destroyer. While this ship wasn’t commissioned until the 1950s, it is visually similar to destroyers of the period.

Nolan wanted to use as much period-correct vehicles as possible to lend historical accuracy to the film. Pictured is one of several Supermarine Spitfires used in the film. Photo source: Wikipedia. 

Nolan wanted to use as much period-correct vehicles as possible to lend historical accuracy to the film. Pictured is one of several Supermarine Spitfires used in the film. Photo source: Wikipedia. 

Though there are a number of Me-109s that remain airworthy, none are the correct version that would have been flying in 1940. As a result, Nolan used a Hispano Ha 1112 "Buchon" as a substitute. This aircraft is a post-war design based on the airfram…

Though there are a number of Me-109s that remain airworthy, none are the correct version that would have been flying in 1940. As a result, Nolan used a Hispano Ha 1112 "Buchon" as a substitute. This aircraft is a post-war design based on the airframe of the Me-109 paired with the engine of the Spitfire. Buchons have been used as Me-109 stand-ins in film before, most notably in the 1968 film "Battle of Britain." Photo source: Wikipedia.

The retired French destroyer Maille-Breze, built in the 1950s, was used as a substitute for British destroyers in the film. Photo source: Wikipedia.

The retired French destroyer Maille-Breze, built in the 1950s, was used as a substitute for British destroyers in the film. Photo source: Wikipedia.

The MLV Castor was one of several ships used to portray a number of minesweepers in the film. Photo source: Wikipedia.

The MLV Castor was one of several ships used to portray a number of minesweepers in the film. Photo source: Wikipedia.

                With all of these efforts to maintain a semblance of historical accuracy then, the film is surely a knockout, right? Well, this is not so easy to say. Readers should be warned that hereafter will be spoilers. The film is presented along three timeframes that eventually converge at the climax of the movie. We are first introduced to the perspective of the soldier Tommy, played by Fionn Whitehead. His story, one of scarcely avoiding death and escape, is told over the course of a week. The story of the crew of a small pleasure boat, captained by Dawson (played by Mark Rylance), takes place over the course of a single day. The third timeline is told from the perspective of Farrier, played by Tom Hardy, a RAF Spitfire pilot flying a hour-long patrol towards Dunkirk. Each of the individual’s stories are very unique and are well-crafted examples of the types of experiences that were had by those who were actually there. Tommy’s story as the soldier frequently alternates be long stretches of boredom interspersed with moments of sheer terror. One of the most striking moments of the film occurs in its opening moments when Stuka dive bombers plummet downwards towards Tommy’s location on the beach. Their howling sirens overwhelm all other sound and we can clearly see the panic on soldiers’ faces. Later, there are moments when Tommy seems safe and everything is suddenly upended by a torpedo strike. With Dawson, the viewer gains the sense of the dedication to sailing across the Channel out of either patriotism or duty, and also of the moments of indecision that suddenly creep up upon the boat captain and his two crew members. Farrier’s story is the opposite of Tommy’s- everything that the pilot does is relegated by time limits and fuel consumption. Eventually, he is decides to set his own personal safety aside by sacrificing his precious fuel in an effort to save ships attempting to make their way across the Channel. These converging personal stories make for a very intricate film- but not one without faults.

                The primary issue that I have with Dunkirk is that the evacuation from Dunkirk was absolutely massive, almost incomprehensibly huge. Over 330,000 men were successfully taken off the beaches, and thousands more remained ashore as a rear guard against the advancing German forces. Yet, despite these numbers of men and the correspondingly large numbers of ships and aircraft engaged on both sides, we never truly get a sense of the scale of the evacuation in this film. Dunkirk the film works well as a microcosm of the evacuation, but fails on presenting the big picture of the operation. Watching Nolan’s film, the viewer hears the number of men taken off the beach, but never sees anything amounting to near that number of people- taking the film at face value, one might be left to conclude that only a fraction of the true number were even involved at Dunkirk. I think that this problem lies rooted in Nolan’s general dislike of computer effects. CGI could have been used to great effect to illustrate how vast the evacuation of the BEF really was, and how many people were involved both in operating the boats that take the men off and in the aircraft attempting to prevent the Luftwaffe from ceaselessly bombing the ships and beaches.

                So how then does the film measure up? I think that Dunkirk works well as both a relatively historically accurate movie and as a well-directed film. Viewers would do well to remember that the movie primarily tells the stories of three people involved in different aspects of the evacuation and not the operation as a whole. It’s worth saying this again- Nolan’s Dunkirk provides a glimpse into this momentous event, a microcosm of Operation Dynamo; it is by no means a panoramic of Dunkirk.             


Sources

1.       Rickard, J. “Operation Dynamo: The Evacuation from Dunkirk, 27 May- 4 June 1940.” History of War, Historyofwar.org, 16 Feb. 2008, www.historyofwar.org/articles/operation_dynamo.html, 17JUN2017.

2.       “Lord John Gort.” History Learning Site, Moocow, 20 Apr. 2015, www.historylearningsite.co.uk/world-war-two/military-commanders-of-world-war-two/lord-john-gort/, 17JUN2017.

3.       Diamond, Jon. “Site Navigation.” Warfare History Network, Sovereign Media, 1 Dec. 2016, warfarehistorynetwork.com/daily/wwii/miracle-at-dunkirk, 17JUN2017.

4.       “The Evacuation at Dunkirk, 1940.” Eyewitness to History, Ibis Communications, Inc., 2008, www.eyewitnesstohistory.com/dunkirk.htm, 17JUN2017.

5.       “History.” Dunkirk 1940 Museum, dynamo-dunkerque.com/en/history, 17JUN2017.

6.       Wickman, Norman, and Pauline Hayton. “Site Navigation.” Warfare History Network, Sovereign Media, 2 Sept. 2016, warfarehistorynetwork.com/daily/wwii/a-royal-engineer-at-dunkirk-tells-his-story, 17JUN2017.

7.       Robinson, Bruce. “History - World Wars: Dunkirk.” BBC, BBC, 17 Feb. 2011, www.bbc.co.uk/history/worldwars/wwtwo/ff2_dunkirk.shtml. 17JUN2017

Dunkirk (2017).” IMDb, Amazon.com, 2017, www.imdb.com/title/tt5013056/.

[1] http://www.historyofwar.org/articles/operation_dynamo.html

[2] http://www.historyofwar.org/articles/operation_dynamo.html

[3] http://www.historylearningsite.co.uk/world-war-two/military-commanders-of-world-war-two/lord-john-gort/

[4] http://warfarehistorynetwork.com/daily/wwii/miracle-at-dunkirk/

[5] http://warfarehistorynetwork.com/daily/wwii/miracle-at-dunkirk/

[6] http://www.eyewitnesstohistory.com/dunkirk.htm

[7] http://warfarehistorynetwork.com/daily/wwii/miracle-at-dunkirk/

[8] http://warfarehistorynetwork.com/daily/wwii/miracle-at-dunkirk/

[9] http://warfarehistorynetwork.com/daily/wwii/miracle-at-dunkirk/

[10] http://dynamo-dunkerque.com/en/history/

[11] http://www.historyofwar.org/articles/operation_dynamo.html

[12] http://www.historyofwar.org/articles/operation_dynamo.html
[13] http://warfarehistorynetwork.com/daily/wwii/miracle-at-dunkirk/

[14] http://www.historyofwar.org/articles/operation_dynamo.html

[15] http://www.eyewitnesstohistory.com/dunkirk.htm

[16] http://warfarehistorynetwork.com/daily/wwii/a-royal-engineer-at-dunkirk-tells-his-story/

[17] http://warfarehistorynetwork.com/daily/wwii/miracle-at-dunkirk/

[18] http://warfarehistorynetwork.com/daily/wwii/miracle-at-dunkirk/

[19] http://www.historyofwar.org/articles/operation_dynamo.html

[20] http://www.bbc.co.uk/history/worldwars/wwtwo/ff2_dunkirk.shtml

[21] http://warfarehistorynetwork.com/daily/wwii/miracle-at-dunkirk/

[22] http://www.historyofwar.org/articles/operation_dynamo.html

[23] http://www.imdb.com/title/tt5013056/

Tools of War: The Battleship Mikasa

MARSHAL-ADMIRAL THE MARQUIS TOGO HEIHACHIRO. BORN ON JANUARY 27, 1848, IN KAGOSHIMA PREFECTURE, TOGO WAS A MEMBER OF THE JAPANESE NAVY FROM THE AGE OF 15. HE SPENT MUCH OF THE 1870S STUDYING IN ENGLAND, RETURNING TO JAPAN IN 1878. GIVEN VARIOUS COMM…

MARSHAL-ADMIRAL THE MARQUIS TOGO HEIHACHIRO. BORN ON JANUARY 27, 1848, IN KAGOSHIMA PREFECTURE, TOGO WAS A MEMBER OF THE JAPANESE NAVY FROM THE AGE OF 15. HE SPENT MUCH OF THE 1870S STUDYING IN ENGLAND, RETURNING TO JAPAN IN 1878. GIVEN VARIOUS COMMANDS AND SEEING COMBAT IN THE SINO-JAPANESE WAR OF 1894-1895, TOGO WAS MADE COMMANDER IN CHIEF OF THE COMBINED FLEET IN 1903. HE HELD THIS COMMAND THROUGH THE RUSSO-JAPANESE WAR, AND WAS ULTIMATELY MADE MARSHAL-ADMIRAL, EQUIVALENT IN RANK TO THE US NAVY'S FLEET ADMIRAL. HE DIED ON MAY 30, 1934 AT AGE 86. PHOTO: WIKIPEDIA.

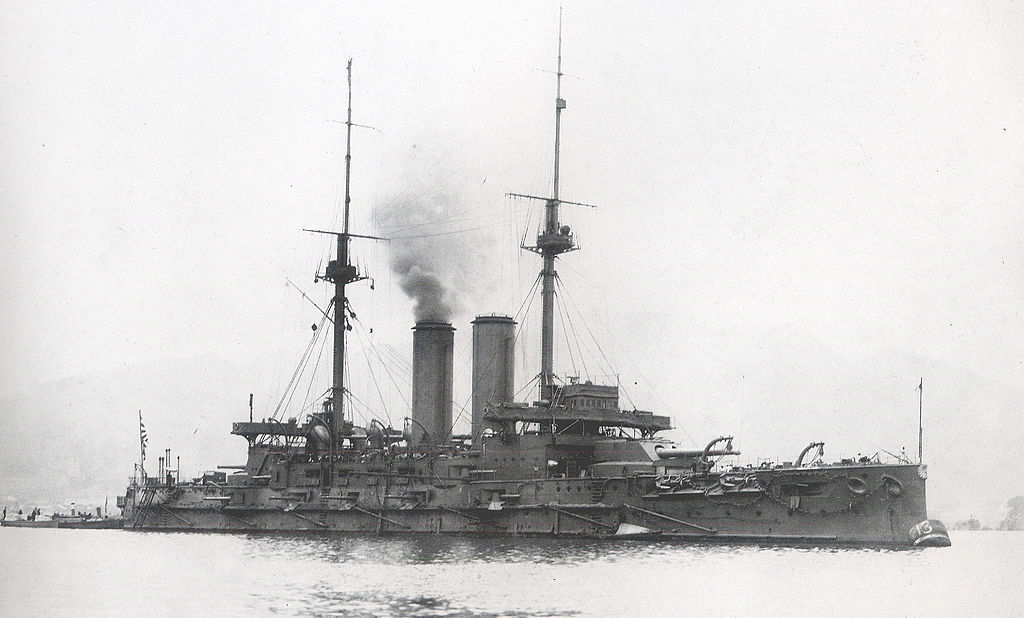
In the late 19th Century, the Imperial Japanese Navy sought to catch up with more modern navies by constructing modern warships. Lacking its own shipbuilding capacity at that time, it contracted a number of battleships to be constructed in the UK. One of those the Mikasa, became the flagship of Admiral Togo Heihachiro during the Russo-Japanese War of 1904-1905. Today, it survives as the world’s last remaining pre-dreadnought battleship.

By Seth Marshall

            By the late 19th Century, Japan had made great strides towards becoming a globally recognized power. For Japan, an island nation, one of the more critical areas of obtaining this recognition was the modernization of its navy to a standard that would put it on par with European and American navies. To this end, in the 1890s, the Imperial Japanese Navy (IJN) ordered the construction of six battleships and six armored cruisers. Lacking shipyards of its own capable of constructing such warships, the IJN was forced to outsource the building of these ships to firms in the UK. The IJN Mikasa was the 6th Japanese battleship built in England.[1]

            Mikasa took her name from Mount Mikasa, a mountain in Nara, Japan.[2] Contracted to Vickers Shipbuilding, she was laid down in Barrow-in-Furness on January 24, 1899. She was launched the following year on November 8th, and commissioned on March 1, 1902.[3] When completed, her armament was comprised of four 12-inch guns housed in two turrets, fourteen 6-inch guns, twenty 3-inch guns, and four torpedo tubes.[4] She was 122m in length and had a beam of 23.2m. Her engines, making 15,000 horsepower, drove two propeller shafts that allowed the Mikasa to reach 18 knots. Up to 9 inches of armor gave protection to her crew of 860 officers and men.[5] Following her completion, the Mikasa visited a number of English ports, then made her way to Japan. Her arrival was timely. Tensions between Russia and Japan were rising, and Mikasa quickly became the flagship of Admiral Togo Heihachiro, commander of the IJN. Mikasa did not have to wait long for her first action.

1024px-Japanese_battleship_Mikasa.jpg
MARSHAL-ADMIRAL THE MARQUIS TOGO HEIHACHIRO. BORN ON JANUARY 27, 1848, IN KAGOSHIMA PREFECTURE, TOGO WAS A MEMBER OF THE JAPANESE NAVY FROM THE AGE OF 15. HE SPENT MUCH OF THE 1870S STUDYING IN ENGLAND, RETURNING TO JAPAN IN 1878. GIVEN VARIOUS COMM…

MARSHAL-ADMIRAL THE MARQUIS TOGO HEIHACHIRO. BORN ON JANUARY 27, 1848, IN KAGOSHIMA PREFECTURE, TOGO WAS A MEMBER OF THE JAPANESE NAVY FROM THE AGE OF 15. HE SPENT MUCH OF THE 1870S STUDYING IN ENGLAND, RETURNING TO JAPAN IN 1878. GIVEN VARIOUS COMMANDS AND SEEING COMBAT IN THE SINO-JAPANESE WAR OF 1894-1895, TOGO WAS MADE COMMANDER IN CHIEF OF THE COMBINED FLEET IN 1903. HE HELD THIS COMMAND THROUGH THE RUSSO-JAPANESE WAR, AND WAS ULTIMATELY MADE MARSHAL-ADMIRAL, EQUIVALENT IN RANK TO THE US NAVY'S FLEET ADMIRAL. HE DIED ON MAY 30, 1934 AT AGE 86. PHOTO: WIKIPEDIA.

            On February 9, 1904, Mikasa took part in the Battle of Port Arthur, the Japanese surprise attack on the vital port which opened the Russo-Japanese War. Mikasa was damaged by shellfire from shore installations which wounded several sailors and an officer. The battle ended with several Russian ships suffering damage requiring repairs, but casualties were relatively light for both sides.[6] Mikasa was also involved in the brief action of April 13th, which ended in the death of Russian Vice Admiral Stepan Makarov, along with all hands of his flagship, the battleship Petropavlovsk, which struck a mine.[7] Several months later, on August 10, 1904, the Mikasa saw action during the Battle of the Yellow Sea. With the exception of Tsushima some 9 ½ months later, the Battle of the Yellow Sea was perhaps the largest naval clash during the Russo-Japanese War. Mikasa was hit over twenty times by Russian naval gunfire, which resulted in a large number of casualties and one of the 12-inch gun turrets disabled. Despite this, the Russian Navy sustained serious damage itself. The Russian flagship, Tsarevich, was hit by two Japanese battleship shells nearly simultaneously, which killed Admiral Vitgeft, Makarov’s replacement, as well as the helmsman and much of the personnel manning the bridge. [8] Both sides suffered similar casualties and damaged ships, and both would subsequently retire to their home ports.

Japanese warships exchange fire with the Russian fleet during the Battle of the Yellow Sea. Photo source: Wikipedia.

Japanese warships exchange fire with the Russian fleet during the Battle of the Yellow Sea. Photo source: Wikipedia.

Mikasa's after turret, damaged in the Battle of the Yellow Sea. Photo source: National Institute for Defense Studies, Ministry of Defense.

Mikasa's after turret, damaged in the Battle of the Yellow Sea. Photo source: National Institute for Defense Studies, Ministry of Defense.

            Mikasa’s most renowned action came the following year in late May during the decisive Battle of Tsushima. Though the battle occurred in May of 1905, the battle was set in motion the previous fall in October, when Vice Admiral Zinovi Rohestvensky was ordered to sail the Second Pacific Squadron to the conflict zone, a voyage covering an unprecedented distance of 18,000 miles.[9] Rohestvensky’s fleet was centered around four new Borodino-class battleships, the Borodino, the Emperor Alexander III, the Orel, and the Kniaz Suvarov. The fleet an inauspicious voyage made all the more difficult by the limited range of the warships, requiring frequent coaling. Russian crews were inexperienced and given few opportunities to refine their skills, a point driven home early in the voyage on October 22, when the Russian squadron encountered a fleet of fishing trawlers. Thinking they were Japanese ships attempting a torpedo attack, the Russian ships opened fire. Despite firing countless rounds, the Russians succeeded only in sinking a single trawler and damaging one of their own cruisers with friendly fire.[10] Months later, Russian Navy headquarters dispatched the Third Baltic Squadron, commanded by Rear Admiral Nikolai Nebogatov. This fleet was composed of older vessels; Rohestvensky had initially declined to take these vessels with him, knowing that they would slow him down. Nonetheless, the fleet was dispatched and used the Suez Canal to catch up with the rest of the Russian vessels, finally joining together at Cam Ranh Bay in Indochina.[11] Adding to Rozhestvensky’s worries was the growing displeasure of his crews, who attempted at least one mutiny during the course of the voyage. After an eight month voyage, the Russian fleet finally arrived in the Far East.

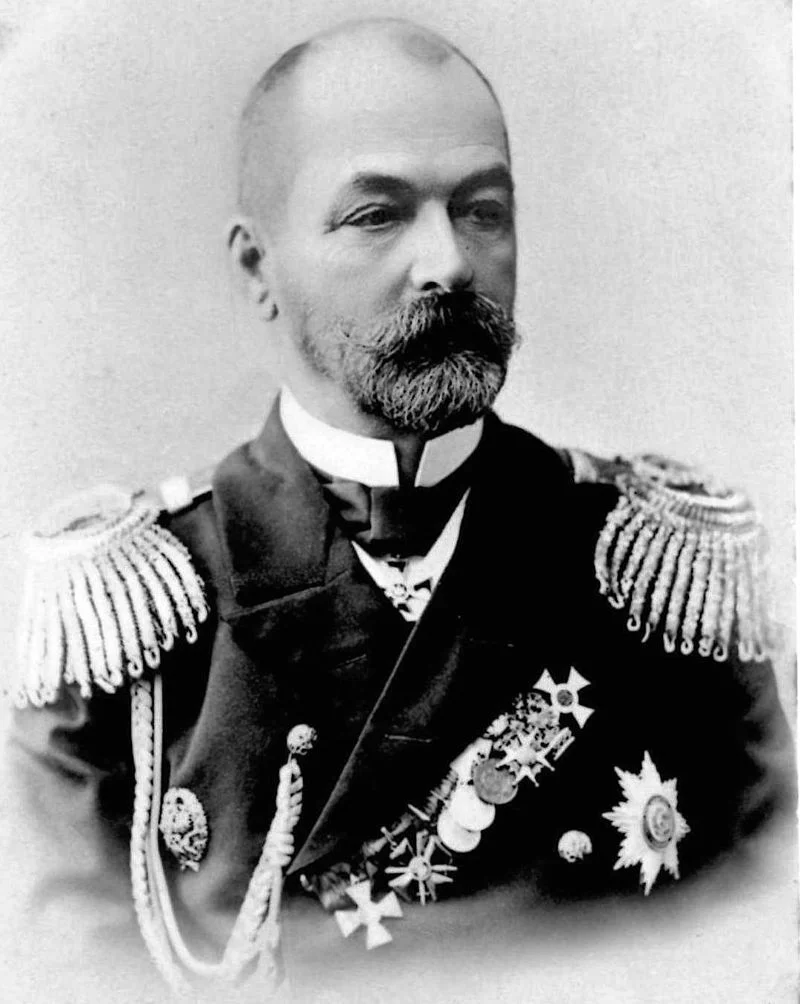
THE COMMANDER OF THE RUSSIAN FLEET AT THE BATTLE OF TSUSHIMA, ADMIRAL ZINOVY ROZHESTVENSKY. BORN ON NOVEMBER 11, 1848 IN ST. PETERSBURG, RUSSIA, ROZHESTVENSKY ALSO JOINED THE NAVY AT AN EARLY AGE. HE SAW ACTION DURING THE RUSSO-TURKISH WAR (1877-187…

THE COMMANDER OF THE RUSSIAN FLEET AT THE BATTLE OF TSUSHIMA, ADMIRAL ZINOVY ROZHESTVENSKY. BORN ON NOVEMBER 11, 1848 IN ST. PETERSBURG, RUSSIA, ROZHESTVENSKY ALSO JOINED THE NAVY AT AN EARLY AGE. HE SAW ACTION DURING THE RUSSO-TURKISH WAR (1877-1878), AND AFTERWARDS WAS PROMOTED TO VARIOUS COMMANDS BEFORE BEING APPOINTED COMMANDER OF THE BALTIC FLEET IN 1904. ROZHESTVENSKY COMMANDED HIS FLEET ON ITS ILL-FATED VOYAGE TO THE PACIFIC FROM 1904-1905. FOLLOWING HIS THE DISASTER THAT BEFELL HIS SHIPS AT TSUSHIMA, HE WAS HELD PRISONER AND RELEASED AT THE CONCLUSION OF THE WAR. ON HIS RETURN TO RUSSIA, HE WAS COURT-MARTIALED FOR HIS DEFEAT AND FOUND GUILTY, THOUGH THE TSAR WOULD COMMUTE HIS SENTENCE OF EXECUTION TO A SHORT STINT IN PRISON. HE DIED OF A HEART ATTACK ON JANUARY 14, 1909. PHOTO: WIKIPEDIA.

The circuitous route of the various components of the Russian fleet on its way to the Pacific Ocean, from 1904-1905. Photo source: Wikipedia.

The circuitous route of the various components of the Russian fleet on its way to the Pacific Ocean, from 1904-1905. Photo source: Wikipedia.

            The Battle of Tsushima began soon after. Early on the morning of May 27th, the Japanese auxiliary merchant cruiser Shinano Maru spotted the Russian fleet making its way northeast in the Yellow Sea. The cruiser along with additional scout ships shadowed the Russians throughout the morning, concealing themselves in heavy fog. The Russian Second and Third Baltic Squadrons were composed of the four Borodino-class battleships, four older battleships, three coastal defense battleships, six cruisers, and 26 other warships.[12] Admiral Togo ordered the Japanese fleet to sea at 0615- the Japanese force was made up of four battleships, two armored cruisers, six cruisers, and 30 destroyers. Sailing south from Pusan, Korea, the Japanese sighted the Russians in the Tsushima Strait at 1345 that afternoon.[13] The Russian fleet was arranged roughly in two columns- Togo attempted to “cross the T” of the Russian fleet with the Mikasa, while sending his cruisers to attack from the rear left flank.[14] The Russian flagship Knayaz Suvorov opened fire first, followed shortly thereafter by return fire from the Mikasa. The Japanese maneuver, which subsequently became known as the “Togo turn”, saw the Japanese warships reverse course. This tactic could have backfired for Togo, as his ships all passed through a single point, which ought to have allowed Russian gunners to zero in and hit each Japanese ship in turn. However, the Russians proved unable to consistently hit the Japanese.[15]

            Using a six-knot speed advantage, Togo’s fleet quickly took advantage of the Russians’ inability to hit their targets. Gunfire from Japanese warships sank the battleship Oslyabya and disabled Rohestvensky’s flagship. Rohestvensky himself was incapacitated from a concussion. During the remainder of the day, the battleships Emperor Alexander III and Borodino were lost to Japanese gunfire, and Knayaz Suvorov succumbed to torpedoes. The wounded Admiral Rohestvensky was taken off his flagship by the destroyer Buyny. In the evening, Togo ordered his destroyers to attack the Russians at will. The destroyers fired 74 torpedoes, which sank the battleship Sysoy Veliky and cruisers Admiral Nakhimov and Vladimir Monomakh. Three additional badly-damaged ships were scuttled the following morning by their crews. Only a handful of Russian ships managed to escape- one cruiser-yacht and two destroyers slowly made their way to Vladivostok, while three damaged cruisers fled to Manila, where they were interned for the duration of the war.[16] On May 28th, the Japanese captured the destroyer Buyny, along with Rohestvensky, who surrendered what remained of his fleet. The battle had utterly annihilated the Russian presence in the Pacific- six battleships, four cruisers, and six destroyers were sunk, while another two battleships and several additional ships were captured.[17] Casualties for the Russians were enormous; 4,545 were killed, 6,106 captured, and 1,862 interned. Against these impressive figures, the Japanese had suffered three torpedo boats sunk and several warships damaged- casualties totaled 117 killed and 583 wounded. During the battle, Mikasa had been hit 32 times, suffering 8 dead.[18] The Russian loss was disastrous- less than four months after the battle, the war ended in a mediated peace.

THE BATTLESHIP KNYAV SUVOROV, ROHESTVENSKY'S FLAGSHIP. HIT COUNTLESS TIMES BY JAPANESE GUNFIRE, INCLUDING A HIT WHICH INCAPACITATED THE ADMIRAL WITH A HEAD WOUND, THE BATTLESHIP WAS ABANDONED AND SANK. PHOTO: WIKIPEDIA.

THE BATTLESHIP KNYAV SUVOROV, ROHESTVENSKY'S FLAGSHIP. HIT COUNTLESS TIMES BY JAPANESE GUNFIRE, INCLUDING A HIT WHICH INCAPACITATED THE ADMIRAL WITH A HEAD WOUND, THE BATTLESHIP WAS ABANDONED AND SANK. PHOTO: WIKIPEDIA.

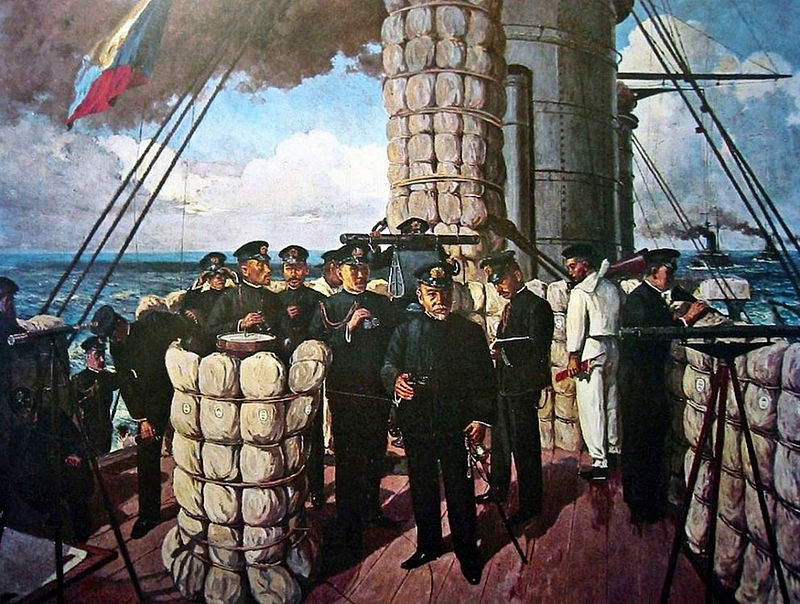
Admiral Togo on the bridge of the Mikasa during the Battle of Tsushima. The original painting now hangs in the lower deck of the Mikasa. Photo source: Wikipedia.

Admiral Togo on the bridge of the Mikasa during the Battle of Tsushima. The original painting now hangs in the lower deck of the Mikasa. Photo source: Wikipedia.

            Shortly after the war ended, the Mikasa suffered a disaster. On September 11th, 1905, she was anchored in Sasebo harbor when one of her magazines exploded, blowing open a large hole in her port quarter and killing 339 of her crew. She sank following the explosion, but was later refloated and repaired.[19] By 1908, Mikasa was back in service on coastal defense duties. She remained functioning in this role through World War I until she was decommissioned in 1922. Her decommissioning took place in accordance with the Washington Naval Treaty, which limited the tonnage that each nation’s navy could have. Owing to her historical nature however, an effort was made to have the Treaty committee approve her preservation as a museum ship. During the mid-1920s, a campaign was launched to restore the ship, which had deteriorated severely, to her former condition. By 1926, the signatories on the Washington Naval Treaty had acquiesced to the preservation request. On November 12th that year, the Mikasa was unveiled before Crown Prince Hirohito and an elderly Admiral Togo. [20] The warship stayed a museum ship during the interwar period, but was severely neglected in the aftermath of World War II. Mikasa’s guns, funnels, and many topside fixtures were removed as a result of postwar policies. However, in 1955, the Japan Times began a campaign to renovate the warship. The newspaper had been a significant force in getting the warship restored the first time; once again, it worked towards returning the warship towards its former state. With the support of the US Navy and Admiral Chester Nimitz, the warship was refitted with its guns, funnels, and numerous other parts. In 1961, the ship was once again opened as a museum ship. Since then the Mikasa has remained open to the public.

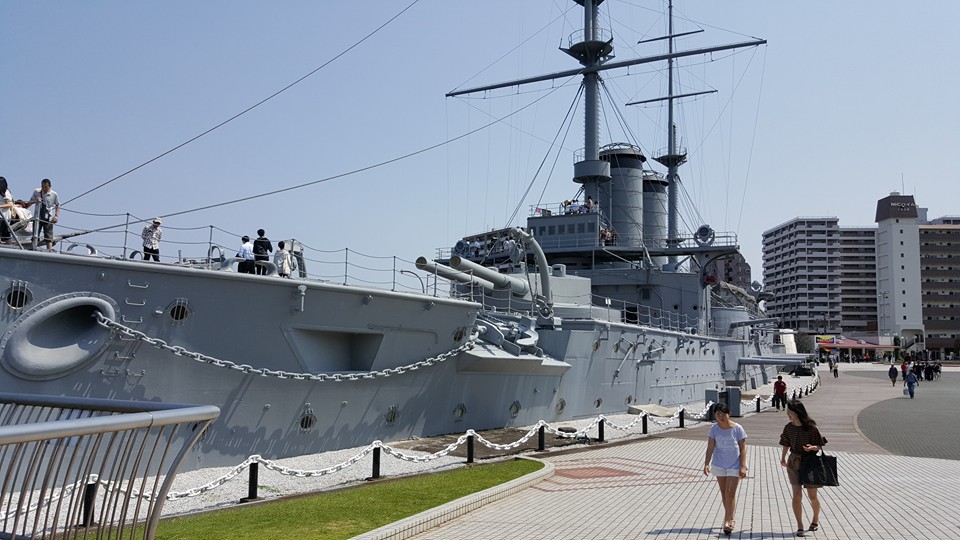
            The author visited the ship in late May 2016 during a trip to Japan. The Mikasa is located in Yokosuka harbor. Tours of the ship are available on a daily basis for the reasonable price of 600 yen- roughly $6. The exterior of the ship has been restored to a grey exterior, with black and white paint around the funnels. The ship’s guns have been returned to their original positions. However, the interior of the ship is not the same as it once was. The topside areas, including pilothouse and radio room, have been restored to close to their original condition, but below-decks is a different story. Only the two decks below the main deck are accessible- the rest were filled in with concrete as part of the terms of the ship being preserved following the Washington Naval Treaty. The deck that is open to the public has largely been converted into a museum, with many models, paintings, display panels, and artifacts relating the ship’s history, the history behind the Russo-Japanese War, and Admiral Togo. There are some exceptions to this, such as Togo’s stateroom, the galley, and the wardroom. Despite the fact that much of the ship has been filled in by concrete and is now inaccessible, the Mikasa is nonetheless important as the last pre-dreadnought battleship in existence. What’s more, the restoration efforts have vastly improved the ship from the condition it was in during the 1950s. Curiously, while the Mikasa is the last example of its type around, one of the few Russian ships to survive the disaster at Tsushima, the cruiser Aurora, also is currently a museum ship, moored at St. Petersburg. However, the Mikasa, as the Japanese flagship in that tremendous battle, has tremendous presence- visitors to the Tokyo area would be well-advised to pay a visit to the old warship.

VIEW OF THE BOW OF THE MIKASA, AS IT APPEARS TODAY. THIS VIEW CLEARLY SHOWS THE SHIP'S CURRENT LOCATION ON LAND, WITH MUCH OF ITS LOWER DECKS FILLED IN WITH CONCRETE. ADDITIONALLY, THE SHIP'S SECONDARY ARMAMENT, 14 6.5-INCH GUNS, ARE EVIDENT IN THIS…

VIEW OF THE BOW OF THE MIKASA, AS IT APPEARS TODAY. THIS VIEW CLEARLY SHOWS THE SHIP'S CURRENT LOCATION ON LAND, WITH MUCH OF ITS LOWER DECKS FILLED IN WITH CONCRETE. ADDITIONALLY, THE SHIP'S SECONDARY ARMAMENT, 14 6.5-INCH GUNS, ARE EVIDENT IN THIS PICTURE. PHOTO: AUTHOR.

A VIEW FROM THE BATTLESHIP'S SUPERSTRUCTURE, LOOKING OUT OVER YOKOSUKA HARBOR. MUCH OF THE MIKASA'S UPPER WORKS ARE NOT ORIGINAL, HAVING BEEN STRIPPED FOLLOWING WORLD WAR II AND REPLACED BY REPRODUCTIONS DURING THE POST-WAR RESTORATION. PHOTO: AUTHO…

A VIEW FROM THE BATTLESHIP'S SUPERSTRUCTURE, LOOKING OUT OVER YOKOSUKA HARBOR. MUCH OF THE MIKASA'S UPPER WORKS ARE NOT ORIGINAL, HAVING BEEN STRIPPED FOLLOWING WORLD WAR II AND REPLACED BY REPRODUCTIONS DURING THE POST-WAR RESTORATION. PHOTO: AUTHOR.

A TYPICALLY RESTORED ROOM ON BOARD THE MIKASA, IN THIS INSTANCE THE COMMUNICATIONS ROOM. A NUMBER OF ARTIFACTS ARE ON DISPLAY WITH THE AID OF PLACARDS. PHOTO: AUTHOR.

A TYPICALLY RESTORED ROOM ON BOARD THE MIKASA, IN THIS INSTANCE THE COMMUNICATIONS ROOM. A NUMBER OF ARTIFACTS ARE ON DISPLAY WITH THE AID OF PLACARDS. PHOTO: AUTHOR.

The Mikasa had additional armament in the form of four 3.5-inch guns, two on each side. Photo: author.

The Mikasa had additional armament in the form of four 3.5-inch guns, two on each side. Photo: author.

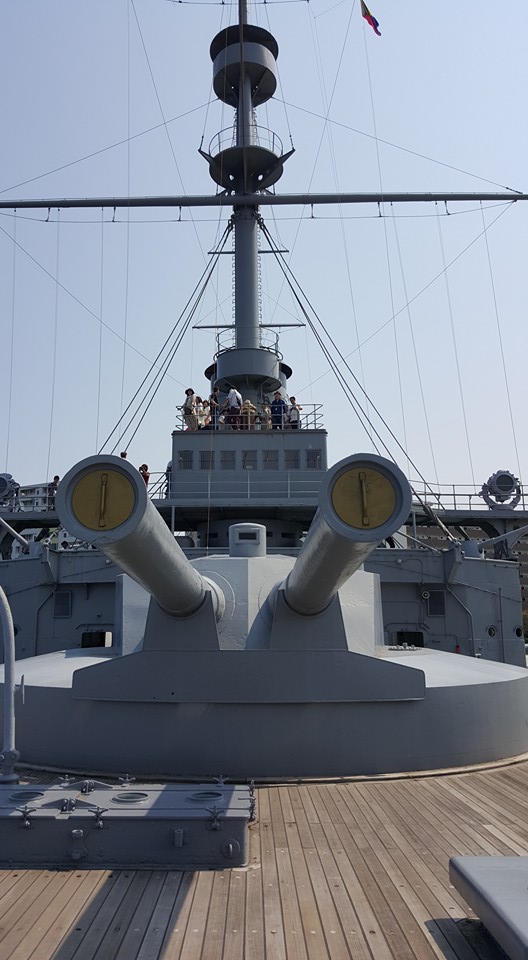
The bow turret of the Mikasa, with its 12-inch battery. The turret and guns are reproductions put in place during the warship's postwar restoration. Photo: author. 

The bow turret of the Mikasa, with its 12-inch battery. The turret and guns are reproductions put in place during the warship's postwar restoration. Photo: author. 

The interior of the Mikasa's main bridge. Photo: author.

The interior of the Mikasa's main bridge. Photo: author.

One of the Mikasa's secondary 6.5-inch guns. The galleries where these guns were house have been converted into exhibit space, supported by large text and photographic panels. Photo: author. 

One of the Mikasa's secondary 6.5-inch guns. The galleries where these guns were house have been converted into exhibit space, supported by large text and photographic panels. Photo: author. 

Along one of the side corridors of the Mikasa's lower deck is this gallery, which is comprised of models representing many classes of ships and aircraft which have served in the Imperial Japanese Navy and Japanese Self-Defense Forces. Photo: author.

Along one of the side corridors of the Mikasa's lower deck is this gallery, which is comprised of models representing many classes of ships and aircraft which have served in the Imperial Japanese Navy and Japanese Self-Defense Forces. Photo: author.

One of the many exhibits which are located on the lower deck of the Mikasa. This lower deck has been converted in large part into a museum space. Photo: author.

One of the many exhibits which are located on the lower deck of the Mikasa. This lower deck has been converted in large part into a museum space. Photo: author.

The main museum area houses several very large scale models of Imperial Japanese Navy ships that served in the Russo-Japanese War. Photo: author.

The main museum area houses several very large scale models of Imperial Japanese Navy ships that served in the Russo-Japanese War. Photo: author.

An officer's bathroom on the lower deck of the Mikasa. Photo: author.

An officer's bathroom on the lower deck of the Mikasa. Photo: author.

The officer's wardroom on board the Mikasa. The stern cabins of the Mikasa have been the subject of a much more intense restoration effort. Photo: author.

The officer's wardroom on board the Mikasa. The stern cabins of the Mikasa have been the subject of a much more intense restoration effort. Photo: author.


Sources

1.      "Mikasa, Historic Warship." Mikasa, Historic Warship. Mikasa Preservation Society. http://www.kinenkan-mikasa.or.jp/en/index.html . Web . 21 May 2017.

2.      "Museum Ships." Museum Ships. WebOke, 2014. http://museumships.us/japan/mikasa. Web. 21 May 2017.

3.      Morrison, Geoffrey. "Japan's 114-year-old Battleship Mikasa: A Relic of Another Time." CNET. CBS Interactive, 05 Aug. 2016. https://www.cnet.com/news/japans-114-year-old-battleship-mikasa-a-relic-of-another-time/. Web. 21 May 2017.

4.      "Battle of Arthur." The Battle of Port Arthur. Russojapanesewar.com, 2002. http://russojapanesewar.com/index.html. Web. . 23 May 2017.

5.      "The Battle of the Yellow Sea." The Battle of the Yellow Sea. Russojapaneswar.com, 2002. http://russojapanesewar.com/bttl-yellow-sea.html. Web. . 29 May 2017.

6.      Reynolds, Brad. "Warfare History Network." Warfare History Network. Sovereign Media, 3 Mar. 2015. http://warfarehistorynetwork.com/daily/military-history/naval-history-the-battle-of-tsushima-in-the-russo-japanese-war/.  Web. 23 May 2017.

7.      Cooper, Tom. "Battle of Tsushima: When Japan and Russia's Most Fearsome Battleships Squared Off." The National Interest. The Center for the National Interest, 29 May 2017. Web. 30 May 2017.
8.      Corkill, Edan. "How The Japan Times Saved a Foundering Battleship, Twice." The Japan Times. Japan Times LTD. Web. 21 May 2017.


[1] http://www.kinenkan-mikasa.or.jp/en/mikasa/index.html 5/21/17

[2] http://museumships.us/japan/mikasa 5/21/17

[3] http://www.kinenkan-mikasa.or.jp/en/mikasa/index.html 5/21/17

[4] https://www.cnet.com/news/japans-114-year-old-battleship-mikasa-a-relic-of-another-time/ 5/21/17

[5] http://www.kinenkan-mikasa.or.jp/en/mikasa/index.html  5/21/17

[6] http://russojapanesewar.com/battle-pa.html 5/23/2017

[7] http://russojapanesewar.com/maka-dies.html 5/23/17

[8] http://russojapanesewar.com/bttl-yellow-sea.html 5/29/17

[9] http://warfarehistorynetwork.com/daily/military-history/naval-history-the-battle-of-tsushima-in-the-russo-japanese-war/  5/23/17

[10] http://www.navalofficer.com.au/mikasa/ 5/23/17

[11] http://www.navalofficer.com.au/mikasa/ 5/23/17

[12] http://www.navalofficer.com.au/mikasa/ 5/23/17

[13] http://www.navalofficer.com.au/mikasa/ 5/23/17

[14] http://warfarehistorynetwork.com/daily/military-history/naval-history-the-battle-of-tsushima-in-the-russo-japanese-war/ 5/23/17

[15] http://www.navalofficer.com.au/mikasa/ 5/23/17

[16] http://www.navalofficer.com.au/mikasa/  5/23/17

[17] http://nationalinterest.org/blog/the-buzz/battle-tsushima-when-japan-russias-most-fearsome-battleships-20896?page=2 5/30/17

[18] http://www.navalofficer.com.au/mikasa/  5/23/17

[19] http://www.navalofficer.com.au/mikasa/  5/23/17

[20]

Battlefield Visit: Stones River

In an attempt to retake the important city of Nashville, a Confederate army commanded by General Braxton Bragg was engaged by the Union’s Army of the Cumberland, lead by Major General William Rosecrans, near the town of Murfreesboro, Tennessee at the close of 1862. The battle was to be one of the bloodiest of the Civil War.

By Seth Marshall

            As the year of 1862 drew to a close, the situation for the Union was rather bleak. General George McClellan’s Peninsular Campaign had been turned back in Virginia, fought to a costly draw at Antietam, and had met a disastrous defeat at Fredericksburg. And while the Western Theater had not seen similar setbacks, neither had it seen significant progress towards pushing the Confederacy back. Commanders on both sides were under pressure from their governments to change the situation.

            The Union’s Army of the Cumberland was commanded by Major General William Rosecrans. An 1842 graduate of the Military Academy at West Point, Rosecrans replaced Major General Don Carlos Buell, who had been heavily criticized for his failure to pursue Confederate General Braxton Bragg after his defeat at Perryville in October. Rosecrans was concerned about the ability to keep his army supplied during a campaign against the South. His hesitation caused much angst with his superior, Major General Henry Halleck, as well as with President Abraham Lincoln. Halleck wrote Rosecrans:

“The President is very impatient at your long stay in Nashville. The favorable season for your campaign will soon be over. You give Bragg time to supply himself by plundering the very country your army should have occupied. From all information received here, it is believed that he is carrying large quantities of stores into Alabama, and preparing to fall back partly on Chattanooga and partly on Columbus, Miss. Twice I have been asked to designate some one else to command, the Government demands action, and if you cannot respond to that demand some one else will be tried.”[1]

The Union commander was therefore under substantial pressure to counter the Confederate forces in middle Tennessee.

MAJOR GENERAL WILLIAM ROSECRANS. AN 1842 GRADUATE OF WEST POINT, ROSECRANS HAD TAKEN COMMAND OF THE ARMY OF THE CUMBERLAND FROM MAJOR GENERAL DON CARLOS BUELL, WHO HAD BEEN CRITICIZED FOR HIS LACK OF ACTION.

MAJOR GENERAL WILLIAM ROSECRANS. AN 1842 GRADUATE OF WEST POINT, ROSECRANS HAD TAKEN COMMAND OF THE ARMY OF THE CUMBERLAND FROM MAJOR GENERAL DON CARLOS BUELL, WHO HAD BEEN CRITICIZED FOR HIS LACK OF ACTION.

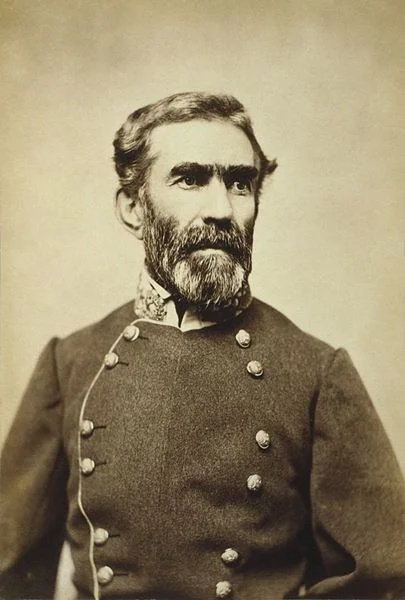
            Rosecrans opposite number commanding the Confederate forces was General Braxton Bragg. Like Rosecrans, Bragg was a graduate of West Point, a member of the class of 1837. A veteran of the Mexican American War. Known for his highly abrasive personality and tendency to argue with other argues, Bragg was highly disliked by his subordinates. Described by southern diarist Mary Chestnut as having a “winning way of earning everyone’s detestation”[2], Bragg was so disliked by his officers and men that a number of them attempted to have him ousted from his command. However, Bragg was liked by Confederate President Jefferson Davis, and remained in place.

GENERAL BRAXTON BRAGG WAS THE COMMANDER OF THE CONFEDERACY'S ARMY OF THE TENNESSEE. A WEST POINT GRADUATE FROM THE CLASS OF 1837, BRAGG WAS HIGHLY SUSPICIOUS OF THE MEMBERS OF HIS STAFF AND EXTREMELY DISLIKED. DESPITE ATTEMPTS BY HIS STAFF TO REMOVE…

GENERAL BRAXTON BRAGG WAS THE COMMANDER OF THE CONFEDERACY'S ARMY OF THE TENNESSEE. A WEST POINT GRADUATE FROM THE CLASS OF 1837, BRAGG WAS HIGHLY SUSPICIOUS OF THE MEMBERS OF HIS STAFF AND EXTREMELY DISLIKED. DESPITE ATTEMPTS BY HIS STAFF TO REMOVE HIM, HE REMAINED IN COMMAND OF THE ARMY OF THE TENNESSEE.

            Bragg made his move before Rosecrans in late 1862. He moved his army to Murphreesboro, 30 miles southeast of Nashville, Rosecrans’ base of operations. He intended to retake Nashville, thus depriving the North of a vital supply hub. However, his attack was delayed by supply shortages as well as reductions in the number of his troops. His delay allowed Rosecrans the time to get his army in order. The day after Christmas, Rosecrans began moving south towards Murphreesboro and arrived in the vicinity of Bragg on December 29th. The following day, both armies prepared to battle one another while the commanders laid their plans. Curiously, both generals planned to assault their opponents rights and roll up the other’s flank. As it transpired, Bragg would be the first to strike.

The tactical situation on December 30, 1862.

The tactical situation on December 30, 1862.

            Early on the morning of December 31st, the 43,000 men of Rosecran’s army were either just waking or still sleeping.[3] Despite indications that the Confederate forces were preparing to attack, most Union commanders had not chosen to put their men on alert. Among these commanders was Major General Alexander McCook. He ignored the reports of increased activity and slept on. As a result, two of his divisions were unprepared for the Confederate assault, which began at 6 AM when Major General John McCown’s division led the attack into the Union lines. Most Union soldiers were just waking up and cooking breakfast and were caught by surprise; they did not present serious resistance before falling back. One of the brigades,  2nd Brigade of the 2nd Division, commanded by Brigadier General Edward Kirk, suffered 826 casualties of its 1,933 men, included Kirk himself, who was seriously wounded.[4]

The Confederate attack on the morning of the 31st.

The Confederate attack on the morning of the 31st.

            The sole brigade who was prepared for battle was commanded by then-Brigadier General Phillip Sheridan. Sheridan had woken his men at 4 AM and ensured that they were manning their posts and guns when the Southerners attacked. Sheridan’s division came under attack at around 7 AM and would fight an effective withdrawal under fire fore the next four hours, claiming to having inflicted some 2,000-3,000 casualties while suffering 990 casualties out of its 5,000 men strength.[5] Sheridan’s performance bought the rest of Rosecran’s army time to establish a more defensible position. After he realized the seriousness of the situation, Rosecrans himself led from the front. “He rode all about the battlefield, asking for reports, giving succinct orders, and providing encouragement where needed, and it was much needed on that morning.”[6]

MAJOR GENERAL ALEXANDER MCCOOK, COMMANDER OF THE UNION'S RIGHT WING, DISREGARDED REPORTS OF CONFEDERATE ACTIVITY ALONG HIS FRONT AND DID NOT ORDER HIS MEN TO STAND TO AT DAWN. AS A RESULT, TWO OF HIS DIVISIONS WERE QUICKLY OVERRUN BY THE CONFEDERATE…

MAJOR GENERAL ALEXANDER MCCOOK, COMMANDER OF THE UNION'S RIGHT WING, DISREGARDED REPORTS OF CONFEDERATE ACTIVITY ALONG HIS FRONT AND DID NOT ORDER HIS MEN TO STAND TO AT DAWN. AS A RESULT, TWO OF HIS DIVISIONS WERE QUICKLY OVERRUN BY THE CONFEDERATE ATTACK.

            Confederate forces pressed the attack through the morning. Union forces fell back on an area known as Round Forest. Artillery had been brought up  to the Nashville turnpike, and on the approach of Confederate units began to fire as quickly as they could reload, inflicting heavy casualties. The Union continued to absorb heavy losses as well, among them was Rosecrans’ chief of staff, Colonel Julius Garesche, who was decapitated by a cannonball that just missed Rosecrans himself. Rosecrans, splattered with gore from his friend and West Point classmate, continued to lead the Union forces though shaken by Garesche’s violent death. The Union line held, having inflicted serious damage on numerous Confederate units, and the day finally came to an end.[7]

Confederate infantry, taking fire from the Union defensive line along the turnpike, struggle to advance across the cotton fields.

Confederate infantry, taking fire from the Union defensive line along the turnpike, struggle to advance across the cotton fields.

The tactical situation at the end of December 31st, following the Union withdrawal to the turnpike.

The tactical situation at the end of December 31st, following the Union withdrawal to the turnpike.

            Both sides spent the first day of 1863 licking their wounds. Bragg was surprised that morning to find Rosecrans still in front of his position- the previous night, he had sent a telegram to Jefferson Davis proclaiming: “The enemy has yielded his strong position and is falling back. God has granted us a happy New Year.” On January 2nd, Bragg discovered that the Union had occupied a hilltop on his right. Desiring the terrain for his own artillery, Bragg ordered division commander Major General John Breckenridge to take the position. Breckenridge, aware of how difficult it would be to take such a strong position, protested the order, but Bragg overruled him. At 3PM, Breckenridge began massing his men in preparation for his attack. [8] Across the river, Breckenridge’s preparations had not gone unnoticed, and Rosecrans set about placing 58 guns in two positions to provide defensive fire. [9]

Confederate Major General John Breckenridge was very reluctant to mount the charge proposed by Bragg. Despite his protests, Bragg ordered him to carry out the attack.

Confederate Major General John Breckenridge was very reluctant to mount the charge proposed by Bragg. Despite his protests, Bragg ordered him to carry out the attack.

Breckenridge's division attacks the Union positions atop a hill near the river.

Breckenridge's division attacks the Union positions atop a hill near the river.

            One hour later, Breckenridge began his attack. Though the Union infantry put up a fierce fight, Breckenridge successfully overwhelmed their position an survivors began falling back across the river, taking refuge behind the line of artillery. Breckenridge’s initial attack had taken 400 prisoners and several flags. Across the river, Colonel John F. Miller, commanding a brigade from Negley’s Division, ordered his men to hold their fire until the retreating Union infantry passed through their lines. At this point, Breckenridge ordered his men to continue their attack, and they charged across the river- straight into the line of artillery and infantry. The Union guns poured fire into the charging Confederates and inflicted terrible casualties. One Confederate soldier later wrote:

“The nearest the Yankees came to getting me was shooting a hole in my pants and cutting my hair off my right temple. I know a peck of balls pass in less than a yard of me… The man in front of me got slightly wounded… the one on my right mortally and the one on my left killed.”

Union forces counterattack following the destruction of Breckenridge's Division.

Union forces counterattack following the destruction of Breckenridge's Division.

The Confederate charge, which had been a success just minutes earlier, became a disaster. In less than an hour, Breckenridge’s division suffered 1800 killed or wounded.[10] As their attack fell apart, Miller ordered his men forward and swept the remaining Southerners back across the river and fields which they had just taken, capturing several Confederate guns and prisoners in the process. Eventually, Miller ordered his men back to their original position, where they remained until relieved.[11] As the survivors of Breckenridge’s attack made their way back to Southern positions, Breckenridge was reduced to tears, crying “My poor Orphans! My poor Orphans! My poor Orphan Brigade! They have cut it to pieces.”[12]

Breckenridge's Division, having sustained 1800 killed or wounded in less than an hour at the hands of 58 Union guns, retreat back across the river.

Breckenridge's Division, having sustained 1800 killed or wounded in less than an hour at the hands of 58 Union guns, retreat back across the river.

            The annihilation of Breckenridge’s assault effectively ended the battle. Skirmishing would continue through the remainder of the 2nd and into the 3rd, but Bragg’s forces had taken serious losses, and with Union forces certain to receive reinforcements from Nashville, their position was untenable. On the night of the 2nd, Bragg met with his subordinates and agreed to retreat 36 miles south to Tullahoma, where the Army of Tennessee would go into winter quarters. Bragg suffered 10, 266 casualties, including over 1300 killed and 7900 wounded- these losses represented 27 percent of his army. The Army of the Cumberland suffered 13,200 casualties, including 1700 killed, 7800 wounded, and 3700 wounded- a 31 percent casualty rate. These casualty figures made the Battle of Stones River one of the bloodiest of the war.[13] Though a costly win, Rosecrans’ victory at Stones River secured Middle Tennessee for the Union for the remainder of the war. President Lincoln would later write to Rosecrans, remarking of the battle, “I can never forget, if I remember anything, that at the end of the last year and the beginning of this, you gave us a hard-earned victory, which had there been a defeat instead, the country instead, the country scarcely could have lived over.”[14] On January 4th, Rosecrans entered Murphreesboro and began constructing what eventually became known as Fortress Rosecrans, an enormous supply base with a large garrison and protected by numerous artillery batteries, to provide a forward staging base for continued operations in Tennessee.

            Today, the area where the battle was fought has been preserved by the National Park Service. Established as a National Battlefield in 1927, the park incorporates much of the area over which the events of December 31, 1862- March 2, 1963 occurred. While the town of Murphreesboro has grown substantially in the intervening 150 years and portions of the former battlefield have been commercialized, the park includes a substantial portion of the ground over which the initial Confederate attack took place on December 31st. At the center of the park is a visitor center, which includes a small museum dedicated to explaining the events of the battle and sharing personal stories from the individuals who fought there. Numerous artifacts including a cannon, small arms, clothing, and personal artifacts are included in the exhibits. Across the street, a cemetery serves as the final resting place for many of the soldiers who fell during the battle, and a large memorial stands at its center. Visitors can follow miles of paths and retrace tactical movements of units during the battle, which are enumerated on by several placards placed around the battlefield. Also part of the park is the oldest Civil War monument in existence, the Hazen Brigade Monument, which was built in 1863. Not far outside of the park is the remains of Fortress Rosecrans, of which several earthen bastions remain standing- one of the large portions of the former defensive position has been incorporated into a separate park- many of the earthworks where Union guns once occupied remain and are accessible to visitors by wooden boardwalks. With these preservation efforts in place, Stones River National Battlefield is one the best preserved battlefields in the former Western Theater.

The entrance to Stones River National Battlefield.

The entrance to Stones River National Battlefield.

Cannons mark the edge of one of the fields through which Confederate troops advanced.

Cannons mark the edge of one of the fields through which Confederate troops advanced.

An area known as the Slaughter Pen- Union troops held out here among the limestone outcroppings as long as they could, until Sheridan's troops ran out of ammunition and forced the troops here to retreat along with them. 

An area known as the Slaughter Pen- Union troops held out here among the limestone outcroppings as long as they could, until Sheridan's troops ran out of ammunition and forced the troops here to retreat along with them. 

Trenches remain from the positions that were occupied by the Pioneer Brigade.

Trenches remain from the positions that were occupied by the Pioneer Brigade.

A road and pedestrian path wind through the cotton field - the scene of the last Confederate assaults on December 31st- the Union had dug in along the turnpike, the position of which would be along the ride side of this picture. 

A road and pedestrian path wind through the cotton field - the scene of the last Confederate assaults on December 31st- the Union had dug in along the turnpike, the position of which would be along the ride side of this picture. 

It was at this position that 58 Union guns were assembled and inflicted terrible losses against Breckenridge's division during its attack on January 2nd.

It was at this position that 58 Union guns were assembled and inflicted terrible losses against Breckenridge's division during its attack on January 2nd.

A monument marks the spot where Union artillery halted Breckenridge's attack.

A monument marks the spot where Union artillery halted Breckenridge's attack.

A monument to the Union dead who are buried in this cemetery stands at its center. 

A monument to the Union dead who are buried in this cemetery stands at its center. 

The oldest remaining Civil War monument stands at the former site of a battery of Union artillery, which was in part responsible for repelling the final Confederate attacks on the 31st.

The oldest remaining Civil War monument stands at the former site of a battery of Union artillery, which was in part responsible for repelling the final Confederate attacks on the 31st.

Inside the remains of Fortress Rosecrans, one of the largest fortifications constructed during the war. The rises on the left are what remains of the earthen walls.

Inside the remains of Fortress Rosecrans, one of the largest fortifications constructed during the war. The rises on the left are what remains of the earthen walls.


Sources

1.      "The Battle of Stones River Summary & Facts." Civil War Trust. Civil War Trust. Web. 11 Apr. 2017.

2.      Cist, Henry. "The Battle of Stone's River (Union View)." The Battle of Stone's River (Union View). Civilwarhome.com, 1997. Web. 11 Apr. 2017

3.      Cheeks, Robert. "Battle Of Stones River." HistoryNet. Wieder History Group, 29 Aug. 2006. Web. 11 Apr. 2017.

4.      Cheeks, Robert. "Battle of Stones River: Philip Sheridan's Rise to Millitary Fame." HistoryNet. Wieder History Group, 12 June 2006. Web. 11 Apr. 2017

5.      Thompson, Robert. "New Year's Hell." Civil War Trust. Civil War Trust, 2014. Web. 11 Apr. 2017

6.      "The Soldiers and the Battle of Stones River." Www.nps.gov. National Park Service, 02 June 2008. Web. 11 Apr. 2017.

7.      "A Hard-Earned Victory." National Park Service. National Park Service, n.d. Web. 11 Apr. 2017.


[1] http://www.civilwar.org/battlefields/stones-river.html?tab=facts

[2] http://www.civilwar.org/battlefields/stones-river.html?tab=facts

[3] http://www.civilwarhome.com/stonesriverunion.html

[4] http://www.historynet.com/battle-of-stones-river.htm

[5] http://www.historynet.com/battle-of-stones-river-philip-sheridans-rise-to-millitary-fame.htm

[6] http://www.civilwarhome.com/stonesriverunion.html

[7] http://www.civilwar.org/battlefields/stonesriver/stones-river-history/new-years-hell-1.html

[8] http://www.civilwar.org/battlefields/stonesriver/stones-river-history/new-years-hell-1.html

[9] http://www.civilwarhome.com/stonesriverunion.html

[10]https://web.archive.org/web/20080602203526/http://www.nps.gov/history/nr/twhp/wwwlps/lessons/40stones/40facts1.htm

[11] http://www.civilwarhome.com/stonesriverunion.html

[12] http://www.civilwar.org/battlefields/stonesriver/stones-river-history/new-years-hell-1.html

[13]https://web.archive.org/web/20080602203526/http://www.nps.gov/history/nr/twhp/wwwlps/lessons/40stones/40facts1.htm

[14] https://www.nps.gov/stri/learn/historyculture/aftermath.htm

Tools of War: P-51 Mustang

In need of fighter aircraft in 1940, Britain contacted North American Aviation about the possibility of producing Curtiss P-40 aircraft under license. Believing that they could create a better product, North American designed and built an entirely new fighter in less than four months. The result, the P-51 Mustang, became an icon of military aviation and one of the most successful fighter designs created.

By Seth Marshall

                By the spring of 1940, it had become apparent to the British that the attrition rate of their fighter aircraft over the Western Front and other theaters was going to be higher than the British aircraft industry was able to cope with. Pre-war orders for foreign aircraft were not uncommon, and the practice only increased following the outbreak of the war. Having previously ordered large numbers of Curtiss P-40 Warhawks, then the most modern US fighter, the British Air Purchasing Commission was searching for other American aircraft companies that could produce the aircraft under license. In April 1940, the Commission contacted North American Aviation, a relatively new company in the American market.[1] While the British were hoping to obtain more P-40s, the president of the company, James H. Kindelberger, said that his company could design a new aircraft built around the same engine powering the Warhawk, the Allison V-1710. The British eventually agreed to the proposal, and design work began immediately.[2]

THE NA-73 PROTOTYPE FOLLOWING THE INSTALLATION OF ITS ENGINE. SURPRISINGLY, THIS AIRCRAFT STILL EXISTS AND IS CURRENTLY ON DISPLAY AT THE EAA MUSEUM AT OSHKOSH, WISCONSIN. SOURCE: WIKIPEDIA.

THE NA-73 PROTOTYPE FOLLOWING THE INSTALLATION OF ITS ENGINE. SURPRISINGLY, THIS AIRCRAFT STILL EXISTS AND IS CURRENTLY ON DISPLAY AT THE EAA MUSEUM AT OSHKOSH, WISCONSIN. SOURCE: WIKIPEDIA.

                What would become the P-51 was initially referred to as the NA-73X. The chief designer of the new aircraft was Edgar Schmued, a German emigrate who had arrived in the US in 1930. Also on the design team was Edward Horkey, an aerodynamics specialist. The team came up with an airframe to fit around the Allison engine that differed greatly from the Warhawk. The design team strove to make the plane as aerodynamically clean as possible to increase speed. Additionally, in a break from conventional wing designs of the time, the NA-73X was given a laminar flow wing. In previous designs, the wing’s maximum thickness was achieved close to the leading edge of the wing. The laminar flow wing, by contrast, positioned the thickest section of the wing more towards the halfway point of the wing, reducing turbulent airflow across the wing. This had the combined effect of increasing speed and range.[3] Additionally, the Mustang featured squared wingtips, which were found to have slightly less drag in wind tunnel testing than contemporary rounded wingtips.[4] On September 9, 1940, 102 days after North American had signed its contract with the British, the NA-37X was rolled out of the factory- a remarkably short period of design and initial construction even in that period- minus its engine and armament. The engine arrived in October, and on the 26th of that month, the prototype made its first flight and achieved a speed of 382mph, 25mph faster than the P-40.[5]

A P-51A, ONE OF THE FIRST DELIVERED TO THE BRITISH. RED ROUNDELS ON THE STARS INDICATE THIS PHOTOGRAPH WAS LIKELY TAKEN IN LATE 1941 OR EARLY 1942, BEFORE THE MARKING WAS DELETED FROM US INSIGNIA. THE CAMOUFLAGE PATTERN IS BRITISH, PAINTED AT THE FA…

A P-51A, ONE OF THE FIRST DELIVERED TO THE BRITISH. RED ROUNDELS ON THE STARS INDICATE THIS PHOTOGRAPH WAS LIKELY TAKEN IN LATE 1941 OR EARLY 1942, BEFORE THE MARKING WAS DELETED FROM US INSIGNIA. THE CAMOUFLAGE PATTERN IS BRITISH, PAINTED AT THE FACTORY BY NORTH AMERICAN. SOURCE: WIKIPEDIA.

                It was not until May 1, 1941 that the second aircraft, the first production model, was rolled out. By this time, the new fighter had acquired the name “Mustang” from the British. The third Mustang was shipped to Britain in the fall of 1941 and made its first flight on October 26th after being equipped with VHF radio, a gunsight, and other equipment. Testing continued to take place through late 1941 and early 1942 with the Air Fighting Development Unit located at RAF Duxford.[6] During this time, RAF pilots found that while the Mustang was fast and highly maneuverable, its performance degraded at altitudes above 15,000 feet, due to the Allison engine not functioning as well at higher altitudes. While this made the Mustang Mark I (the British used Marks to differentiate models instead of letters, which was preferred by the USAAF) unsuitable for interception and escort missions, the RAF accepted the aircraft for use as a photo-reconnaissance plane and tactical fighter bomber. The first Mustang Is began arriving in RAF squadrons in early 1942, with the first missions taking place that spring. The first operational loss of a Mustang occurred over France in July 1942, and the fighter scored its first kill on August 19, 1942, when an American pilot flying for the Royal Canadian Air Force, Hollis H. Hillis, shot down a German fighter in support of the ill-fated Dieppe raid.[7]

THIS P-51A IS ONE OF THE PRODUCTION VERSIONS ORDERED TO BRITISH STANDARD, EVIDENT BY THE FOUR HISPANO 20MM CANNONS WHICH ARM THIS AIRCRAFT, RATHER THAN THE NORMAL SIX .50 CALIBER MACHINE GUNS. SOME OF THESE AIRCRAFT WERE RETAINED BY THE USAAF. SOURC…

THIS P-51A IS ONE OF THE PRODUCTION VERSIONS ORDERED TO BRITISH STANDARD, EVIDENT BY THE FOUR HISPANO 20MM CANNONS WHICH ARM THIS AIRCRAFT, RATHER THAN THE NORMAL SIX .50 CALIBER MACHINE GUNS. SOME OF THESE AIRCRAFT WERE RETAINED BY THE USAAF. SOURCE: WIKIPEDIA.

                Not long after North American had signed its contract with the British to produce the Mustang, the United States Army Air Corps (known after mid-1941 as the United States Army Air Forces) agreed to let exports of the Mustang proceed on the condition that North American deliver two planes to the USAAC for evaluation. Subsequently, the ninth and tenth Mustangs built were given to the USAAC and redesignated as XP-51s. After a period of evaluation, the USAAF decided to order 310 P-51As and 300 A-36As, dive-bomber variants of the P-51A with dive-brakes and bomb racks beneath the wings, in 1942. Additionally, a number of Allison-engined Mustangs were converted to F-6As, the USAAF photo-reconnaissance version of the fighter. The went into action with the USAAF in March 1943, when three dozen F-6As with the 111th and 154th Observation Squadrons arrived in Tunisia to provide reconnaissance support during the closing stages of the North African campaign.[8] Other P-51As would see combat elsewhere in the Mediterranean Theater as well as in the China-Burma-India Theater.[9]

                While the P-51A was a definite improvement over the P-40 Warhawk, it was felt that better performance could be gained through the substitution of a different powerplant. In 1942, four Mustangs were modified by the British to use the Rolls-Royce Merlin engine, the same engine that powered the Supermarine Spitfire of Battle of Britain fame, as well as the DeHavilland Mosquito and Avro Lancaster. American engineers performed similar tests with two Mustangs powered by Packard-built Merlin engines.[10] In order to accommodate the power of the new engine, which boasted 1,695hp, the airframe was strengthened; the radiator, located on the belly of the aircraft, was deepened, and the carburetor was moved from on top of the nose to below it.[11] The results revolutionized the Mustang’s performance. Speed was increased to 426mph at 24,000ft.[12] Tests comparing the Mustang to the Spitfire demonstrated that the Mustang had far greater range and now had excellent high altitude performance.[13] The newly-redesigned Mustang arrived at an apt time for the USAAF.

A MERLIN-ENGINED P-51B MUSTANG IN FLIGHT. THIS AIRCRAFT USES THE EARLIER FRAMED CANOPY, WHICH WAS REPLACED BY THE MACOLM HOOD, A ROUNDED PLEXIGLAS CANOPY THAT OMITTED METAL FRAMES AND ALLOWED FOR INCREASED VISIBILITY. SOURCE: WIKIPEDIA.

A MERLIN-ENGINED P-51B MUSTANG IN FLIGHT. THIS AIRCRAFT USES THE EARLIER FRAMED CANOPY, WHICH WAS REPLACED BY THE MACOLM HOOD, A ROUNDED PLEXIGLAS CANOPY THAT OMITTED METAL FRAMES AND ALLOWED FOR INCREASED VISIBILITY. SOURCE: WIKIPEDIA.

                In 1942, the USAAF had begun its daylight bombing campaign against Germany. Convinced that daylight precision bombing was the proper way to wage aerial warfare against the Germans, the USAAF had begun sending its heavy bombers deep into Reich territory. However, earlier USAAF and RAF fighters, namely the P-47 Thunderbolt and Spitfire, lacked the range to escort the bombers all the way to their targets; upon reaching the German frontier, the friendly escorts were forced to turn back for their bases. It was after this point that Luftwaffe fighters attacked the bomber formations. During 1943, losses increased steadily, culminating in the second raid on the ball-bearing production facilities at Schweinfurt, Germany on October 14, 1943. Known thereafter as Black Thursday, out of the 350 heavy bombers sent to attack both Schweinfurt, 60 B-17s were shot down by fighter attacks over Europe, another five had crashed in England and 17 were written off on their return as too badly damaged to ever fly again. With a mission loss rate of 26%, the second Schweinfurt raid was the costliest raid the Eighth Air Force mounted- in return, the Luftwaffe had lost around 40 fighters to the guns of the bomber formation.[14] With the losses on Black Thursday as well as preceding raids, the Eighth Air Force was forced to put its bomber offensive on hold until replacement aircraft could arrive and more adequate fighter protection be provided.

                With the introduction of the Merilin-powered Mustang, the solution to the problem of fighter escort had arrived. Carrying two releasable drop-tanks full of fuel, Mustangs were capable of escorting the bombers all the way to their targets and back. Despite this, the first USAAF P-51Bs to arrive in England were assigned to the 354th Fighter Group with the Ninth Air Force in October 1943, which was slated to primarily function in the tactical role during upcoming operations.[15] Eventually, it was decided that most of VIII Fighter Command’s squadrons would be equipped with the P-51- squadrons already equipped with the P-47 and P-38 would eventually transition to the new Mustang. The Ninth Air Force would ultimately be equipped primarily with P-47s, which were better suited to the ground-attack role, though it also retained two groups of P-51s.[16]

CAPTAIN DON GENTILE POSES WITH HIS P-51B MUSTANG IN THE SPRING OF 1944. AFTER SERVING WITH ONE OF  THE RAF'S EAGLE SQUADRONS (COMPOSED OF AMERICAN VOLUNTEERS) AND SHOOTING DOWN TWO AIRCRAFT, GENTILE TRANSFERRED TO THE USAAF, EVENTUALLY FLYING W…

CAPTAIN DON GENTILE POSES WITH HIS P-51B MUSTANG IN THE SPRING OF 1944. AFTER SERVING WITH ONE OF  THE RAF'S EAGLE SQUADRONS (COMPOSED OF AMERICAN VOLUNTEERS) AND SHOOTING DOWN TWO AIRCRAFT, GENTILE TRANSFERRED TO THE USAAF, EVENTUALLY FLYING WITH THE 4TH FIGHTER GROUP. DURING EARLY 1944, WHILE FLYING THE MUSTANG, HE SHOT DOWN 15.5 ENEMY PLANES, MAKING HIM THE HIGHEST-SCORING ACE IN 8TH AIR FORCE AT THE TIME. SOURCE: WIKIPEDIA.

A P-51D OF THE 374TH FIGHTER SQUADRON. BENEATH THE WINGS ARE 75 GALLON DROP TANKS, WHICH FURTHER EXTENDED THE RANGE OF THE MUSTANG. STANDARD PRACTICE FOR MUSTANG PILOTS WAS TO DROP THE TANKS ON SIGHTING ENEMY AIRCRAFT AND SWITCH TO THEIR MAIN TANKS.…

A P-51D OF THE 374TH FIGHTER SQUADRON. BENEATH THE WINGS ARE 75 GALLON DROP TANKS, WHICH FURTHER EXTENDED THE RANGE OF THE MUSTANG. STANDARD PRACTICE FOR MUSTANG PILOTS WAS TO DROP THE TANKS ON SIGHTING ENEMY AIRCRAFT AND SWITCH TO THEIR MAIN TANKS. SOURCE: WIKIPEDIA.

                By the spring of 1944, the definitive version of the Mustang, the P-51D, began to arrive in England. This new Mustang had a cut down rear fuselage and bubble-shaped canopy which greatly improved pilot visibility. Additionally, two .50 caliber machine guns were added, one in each wing, making a total of six machine guns. With a maximum speed of 437mph and range of 1650 miles with external tanks, the P-51D became the premier fighter of the Eighth Air Force. Combined factors of increasingly better pilot training in the USAAF, decreasing pilot training and effectiveness in the Luftwaffe, and excellent performance allowed Mustang pilots to claim 4,950 aircraft shot down during the war, more than any other Allied fighter.[17] Dozens of Mustang pilots would become aces, a special status reserved for those who had shot down five or more enemy aircraft. Among the Mustang’s well-known pilots was then Captain Charles E. “Chuck” Yeager, who would go on the break the sound barrier in 1947- serving with the 357th Fighter Group, Yeager shot down 12.5 planes.[18] Describing a typical mission, William Lyons later recalled a mission he flew on November 21, 1944 as a 20-year old 1LT with the 355th Fighter Group:

“We’re about 12 minutes from Misburg. The 357th’s Red flight is arrayed to the right of our bomber box, and my Yellow flight is to the right of Red, with the Blue and Green flights to the left a mile behind us. Someone calmly radios, “Bogeys at 10 o’clock” (bogeys are unidentified aircraft; bandits are enemy aircraft). Another calls, “Bogeys, 2 o’clock high.” I can see little black dots ahead, and then I hear, “Bandits, 12 o’clock!” followed by “Bandits at 3!”—Kelley’s voice. The dots rapidly enlarge and multiply across the horizon. They expand into 75 to 100 Me-109s, closing fast on the front of the bomber stream. I quickly switch to the rear internal tank, drop my two external tanks and flick on the gun switch. Fred jettisons his externals and pivots right, toward 1 and 2 o’clock, where the gaggle of Germans is densest. We head into them full throttle—our combined closure speed some 600-700 mph—and go right through them, both of us narrowly avoiding crashing into enemy fighters. Our guns are firing, though I see no hits. When Fred whips back, I’m glued to his tail, right behind and to one side. Now Fred’s firing at a 109 that’s in a diving turn under the bombers, following him down while hitting him. Trailing heavy smoke, that one’s done for. Out of the corner of my eye I see a bomber burst apart, and tiny forms falling out. No parachutes are opening. Fighters from both sides are swirling contrails all over the place. Then another bomber falls, with black smoke coming from the left-wing engines. Fred latches onto another 109, both of them diving and twisting down until the 109 loses half its right wing. That’s two for Fred. We’re down to 5,000 feet. My heart is pounding, and I’m drenched in perspiration. On the radio we hear urgent shouts and warnings, some sounding close, others way off. More enemy fighters are hitting the bombers, though I can’t see them. Just now the sky seems empty of planes except our Yellow flight and the bomber stream far above us. Suddenly Kelley yells, “Yellow 2, SIX!” I pull back sharply and left, then I hear Barney Barab slowly saying, “I…got…him.” Looking back, I glimpse Barab following down a smok­ing Me-109, with Kelley trailing them. Then it hits me: Yellow 3 and 4 just saved my life. As we climb back toward the bomber stream, a 109 dives straight down almost directly ahead of us. Fred does a split-S to follow him, and during our dive we spot three more 109s on the deck, heading east. Fred corkscrews toward the trailing plane, with me following, but his dive is too steep and he has to pull out early. His target whips to the left while the leading 109 below turns right and comes in behind Fred, shooting up at him 200 to 300 yards ahead of me at about 30 degrees. I fire, landing many strikes on the German. There’s smoke and the 109 goes out of control, crashing into the deck. The rest of the 109s then disappear, heading east. I follow Fred’s low, climbing circle, and we’re joined by Yellow 3 and 4. At 500 feet Fred turns due west: We’re heading home. Kelley is flying funny, though his speed seems OK. Engine oil blackens his fuselage, but we can’t tell whether there’s damage to his plane. Now he drifts off formation, shifting erratically. Something’s wrong. The three of us radio him, but there’s no answer. Barab goes in close to take a look. Suddenly Kelley swerves into him, and they both explode in a cloud of aluminum confetti! No possibility of survival. Horrible. Fred and I circle around the silvery shards slowly floating down, looking for any positive sign, but we see nothing hopeful. We head toward home in a grim mood. Our transit over Germany to the North Sea coast is uneventful, though there’s flak over the Frisians. Fred and I are first ones back. I tell my crew chief about Kelley and Barab so he’ll tell their crew chiefs not to expect them.”[19]

Lyons would finish his tour on March 28, 1945 after completing 63 missions with two confirmed kills. The highest-scoring Mustang ace of the war was George Preddy. Previously a P-40 pilot in the Pacific, Preddy was reassigned to Europe following serious injuries resulting from a collision with another aircraft. Flying with the 352nd Fighter Group, Preddy would shoot down 25 German aircraft from late April 1944 to December 25, 1944. On one memorable occasion, August 6th, Preddy took off on a mission with a severe hangover from a party that had lasted until the early hours of the morning. Despite his condition, Preddy shot down six German planes that day. However, his luck ran out on December 25th, when he was shot down by a friendly anti-aircraft unit as he was pursuing a Luftwaffe fighter and died of his wounds.[20] The most successful Mustang unit was the 4th Fighter Group, commanded by Colonel Donald Blakeslee; the first VIII Fighter Command Group to convert to the Mustang, the 4th shot down 583 planes in the air and destroyed 469 more on the ground.[21]

Chuck Yeager's second P-51D, Glamorous Glen III, in which he shot down most of his 12.5 kills. Source: Wikipedia.

Chuck Yeager's second P-51D, Glamorous Glen III, in which he shot down most of his 12.5 kills. Source: Wikipedia.

A P-51D of the 357th Fighter Group. Source: Wikipedia.

A P-51D of the 357th Fighter Group. Source: Wikipedia.

P-51D production line. Source: Wikipedia.

P-51D production line. Source: Wikipedia.

Among the operators of the P-51 was the 322nd Fighter Group, popularly known as the Red Tails or Tuskegee Airmen. Source: Wikipedia.

Among the operators of the P-51 was the 322nd Fighter Group, popularly known as the Red Tails or Tuskegee Airmen. Source: Wikipedia.

                Outside of Europe, the Mustang saw action in the Pacific. Reluctant to replace his P-38s with Mustangs, 5th Air Force commander Major General George Kenney refused to accept the new fighters. However, the range of the Mustangs ultimately allowed them to escort B-29s on raids against Japan late in the war. Following the captured of Iwo Jima, fighter groups were quickly established on the small island to provide escort for the big bombers. The first B-29 escort mission was carried out on April 29, 1945, when 108 P-51s escorting the Superfortresses to their target.[22]

                By the end of the war, the US had produced 15,386 P-51s of all types. Additionally, the Commonwealth Aircraft Corporation in Australia had produced another 200. In the post-war era, Mustangs served in numerous air forces all over the world. Despite the advent of the jet, the Mustang saw heavy use early in the Korean War as a fighter bomber- the P-51 was the only aircraft available in significant numbers that could be sent to the theater quickly, and it served as the USAF’s primary close air support weapon for much of the war. Later in the conflict, the reconstituted Republic of Korea Air Force was given many of the USAF’s Mustangs to fly for their own missions. The P-51 was phased completely out of US inventories when the last Mustangs left the Air Force Reserve and Air National Guard in 1957.[23] Other countries continued to the use the Mustang for decades. Today, the Mustang is a popular sight at air shows. Over 100 P-51s remain airworthy, with many more on static display in museums.

WHEN THE KOREAN WAR BROKE OUT IN 1950, THE MUSTANG WAS THE MOST READILY AVAILABLE AIRCRAFT THAT COULD BE SENT TO REINFORCE THE US 5TH AIR FORCE AND ROKAF. THESE P-51DS, PAINTED IN ROKAF MARKINGS, WERE LIKELY HANDED OVER BY USAF UNITS AFTER THEY CONV…

WHEN THE KOREAN WAR BROKE OUT IN 1950, THE MUSTANG WAS THE MOST READILY AVAILABLE AIRCRAFT THAT COULD BE SENT TO REINFORCE THE US 5TH AIR FORCE AND ROKAF. THESE P-51DS, PAINTED IN ROKAF MARKINGS, WERE LIKELY HANDED OVER BY USAF UNITS AFTER THEY CONVERTED TO JETS. THE MUSTANG WAS THE PRIMARY CLOSE AIR SUPPORT WEAPON DURING THE FIRST YEAR OF THE WAR. SOURCE: WIKIPEDIA.

A USAF F-51D (DURING THE INTERWAR PERIOD, A REDESIGNATION OF FIGHTER AIRCRAFT FROM "PURSUIT" TO "FIGHTER" OCCURRED) TAXIES THROUGH A PUDDLE IN KOREA. THIS AIRCRAFT IS ARMED WITH 2 500 LBS BOMBS, 4 2.75 INCH ROCKETS, AND SIX .50 CALIBER MACHINE GUNS.…

A USAF F-51D (DURING THE INTERWAR PERIOD, A REDESIGNATION OF FIGHTER AIRCRAFT FROM "PURSUIT" TO "FIGHTER" OCCURRED) TAXIES THROUGH A PUDDLE IN KOREA. THIS AIRCRAFT IS ARMED WITH 2 500 LBS BOMBS, 4 2.75 INCH ROCKETS, AND SIX .50 CALIBER MACHINE GUNS. SOURCE: WIKIPEDIA.

                The P-51 Mustang remains one of the most iconic aircraft made, and was one of the best fighter designs produced during World War II. It’s ability to escort heavy bombers all the way to their targets and then out-perform the Luftwaffe fighters which it encountered sealed the fate of the already troubled-Luftwaffe over Western and Central Europe. It’s unmatched record of nearly 5,000 kills cemented its place as the most-successful Allied fighter of the war.


Sources

1.       Dwyer, Larry. "North American P-51 Mustang." North American P-51 Mustang. The Aviation History Online Museum, 21 Nov. 2001. http://www.aviation-history.com/north-american/p51.html . 7 Feb. 2017.

2.       McGowan, Sam. "Site Navigation." Warfare History Network. Sovereign Media, 13 Jan. 2017. http://warfarehistorynetwork.com/daily/wwii/the-untamed-north-american-p-51-mustang/ . 19 Feb. 2017.

3.       Goebel, Greg. "The North American P-51 Mustang." The North American P-51 Mustang. N.p., 1 Feb. 2017. http://www.airvectors.net/avp51.html . 5 Feb. 2017.

4.       Garrison, Peter. "In the Mustang's Wake." HistoryNet. World History Group, 13 Apr. 2016. http://www.historynet.com/in-the-mustangs-wake.htm . 19 Feb. 2017.

5.       "North American P-51D Mustang." National Museum of the US Air Force. United States Air Force, 20 Apr. 2015. http://www.nationalmuseum.af.mil/Visit/MuseumExhibits/FactSheets/Display/tabid/509/Article/196263/north-american-p-51d-mustang.aspx . 05 Feb. 2017.

6.       Erikson, Brent, Neil Stirling, and Mike Williams. "P-51 Mustang Performance." WWII Aircraft Performance. N.p., 2005. http://www.wwiiaircraftperformance.org/mustang/mustangtest.html . 05 Feb. 2017.

7.       Crawford, Bruce. "World War II: Eighth Air Force Raid on Schweinfurt." HistoryNet. World History Group, 12 June 2006. http://www.historynet.com/world-war-ii-eighth-air-force-raid-on-schweinfurt.htm . 19 Feb. 2017.

8.       "P-51 Mustang." Flight Journal. Air Age Media, 29 Nov. 2016. http://www.flightjournal.com/blog/2016/11/29/p-51-mustang/ . 19 Feb. 2017.

9.       Young, James. "The War Years." General Chuck Yeager. PMN III LLC, 2017. http://www.chuckyeager.com/1943-1945-the-war-years . 19 Feb. 2017.

10.   Lyons, William. "Mustang Pilot's Mission: A Day in the Life." HistoryNet. World History Group, 15 Jan. 2013. http://www.historynet.com/p-51-pilot-a-day-in-the-life.htm . 5 Feb. 2017.

11.   Bell, Kelly. "George Preddy: Top-Scoring World War II Mustang Ace." HistoryNet. World History Group, 6 Nov. 2006. http://www.historynet.com/george-preddy-top-scoring-world-war-ii-mustang-ace.htm . 05 Feb. 2017.


[1] http://www.aviation-history.com/north-american/p51.html 2/5/17

[2] http://warfarehistorynetwork.com/daily/wwii/the-untamed-north-american-p-51-mustang/ 2/5/17

[3] http://www.airvectors.net/avp51.html 2/5/17

[4] http://www.historynet.com/in-the-mustangs-wake.htm 2/5/17

[5] http://www.aviation-history.com/north-american/p51.html 2/5/17

[6] http://www.airvectors.net/avp51.html 2/5/17

[7] http://www.airvectors.net/avp51.html 2/5/17

[8] http://www.nationalmuseum.af.mil/Visit/MuseumExhibits/FactSheets/Display/tabid/509/Article/196263/north-american-p-51d-mustang.aspx 2/5/17

[9] http://www.airvectors.net/avp51.html 2/5/17

[10]http://www.aviation-history.com/north-american/p51.html 2/5/17

[11] http://www.aviation-history.com/north-american/p51.html 2/5/17

[12] http://www.wwiiaircraftperformance.org/mustang/mustangtest.html 2/5/17

[13] http://warfarehistorynetwork.com/daily/wwii/the-untamed-north-american-p-51-mustang/ 2/5/17

[14] http://www.historynet.com/world-war-ii-eighth-air-force-raid-on-schweinfurt.htm 2/14/17

[15] http://warfarehistorynetwork.com/daily/wwii/the-untamed-north-american-p-51-mustang/ 2/5/17

[16] http://warfarehistorynetwork.com/daily/wwii/the-untamed-north-american-p-51-mustang/ 2/5/17

[17] http://www.flightjournal.com/blog/2016/11/29/p-51-mustang/ 2/5/17

[18] http://www.chuckyeager.com/1943-1945-the-war-years 2/14/17

[19] http://www.historynet.com/p-51-pilot-a-day-in-the-life.htm 2/14/17

[20] http://www.historynet.com/george-preddy-top-scoring-world-war-ii-mustang-ace.htm 2/5/17

[21] http://warfarehistorynetwork.com/daily/wwii/the-untamed-north-american-p-51-mustang/ 2/5/17

[22] http://warfarehistorynetwork.com/daily/wwii/the-untamed-north-american-p-51-mustang/ 2/5/17

[23] http://www.nationalmuseum.af.mil/Visit/MuseumExhibits/FactSheets/Display/tabid/509/Article/196263/north-american-p-51d-mustang.aspx 2/5/17

Battlefield Visit: Fort Donelson


In early 1862, then-Brigadier General Ulysses S. Grant led a campaign to capture a number of Confederate forts and towns along vital waterways in southern Kentucky and northern Tennessee. The climax of this campaign came with the capture of Fort Donelson on February 16, 1862 following a battle.

By Seth Marshall

                Prior to the start of hostilities in the Civil War, Confederate officials both in Tennessee and further east recognized that defensive positions needed to be established along the Tennessee/Kentucky border to protect the Southern state and its vital waterways. Tennessee governor Isham G. Harris began development of such fortifications during the summer of 1861. Though positions across the Cumberland River would have provided better defenses, the Confederates wished to respect Kentucky’s neutrality. Eventually, a 100-acre site near Dover, the county-seat of Stewart, Tennessee, was selected for what would become Fort Donelson. Named after a senior militia leader, the fort was just 75 miles downstream from Nashville. The fort’s primary armament took the firm of two batteries; the lower battery featured a 10-inch Columbiad and two 32-pounder cannons, while the upper battery contained one rifled 64-pounder Columbiad and two 64-pounder howitzers. All of these guns were dug into the hillside and reinforced with sandbags.[1]

                In early 1862, Brigadier General Ulysses S. Grant presented a plan to capture the forts along the Cumberland and Tennessee Rivers to his commander, Major General Henry Halleck. Though he initially declined the plan, Halleck was eventually convinced by Grant along with Captain Andrew Foote of the US Navy. On February 6th, Grant seized Fort Heiman and Fort Henry after Foote’s gunboats bombarded both. As Confederate soldiers straggled their way to Donelson, Lieutenant General Albert Sidney Johnston ordered reinforcements be sent to the fort. On February 11th, he appointed Brigadier General John B. Floyd as the fort’s commander.[2] Reinforcements meant that the fort now had some 28 infantry regiments, a cavalry regiment, two independent battalions, and six light artillery batteries. Additionally, the fort’s main batteries along the river now had 17 heavy guns covering Cumberland.[3] Altogether, there was some 17,000 soldiers defending the fort.[4] Delayed by a river that had swelled over its banks and snows that had turned the roads to mud, Grant did not move on Donelson until February 12th. The pause gave Halleck time to send Grant additional reinforcements from Cairo. Now with three divisions and 21,500 soldiers under his command and the support of Foote’s six gunboats, Grant set off for Donelson. He left 2500 men under the command of Brigadier General Lew Wallace at Fort Henry. Grant’s forces appeared in front of the Confederate defensive positions near the end of the day, and small skirmishes broke out just before night fell.[5]

ULYSSES S. GRANT, PICTURED HERE AS A LIEUTENANT GENERAL, WAS JUST A BRIGADIER GENERAL AT THE TIME OF HIS CAMPAIGN AGAINST FORTS HENRY AND DONELSON, AND WAS IN OVERALL COMMAND OF THE UNION FORCE IN TENNESSEE. SOURCE: PUBLIC DOMAIN.

ULYSSES S. GRANT, PICTURED HERE AS A LIEUTENANT GENERAL, WAS JUST A BRIGADIER GENERAL AT THE TIME OF HIS CAMPAIGN AGAINST FORTS HENRY AND DONELSON, AND WAS IN OVERALL COMMAND OF THE UNION FORCE IN TENNESSEE. SOURCE: PUBLIC DOMAIN.

REAR ADMIRAL ANDREW FOOTE WAS ONE OF THE FIRST US NAVAL OFFICER TO BE PROMOTED TO THE RANK OF ADMIRAL. AFTER COMMANDING THE WESTERN GUNBOAT FLOTILLA THROUGH MUCH OF 1862, BEFORE MOVING ON TO OTHER COMMANDS. HE DIED UNEXPECTEDLY IN THE SUMMER OF 1863…

REAR ADMIRAL ANDREW FOOTE WAS ONE OF THE FIRST US NAVAL OFFICER TO BE PROMOTED TO THE RANK OF ADMIRAL. AFTER COMMANDING THE WESTERN GUNBOAT FLOTILLA THROUGH MUCH OF 1862, BEFORE MOVING ON TO OTHER COMMANDS. HE DIED UNEXPECTEDLY IN THE SUMMER OF 1863 WHILE MOVING TO HIS NEW COMMAND WITH THE SOUTH ATLANTIC BLOCKADING SQUADRON. SOURCE: PUBLIC DOMAIN.

BRIGADIER GENERAL JOHN B. FLOYD WAS THE US SECRETARY OF WAR BEFORE THE CIVIL WAR BEGAN. DESPITE HAVING NO PRIOR MILITARY EXPERIENCE, HE WAS COMMISSIONED A BRIGADIER GENERAL IN THE CONFEDERATE ARMY AND EVENTUALLY BECAME THE OVERALL SOUTHERN COMMANDER…

BRIGADIER GENERAL JOHN B. FLOYD WAS THE US SECRETARY OF WAR BEFORE THE CIVIL WAR BEGAN. DESPITE HAVING NO PRIOR MILITARY EXPERIENCE, HE WAS COMMISSIONED A BRIGADIER GENERAL IN THE CONFEDERATE ARMY AND EVENTUALLY BECAME THE OVERALL SOUTHERN COMMANDER AT FORT DONELSON. RELIEVED OF HIS COMMAND FOLLOWING THE BATTLE, HE REMAINED AN OFFICER IN VIRGINIA'S MILITIA UNTIL HIS DEATH IN 1863. SOURCE: PUBLIC DOMAIN.

BRIGADIER GENERAL SIMON B. BRUCKNER WAS THE MOST EXPERIENCED SOUTHERN COMMANDER AT FORT DONELSON, HAVING SERVED A NUMBER OF YEARS IN THE REGULAR ARMY PRIOR TO THE CIVIL WAR. HE WOULD BECOME THE FIRST CONFEDERATE GENERAL OFFICER TO SURRENDER TO THE U…

BRIGADIER GENERAL SIMON B. BRUCKNER WAS THE MOST EXPERIENCED SOUTHERN COMMANDER AT FORT DONELSON, HAVING SERVED A NUMBER OF YEARS IN THE REGULAR ARMY PRIOR TO THE CIVIL WAR. HE WOULD BECOME THE FIRST CONFEDERATE GENERAL OFFICER TO SURRENDER TO THE UNION ARMY DURING THE WAR. HE WAS LATER RETURNED TO THE SOUTH THROUGH A PRISONER EXCHANGE AND HELD A NUMBER OF OTHER COMMANDS DURING THE REMAINDER OF THE WAR. AFTER THE WAR, HE ENTERED POLITICS, EVENTUALLY BECOMING THE GOVERNOR OF KENTUCKY, HE DIED IN 1914. SOURCE: PUBLIC DOMAIN.

NATHAN BEDFORD FORREST, A COLONEL AT THE TIME OF THE BATTLE, WAS RELATIVELY UNKNOWN IN EARLY 1862. HOWEVER, HE WOULD EVENTUALLY GAIN FAME FOR HIS RAIDS INTO UNION TERRITORY AND BE PROMOTED TO LIEUTENANT GENERAL. SOURCE: PUBLIC DOMAIN.

NATHAN BEDFORD FORREST, A COLONEL AT THE TIME OF THE BATTLE, WAS RELATIVELY UNKNOWN IN EARLY 1862. HOWEVER, HE WOULD EVENTUALLY GAIN FAME FOR HIS RAIDS INTO UNION TERRITORY AND BE PROMOTED TO LIEUTENANT GENERAL. SOURCE: PUBLIC DOMAIN.

                February 13th saw additional skirmishes, as several Union brigade commanders decided to ignore Grant’s order to avoid an engagement during the day and probe the Confederate lines. Though the reconnaissance mission was short, the Union suffered many killed on the first day. Additionally, Union gunboats bombarded the fort, though at least one, the Carondelet, was damaged by a 128-pound projectile that penetrated through both sides of the boat and detonated in the water on the other side.[6] That night, snow fell, leaving several inches on the ground. Temperatures plummeted below 12 degrees Farrenheit. Making matters worse, commanders on both sides forbade fires for fear that it would give their positions away, leaving the soldiers to shiver through the night.[7] The following morning, Foote’s seven gunboats moved towards Fort Donelson on the Cumberland River. Composed of four ironclads, the USS St. Louis, the USS Carondelet, the USS Louisville, and the USS Pittsburg, as well as three timberclads, the USS Conestoga, the USS Tyler, and the USS Lexington, the warships were confident- just days earlier, their guns had forced Fort Henry to surrender relatively quickly.[8] Their hopes were quickly dispelled when the Confederate batteries opened fire. Over the course of an hour and a half, the gunboats dueled with the riverine artillery, with several becoming severely damaged in the process. Eventually Foote’s ships retreated back from where they had come.[9] In a report following the bombardment, Foote wrote:

“… I made an attack on Fort Donelson yesterday, the 14th instant, at 3 o’clock p.m. with four iron clad and two wooden gunboats, the St. Louis, Carondelet, Louisville, and Pittsburg, with the Tyler and Conestoga, and after a sever fight of an hour and a half, being in the latter part of the action less than 400 yards from the fort, the wheel of this vessel, by a shot through her pilot-house, was carried away, and the tiller-ropes of the Louisville also disabled by a shot, which rendered the two boats wholly unmanageable. They then drifted down the river, the relieving tackles not being able to steer or control them in the rapid current. The two remaining boats, the Pittsburg and Carondelet, were also greatly damaged between wind and water, and soon followed us, as the enemy rapidly renewed the fire as we drifted helplessly down the river. This vessel, the St. Louis, alone received 59 shoots, 4 between wind and water and one in the pilot-house, mortally wounding the pilot and others… There were 54 killed and wounded in this attack…”[10]

FOOTE'S GUNBOATS EXCHANGING "IRON VALENTINES" WITH THE CONFEDERATE BATTERIES DURING THE AFTERNOON OF FEBRUARY 14TH. SOURCE: WWW.NPS.GOV

FOOTE'S GUNBOATS EXCHANGING "IRON VALENTINES" WITH THE CONFEDERATE BATTERIES DURING THE AFTERNOON OF FEBRUARY 14TH. SOURCE: WWW.NPS.GOV

                With Foote’s gunboats out of action, it fell to Grant’s troops to take the fort. Early on the morning of February 15th, before the Union could attack, the Confederates seized the iniative and mounted their own attack. Brigadier General McClernand’s division took heavy losses and was driven back from their positions.[11] Curiously though, just as it seemed that the Confederates were close to breaking through the Union lines entirely, Brigadier General Gideon Pillow called his attack to a halt. In the time that the Confederates paused, the Union struck back. Brigadier General Lew Wallace, though unable to communicate with Grant, ordered his division to counter-attack and drove the southerners back to their lines with heavy casualties. At this point, Grant reappeared on the battlefield and ordered Brigadier General C.F. Smith to attack the Confederate lines opposite his position. Smith’s men quickly overwhelmed the southerners in his sector and took a large portion of the earthworks in the area. His attack was stopped by the onset of darkness.[12]

UNION SOLDIERS APPROACH THE CONFEDERATE EARTHWORKS OF FORT DONELSON IN THIS 19TH CENTURY ILLUSTRATION. SOURCE: PUBLIC DOMAIN.

UNION SOLDIERS APPROACH THE CONFEDERATE EARTHWORKS OF FORT DONELSON IN THIS 19TH CENTURY ILLUSTRATION. SOURCE: PUBLIC DOMAIN.

THE SITUATION AT FORT DONELSON ON THE AFTERNOON OF FEBRUARY 15. SOURCE: PUBLIC DOMAIN.

THE SITUATION AT FORT DONELSON ON THE AFTERNOON OF FEBRUARY 15. SOURCE: PUBLIC DOMAIN.

                During the night, the Confederate commanders discussed their options. Their best chance to get most of their men out had been lost when their attack had foundered earlier in the day. During the early hours of the morning, a then-relatively unknown cavalry commander, Colonel Nathan Bedford Forrest, reported to the Confederate headquarters:

“During the conversation that then ensued among the general officers General Pillow was in favor of trying to cut our way out. General Buckner said that he could not hold his position over half an hour in the morning, and that if he attempted to take his force out it would be seen by the enemy (who held part of his intrenchments), and be followed and cut to pieces. I told him that I would take my cavalryaround there and he could draw out under cover of them. He said that an attempt to cut our way out would involve the loss of three-four. General Floyd said our force was so demoralized as to cause him to agree with General Buckner as to our probable loss in attempting to cut our way out.”[13]

After weighing these considerations, the decision was made to surrender the following day.

CONFEDERATE SOLDIERS ATTEMPT TO BREAK OUT OF THEIR ENCIRCLEMENT ON FEBRUARY 15TH. INITIALLY SUCCESSFUL, THE ATTACK WAS CALLED TO A HALT IN MID-AFTERNOON, THEN WAS COUNTERED BY UNION FORCES LATER IN THE DAY. SOURCE: WWW.NPS.GOV

CONFEDERATE SOLDIERS ATTEMPT TO BREAK OUT OF THEIR ENCIRCLEMENT ON FEBRUARY 15TH. INITIALLY SUCCESSFUL, THE ATTACK WAS CALLED TO A HALT IN MID-AFTERNOON, THEN WAS COUNTERED BY UNION FORCES LATER IN THE DAY. SOURCE: WWW.NPS.GOV

Forrest decided that he himself would not surrender and chose to break out with his cavalry unit by crossing Lick Creek, swollen by flood waters[14]. Floyd also slipped away with Pillow and 2,000 men and retreated towards Nashville- he left Bruckner in command to surrender the fort and its garrison. Later in the morning, Buckner sent a message for terms to Grant, asking for terms of surrender. Grant responded, “No terms except an unconditional and immediate surrender can be accepted.”[15] Bruckner’s position left him little option, as he reported later.

“My men were in a state of complete exhaustion from extreme suffering from cold and fatigue. The supply of ammunition, especially for the artillery, was being rapidly exhausted; the army was to a great extent demoralized by the retrograde movement. On being placed in command I ordered such troops as could not cross the river to return to their intrenchments, to make at the last moment such resistance as was possible to the overwhelming force of the enemy. But a small portion of the forces had returned to the lines when I received from General Grant a reply to my proposal to negotiate for terms of surrender. To have refused his terms would, in the conditions of the army at the time, have led to the massacre of my troops without any advantage resulting from the sacrifice. I therefore felt it my highest duty to these brave men… to accept the ungenerous terms proposed by the Federal commander…”[16]

Bruckner surrendered Fort Donelson, along with between 12,000-15,000 soldiers, 48 artillery pieces, all of the heavy guns facing the river, and 2,000-4,000 horses.[17] Following the end of the battle, the Union counted 507 killed, 1,976 wounded, over 200 missing or captured. In addition to the 12,000+ captured troops, the Confederates lost 327 killed and 1,127 wounded.[18] The victory at Fort Donelson was the Union’s first major win during the war and would have several important effects. The fort’s capture left the road to Nashville open- several towns downstream along the Cumberland surrendered in the wake of the fort’s fall, and eventually Nashville itself was surrendered without a fight. Just as important was the loss of the Cumberland itself, an important waterway used for transportation in northern Tennessee. Finally, the battle established Grant as a leading general among the north’s commander- he became known as “Unconditional Surrender” Grant thereafter and was promoted to Major General.

THE LOWER BATTERY AS SEEN TODAY. SOURCE: AUTHOR.

THE LOWER BATTERY AS SEEN TODAY. SOURCE: AUTHOR.

                Today, part of the Fort Donelson battlefield is preserved as the Fort Donelson National Battlefield. Originally established in 1928, the fort’s original earthworks have been partially preserved. Both the upper and lower batteries have been preserved, along with the revetments in which they were emplaced. The perimeter wall of the fort has also partially been preserved, though it has eroded considerably in the 155 years since the battle was fought. A number of replica or restored artillery pieces have been set in various places around the wall. Much of the trenchworks dug by the Confederate soldiers are also still in existence, though again erosion has taken its toll on the trenches. In 1933, the Daughters of the Confederacy raised a memorial dedicated to fallen Confederate soldiers; this monument stands near the park’s entrance. The National Park Service has a visitor’s center located near the entrance as well, though at the time of this writing the building is currently closed for renovations. The NPS has also erected numerous placards discussing the history of the fort, its batteries, as well as the various sites of defensive positions and offensive actions. Also preserved outside of the park is the Dover Hotel, where the formal surrender took place, and the Fort Donelson National Cemetery, which currently serves as the final resting place of hundreds of Union soldiers and sailors who were reinterred at the site following the war. While none of the original structures of the interior remain, the remnants of the earthworks and the battery positions stand as a reminder of the battle that took place in early 1862 and played such a pivotal role early in the war.

A SIDE-ANGLE SHOT OF THE LOWER BATTERY, DEMONSTRATING THE ELEVATION OF THE GUNS ABOVE THE CUMBERLAND RIVER. SOURCE: AUTHOR.

A SIDE-ANGLE SHOT OF THE LOWER BATTERY, DEMONSTRATING THE ELEVATION OF THE GUNS ABOVE THE CUMBERLAND RIVER. SOURCE: AUTHOR.

THE ROW OF GUNS CONSISTING OF THE LOWER BATTERY, EACH WITH ITS OWN REVETMENT. SOURCE: AUTHOR.

THE ROW OF GUNS CONSISTING OF THE LOWER BATTERY, EACH WITH ITS OWN REVETMENT. SOURCE: AUTHOR.

THE AMMUNITION BUNKER FOR THE LOWER BATTERY, SITUATED TO THE REAR OF THAT POSITION, STILL EXISTS BUT IS NOT AVAILABLE FOR PUBLIC ACCESS.

THE AMMUNITION BUNKER FOR THE LOWER BATTERY, SITUATED TO THE REAR OF THAT POSITION, STILL EXISTS BUT IS NOT AVAILABLE FOR PUBLIC ACCESS.

THE UPPER BATTERY. SOURCE: AUTHOR

THE UPPER BATTERY. SOURCE: AUTHOR

A NUMBER OF ARTILLERY PIECES ARE POSITIONED AROUND THE FORT, INDICATING THE FORMER POSITIONS OF THE OUTER EARTHWORKS. SOURCE: AUTHOR.

A NUMBER OF ARTILLERY PIECES ARE POSITIONED AROUND THE FORT, INDICATING THE FORMER POSITIONS OF THE OUTER EARTHWORKS. SOURCE: AUTHOR.

ONE OF THE ONLY STRUCTURES INSIDE THE FORT TODAY IS A REPLICA OF THE KIND OF CABINS THAT CONFEDERATE SOLDIERS WOULD HAVE LIVED IN DURING THE WINTER OF 1861-1862. SOURCE: AUTHOR.

ONE OF THE ONLY STRUCTURES INSIDE THE FORT TODAY IS A REPLICA OF THE KIND OF CABINS THAT CONFEDERATE SOLDIERS WOULD HAVE LIVED IN DURING THE WINTER OF 1861-1862. SOURCE: AUTHOR.

OUTSIDE OF THE ACTUAL LOCATION OF THE FORTRESS, THE FORMER TRENCH POSITIONS REMAIN PRESERVED, ALBEIT SOMEWHAT ERODED. SOURCE: AUTHOR.

OUTSIDE OF THE ACTUAL LOCATION OF THE FORTRESS, THE FORMER TRENCH POSITIONS REMAIN PRESERVED, ALBEIT SOMEWHAT ERODED. SOURCE: AUTHOR.

THIS FENCE AND SLIGHT HILL WERE THE FORMER POSITIONS OF BRIG. GEN. SIMON BRUCKNER'S DEFENSIVE POSITIONS. SOURCE: AUTHOR.

THIS FENCE AND SLIGHT HILL WERE THE FORMER POSITIONS OF BRIG. GEN. SIMON BRUCKNER'S DEFENSIVE POSITIONS. SOURCE: AUTHOR.

THE CONFEDERATE SOLDIERS MEMORIAL, ERECTED IN 1933 BY THE DAUGHTERS OF THE CONFEDERACY. SOURCE: AUTHOR.

THE CONFEDERATE SOLDIERS MEMORIAL, ERECTED IN 1933 BY THE DAUGHTERS OF THE CONFEDERACY. SOURCE: AUTHOR.

THE FORT DONELSON NATIONAL CEMETERY, WHERE OVER 600 UNION DEAD ARE BURIED. SOURCE: AUTHOR.

THE FORT DONELSON NATIONAL CEMETERY, WHERE OVER 600 UNION DEAD ARE BURIED. SOURCE: AUTHOR.

THE CEMETERY KEEPER'S HOUSE, SITUATED IN THE MIDDLE OF THE CEMETERY. SOURCE: AUTHOR.

THE CEMETERY KEEPER'S HOUSE, SITUATED IN THE MIDDLE OF THE CEMETERY. SOURCE: AUTHOR.

THE DOVER HOTEL, SITE OF THE SIGNING OF THE SURRENDER FOR FORT DONELSON. SOURCE: AUTHOR.

THE DOVER HOTEL, SITE OF THE SIGNING OF THE SURRENDER FOR FORT DONELSON. SOURCE: AUTHOR.


Sources

1.       Cooling, Benjamin F. "National Park Civil War Series: The Campaign for Fort Donelson." National Parks Service. U.S. Department of the Interior, 2008. Web. 24 Jan. 2017. https://www.nps.gov/parkhistory/online_books/civil_war_series/13/index.htm

2.       "The Battle of Fort Donelson Summary & Facts." Civil War Trust. Civil War Trust, 2014. Web. 24 Jan. 2017. http://www.civilwar.org/battlefields/fort-donelson.html?tab=facts

3.       "Civil War Academy." Civil War Academy - American Civil War. Civil War Academy.com, 2007. Web. 24 Jan. 2017. http://www.civilwaracademy.com/fort-donelson.html

4.       "Foote's Fort Donelson's OR." Foote's Fort Donelson's OR. CivilWarTalk Network, 11 Jan. 2009. Web. 24 Jan. 2017. http://www.civilwarhome.com/donelson.html

5.       United States. National Park Service. "The Battle." National Parks Service. U.S. Department of the Interior, n.d. Web. 24 Jan. 2017. https://www.nps.gov/fodo/planyourvisit/thebattleforfortdonelson.htm


[1] https://www.nps.gov/parkhistory/online_books/civil_war_series/13/sec2.htm 19 JAN 2017

[2] http://www.civilwar.org/battlefields/fort-donelson.html?tab=facts 17 JAN 2017

[3] http://www.civilwaracademy.com/fort-donelson.html 17 JAN 2017

[4] http://www.civilwar.org/battlefields/fort-donelson.html?tab=facts  17 JAN 2017

[5] https://www.nps.gov/parkhistory/online_books/civil_war_series/13/sec7.htm 21 JAN 2017

[6] https://www.nps.gov/parkhistory/online_books/civil_war_series/13/sec8.htm 21 JAN 2017

[7] https://www.nps.gov/parkhistory/online_books/civil_war_series/13/sec9.htm 21 JAN 2017

[8] http://www.civilwar.org/battlefields/fort-donelson.html?tab=facts 17 JAN 2017

[9] https://www.nps.gov/parkhistory/online_books/civil_war_series/13/sec9.htm 21 JAN 2017

[10] http://www.civilwarhome.com/footefortdonelson.html 17 JAN 2017

[11] http://www.civilwar.org/battlefields/fort-donelson.html?tab=facts 17 JAN 2017

[12] http://www.civilwar.org/battlefields/fort-donelson.html?tab=facts 17 JAN 2017

[13] http://www.civilwarhome.com/forresft.html 17 JAN 2017

[14] https://www.nps.gov/fodo/planyourvisit/thebattleforfortdonelson.htm 17 JAN 2017

[15] https://www.nps.gov/fodo/planyourvisit/thebattleforfortdonelson.htm 17 JAN 2017

[16] http://www.civilwarhome.com/buckner.html 17 JAN 2017

[17] https://www.nps.gov/parkhistory/online_books/civil_war_series/13/sec11.htm 22 JAN 2017

[18] http://www.civilwar.org/battlefields/fort-donelson.html?tab=facts 17 JAN 2017