Tools of War: Battleship Mikasa
/
In the late 19th Century, the Imperial Japanese Navy sought to catch up with more modern navies by constructing modern warships. Lacking its own shipbuilding capacity at that time, it contracted a number of battleships to be constructed in the UK. One of those the Mikasa, became the flagship of Admiral Togo Heihachiro during the Russo-Japanese War of 1904-1905. Today, it survives as the world’s last remaining pre-dreadnought battleship.
By Seth Marshall
By the late 19th Century, Japan had made great strides towards becoming a globally recognized power. For Japan, an island nation, one of the more critical areas of obtaining this recognition was the modernization of its navy to a standard that would put it on par with European and American navies. To this end, in the 1890s, the Imperial Japanese Navy (IJN) ordered the construction of six battleships and six armored cruisers. Lacking shipyards of its own capable of constructing such warships, the IJN was forced to outsource the building of these ships to firms in the UK. The IJN Mikasa was the 6th Japanese battleship built in England.[1]
Mikasa took her name from Mount Mikasa, a mountain in Nara, Japan.[2] Contracted to Vickers Shipbuilding, she was laid down in Barrow-in-Furness on January 24, 1899. She was launched the following year on November 8th, and commissioned on March 1, 1902.[3] When completed, her armament was comprised of four 12-inch guns housed in two turrets, fourteen 6-inch guns, twenty 3-inch guns, and four torpedo tubes.[4] She was 122m in length and had a beam of 23.2m. Her engines, making 15,000 horsepower, drove two propeller shafts that allowed the Mikasa to reach 18 knots. Up to 9 inches of armor gave protection to her crew of 860 officers and men.[5] Following her completion, the Mikasa visited a number of English ports, then made her way to Japan. Her arrival was timely. Tensions between Russia and Japan were rising, and Mikasa quickly became the flagship of Admiral Togo Heihachiro, commander of the IJN. Mikasa did not have to wait long for her first action.


Marshal-Admiral The Marquis Togo Heihachiro. Born on January 27, 1848, in Kagoshima Prefecture, Togo was a member of the Japanese Navy from the age of 15. He spent much of the 1870s studying in England, returning to Japan in 1878. Given various commands and seeing combat in the Sino-Japanese War of 1894-1895, Togo was made Commander in Chief of the Combined Fleet in 1903. He held this command through the Russo-Japanese War, and was ultimately made Marshal-Admiral, equivalent in rank to the US Navy's Fleet Admiral. He died on May 30, 1934 at age 86. Photo: Wikipedia.
On February 9, 1904, Mikasa took part in the Battle of Port Arthur, the Japanese surprise attack on the vital port which opened the Russo-Japanese War. Mikasa was damaged by shellfire from shore installations which wounded several sailors and an officer. The battle ended with several Russian ships suffering damage requiring repairs, but casualties were relatively light for both sides.[6] Mikasa was also involved in the brief action of April 13th, which ended in the death of Russian Vice Admiral Stepan Makarov, along with all hands of his flagship, the battleship Petropavlovsk, which struck a mine.[7] Several months later, on August 10, 1904, the Mikasa saw action during the Battle of the Yellow Sea. With the exception of Tsushima some 9 ½ months later, the Battle of the Yellow Sea was perhaps the largest naval clash during the Russo-Japanese War. Mikasa was hit over twenty times by Russian naval gunfire, which resulted in a large number of casualties and one of the 12-inch gun turrets disabled. Despite this, the Russian Navy sustained serious damage itself. The Russian flagship, Tsarevich, was hit by two Japanese battleship shells nearly simultaneously, which killed Admiral Vitgeft, Makarov’s replacement, as well as the helmsman and much of the personnel manning the bridge. [8] Both sides suffered similar casualties and damaged ships, and both would subsequently retire to their home ports.
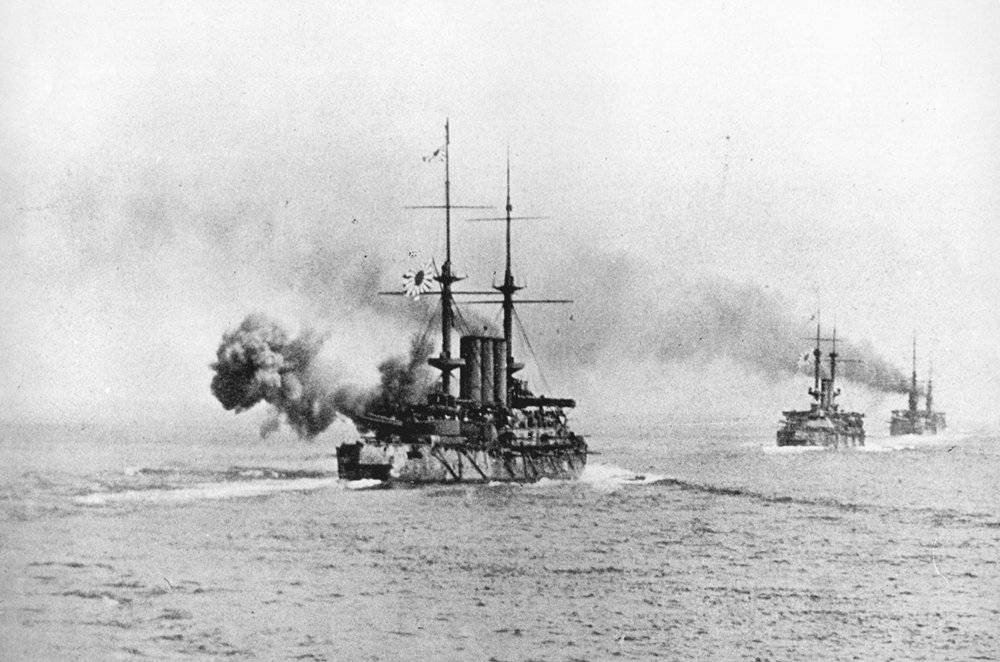
Japanese warships exchange fire with the Russian fleet during the Battle of the Yellow Sea. Source: maritimeprofessional.com.
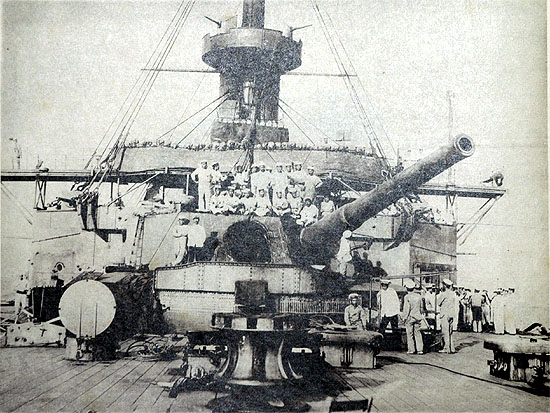
Mikasa's after turret, damaged in the Battle of the Yellow Sea. Source: National Institute for Defense Studies, Ministry of Defense.
Mikasa’s most renowned action came the following year in late May during the decisive Battle of Tsushima. Though the battle occurred in May of 1905, the battle was set in motion the previous fall in October, when Vice Admiral Zinovi Rohestvensky was ordered to sail the Second Pacific Squadron to the conflict zone, a voyage covering an unprecedented distance of 18,000 miles.[9] Rohestvensky’s fleet was centered around four new Borodino-class battleships, the Borodino, the Emperor Alexander III, the Orel, and the Kniaz Suvarov. The fleet had an inauspicious voyage made all the more difficult by the limited range of the warships, requiring frequent coaling. Russian crews were inexperienced and given few opportunities to refine their skills, a point driven home early in the voyage on October 22, when the Russian squadron encountered a fleet of fishing trawlers. Thinking they were Japanese ships attempting a torpedo attack, the Russian ships opened fire. Despite firing countless rounds, the Russians succeeded only in sinking a single trawler and damaging one of their own cruisers with friendly fire.[10] Months later, Russian Navy headquarters dispatched the Third Baltic Squadron, commanded by Rear Admiral Nikolai Nebogatov. This fleet was composed of older vessels; Rohestvensky had initially declined to take these vessels with him, knowing that they would slow him down. Nonetheless, the fleet was dispatched and used the Suez Canal to catch up with the rest of the Russian vessels, finally joining together at Cam Ranh Bay in Indochina.[11] Adding to Rozhestvensky’s worries was the growing displeasure of his crews, who attempted at least one mutiny during the course of the voyage. After an eight month voyage, the Russian fleet finally arrived in the Far East.

The commander of the Russian fleet at the Battle of Tsushima, Admiral Zinovy Rozhestvensky. Born on November 11, 1848 in St. Petersburg, Russia, Rozhestvensky also joined the navy at an early age. He saw action during the Russo-Turkish War (1877-1878), and afterwards was promoted to various commands before being appointed commander of the Baltic Fleet in 1904. Rozhestvensky commanded his fleet on its ill-fated voyage to the Pacific from 1904-1905. Following his the disaster that befell his ships at Tsushima, he was held prisoner and released at the conclusion of the war. On his return to Russia, he was court-martialed for his defeat and found guilty, though the Tsar would commute his sentence of execution to a short stint in prison. He died of a heart attack on January 14, 1909. Photo: Wikipedia.

The circuitous route of the various components of the Russian fleet on its way to the Pacific Ocean, from 1904-1905. Source: Wikipedia.
The Battle of Tsushima began soon after. Early on the morning of May 27th, the Japanese auxiliary merchant cruiser Shinano Maru spotted the Russian fleet making its way northeast in the Yellow Sea. The cruiser along with additional scout ships shadowed the Russians throughout the morning, concealing themselves in heavy fog. The Russian Second and Third Baltic Squadrons were composed of the four Borodino-class battleships, four older battleships, three coastal defense battleships, six cruisers, and 26 other warships.[12] Admiral Togo ordered the Japanese fleet to sea at 0615- the Japanese force was made up of four battleships, two armored cruisers, six cruisers, and 30 destroyers. Sailing south from Pusan, Korea, the Japanese sighted the Russians in the Tsushima Strait at 1345 that afternoon.[13] The Russian fleet was arranged roughly in two columns- Togo attempted to “cross the T” of the Russian fleet with the Mikasa, while sending his cruisers to attack from the rear left flank.[14] The Russian flagship Knayaz Suvorov opened fire first, followed shortly thereafter by return fire from the Mikasa. The Japanese maneuver, which subsequently became known as the “Togo turn”, saw the Japanese warships reverse course. This tactic could have backfired for Togo, as his ships all passed through a single point, which ought to have allowed Russian gunners to zero in and hit each Japanese ship in turn. However, the Russians proved unable to consistently hit the Japanese.[15]
Using a six-knot speed advantage, Togo’s fleet quickly took advantage of the Russians’ inability to hit their targets. Gunfire from Japanese warships sank the battleship Oslyabya and disabled Rohestvensky’s flagship. Rohestvensky himself was incapacitated from a concussion. During the remainder of the day, the battleships Emperor Alexander III and Borodino were lost to Japanese gunfire, and Knayaz Suvorov succumbed to torpedoes. The wounded Admiral Rohestvensky was taken off his flagship by the destroyer Buyny. In the evening, Togo ordered his destroyers to attack the Russians at will. The destroyers fired 74 torpedoes, which sank the battleship Sysoy Veliky and cruisers Admiral Nakhimov and Vladimir Monomakh. Three additional badly-damaged ships were scuttled the following morning by their crews. Only a handful of Russian ships managed to escape- one cruiser-yacht and two destroyers slowly made their way to Vladivostok, while three damaged cruisers fled to Manila, where they were interned for the duration of the war.[16] On May 28th, the Japanese captured the destroyer Buyny, along with Rohestvensky, who surrendered what remained of his fleet. The battle had utterly annihilated the Russian presence in the Pacific- six battleships, four cruisers, and six destroyers were sunk, while another two battleships and several additional ships were captured.[17] Casualties for the Russians were enormous; 4,545 were killed, 6,106 captured, and 1,862 interned. Against these impressive figures, the Japanese had suffered three torpedo boats sunk and several warships damaged- casualties totaled 117 killed and 583 wounded. During the battle, Mikasa had been hit 32 times, suffering 8 dead.[18] The Russian loss was disastrous- less than four months after the battle, the war ended in a mediated peace.

The battleship Knyav Suvorov, Rohestvensky's flagship. Hit countless times by Japanese gunfire, including a hit which incapacitated the admiral with a head wound, the battleship was abandoned and sank. Photo: Wikipedia.

Admiral Togo on the bridge of the Mikasa during the Battle of Tsushima. The original painting now hangs in the lower deck of the Mikasa. Photo: Wikipedia.
Shortly after the war ended, the Mikasa suffered a disaster. On September 11th, 1905, she was anchored in Sasebo harbor when one of her magazines exploded, blowing open a large hole in her port quarter and killing 339 of her crew. She sank following the explosion, but was later refloated and repaired.[19] By 1908, Mikasa was back in service on coastal defense duties. She remained functioning in this role through World War I until she was decommissioned in 1922. Her decommissioning took place in accordance with the Washington Naval Treaty, which limited the tonnage that each nation’s navy could have. Owing to her historical nature however, an effort was made to have the Treaty committee approve her preservation as a museum ship. During the mid-1920s, a campaign was launched to restore the ship, which had deteriorated severely, to her former condition. By 1926, the signatories on the Washington Naval Treaty had acquiesced to the preservation request. On November 12th that year, the Mikasa was unveiled before Crown Prince Hirohito and an elderly Admiral Togo. [20] The warship stayed a museum ship during the interwar period, but was severely neglected in the aftermath of World War II. Mikasa’s guns, funnels, and many topside fixtures were removed as a result of postwar policies. However, in 1955, the Japan Times began a campaign to renovate the warship. The newspaper had been a significant force in getting the warship restored the first time; once again, it worked towards returning the warship towards its former state. With the support of the US Navy and Admiral Chester Nimitz, the warship was refitted with its guns, funnels, and numerous other parts. In 1961, the ship was once again opened as a museum ship. Since then the Mikasa has remained open to the public.
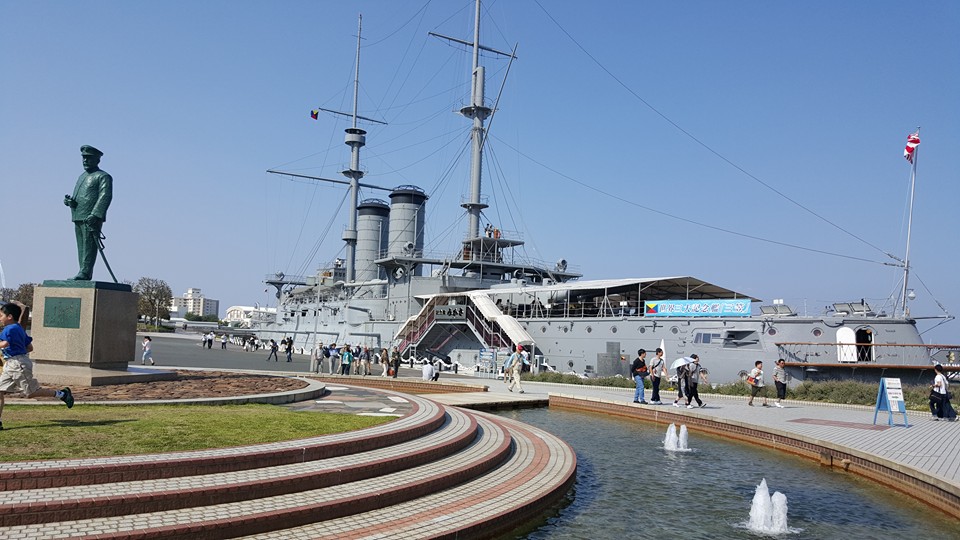
The author visited the ship in late May 2016 during a trip to Japan. The Mikasa is located in Yokosuka harbor. Tours of the ship are available on a daily basis for the reasonable price of 600 yen- roughly $6. The exterior of the ship has been restored to a grey exterior, with black and white paint around the funnels. The ship’s guns have been returned to their original positions. However, the interior of the ship is not the same as it once was. The topside areas, including pilothouse and radio room, have been restored to close to their original condition, but below-decks is a different story. Only the two decks below the main deck are accessible- the rest were filled in with concrete as part of the terms of the ship being preserved following the Washington Naval Treaty. The deck that is open to the public has largely been converted into a museum, with many models, paintings, display panels, and artifacts relating the ship’s history, the history behind the Russo-Japanese War, and Admiral Togo. There are some exceptions to this, such as Togo’s stateroom, the galley, and the wardroom. Despite the fact that much of the ship has been filled in by concrete and is now inaccessible, the Mikasa is nonetheless important as the last pre-dreadnought battleship in existence. What’s more, the restoration efforts have vastly improved the ship from the condition it was in during the 1950s. Curiously, while the Mikasa is the last example of its type around, one of the few Russian ships to survive the disaster at Tsushima, the cruiser Aurora, also is currently a museum ship, moored at St. Petersburg. However, the Mikasa, as the Japanese flagship in that tremendous battle, has tremendous presence- visitors to the Tokyo area would be well-advised to pay a visit to the old warship.

View of the bow of the Mikasa, as it appears today. This view clearly shows the ship's current location on land, with much of its lower decks filled in with concrete. Additionally, the ship's secondary armament, 14 6.5-inch guns, are evident in this picture. Photo: author.
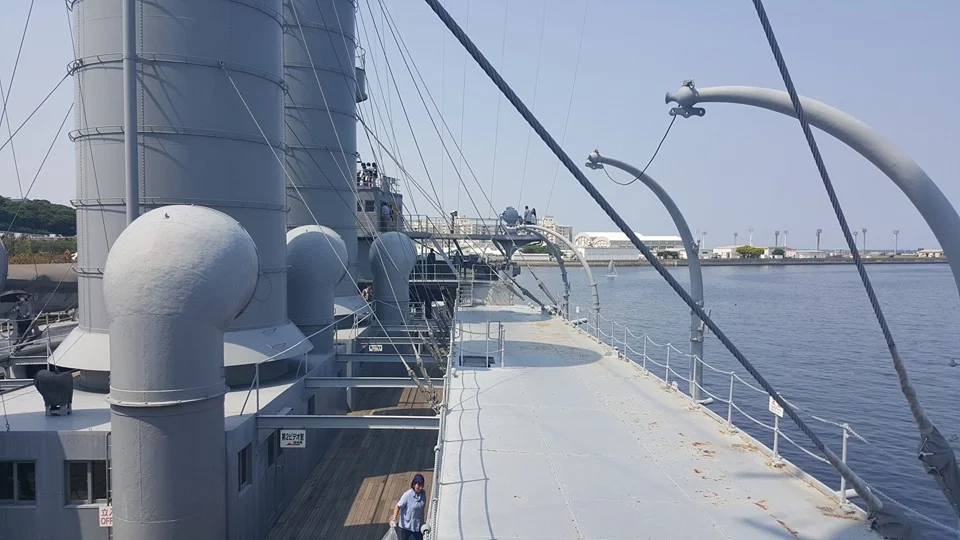
A view from the battleship's superstructure, looking out over Yokosuka harbor. Much of the Mikasa's upper works are not original, having been stripped following World War II and replaced by reproductions during the post-war restoration. Photo: author.

A typically restored room on board the Mikasa, in this instance the communications room. A number of artifacts are on display with the aid of placards. Photo: author.

The Mikasa had additional armament in the form of four 3.5-inch guns, two on each side. Photo: author.

The bow turret of the Mikasa, with its 12-inch battery. The turret and guns are reproductions put in place during the warship's postwar restoration. Photo: author.

The interior of the Mikasa's main bridge. Photo: author.

One of the Mikasa's secondary 6.5-inch guns. The galleries where these guns are housed have been converted into exhibit space, supported by large text and photographic panels. Photo: author.

Along one of the side corridors on the Mikasa's lower deck is this gallery, which is comprised of models representing many classes of ships and aircraft which have served in the Imperial Japanese Navy and Japanese Self Defense Forces. Photo: author.

One of the many exhibits which are located on the lower deck of the Mikasa. This lower deck has been converted in large part into a museum space. Photo: author.

The main museum area house several very large-scale models of Imperial Japanese Navy ships that served in the Russo-Japanese War. Photo: author.

An officer's bathroom on the lower deck of the Mikasa. Photo: author.

The officer's wardroom on board the Mikasa. The stern cabins of the Mikasa have been the subject of a much more intense restoration effort.
Sources
1. "Mikasa, Historic Warship." Mikasa, Historic Warship. Mikasa Preservation Society. http://www.kinenkan-mikasa.or.jp/en/index.html . Web . 21 May 2017.
2. "Museum Ships." Museum Ships. WebOke, 2014. http://museumships.us/japan/mikasa. Web. 21 May 2017.
3. Morrison, Geoffrey. "Japan's 114-year-old Battleship Mikasa: A Relic of Another Time." CNET. CBS Interactive, 05 Aug. 2016. https://www.cnet.com/news/japans-114-year-old-battleship-mikasa-a-relic-of-another-time/. Web. 21 May 2017.
4. "Battle of Arthur." The Battle of Port Arthur. Russojapanesewar.com, 2002. http://russojapanesewar.com/index.html. Web. . 23 May 2017.
5. "The Battle of the Yellow Sea." The Battle of the Yellow Sea. Russojapaneswar.com, 2002. http://russojapanesewar.com/bttl-yellow-sea.html. Web. . 29 May 2017.
6. Reynolds, Brad. "Warfare History Network." Warfare History Network. Sovereign Media, 3 Mar. 2015. http://warfarehistorynetwork.com/daily/military-history/naval-history-the-battle-of-tsushima-in-the-russo-japanese-war/. Web. 23 May 2017.
7. Cooper, Tom. "Battle of Tsushima: When Japan and Russia's Most Fearsome Battleships Squared Off." The National Interest. The Center for the National Interest, 29 May 2017. Web. 30 May 2017.
8. Corkill, Edan. "How The Japan Times Saved a Foundering Battleship, Twice." The Japan Times. Japan Times LTD. Web. 21 May 2017.
[1] http://www.kinenkan-mikasa.or.jp/en/mikasa/index.html 5/21/17
[2] http://museumships.us/japan/mikasa 5/21/17
[3] http://www.kinenkan-mikasa.or.jp/en/mikasa/index.html 5/21/17
[4] https://www.cnet.com/news/japans-114-year-old-battleship-mikasa-a-relic-of-another-time/ 5/21/17
[5] http://www.kinenkan-mikasa.or.jp/en/mikasa/index.html 5/21/17
[6] http://russojapanesewar.com/battle-pa.html 5/23/2017
[7] http://russojapanesewar.com/maka-dies.html 5/23/17
[8] http://russojapanesewar.com/bttl-yellow-sea.html 5/29/17
[9] http://warfarehistorynetwork.com/daily/military-history/naval-history-the-battle-of-tsushima-in-the-russo-japanese-war/ 5/23/17
[10] http://www.navalofficer.com.au/mikasa/ 5/23/17
[11] http://www.navalofficer.com.au/mikasa/ 5/23/17
[12] http://www.navalofficer.com.au/mikasa/ 5/23/17
[13] http://www.navalofficer.com.au/mikasa/ 5/23/17
[14] http://warfarehistorynetwork.com/daily/military-history/naval-history-the-battle-of-tsushima-in-the-russo-japanese-war/ 5/23/17
[15] http://www.navalofficer.com.au/mikasa/ 5/23/17
[16] http://www.navalofficer.com.au/mikasa/ 5/23/17
[17] http://nationalinterest.org/blog/the-buzz/battle-tsushima-when-japan-russias-most-fearsome-battleships-20896?page=2 5/30/17
[18] http://www.navalofficer.com.au/mikasa/ 5/23/17